
If you are looking for the holy grail of easy desserts, look no further. These 3-Ingredient Oreo Balls, often called Oreo truffles, have reached legendary status in the world of no-bake treats. There is something almost magical about the way a simple package of cookies and a brick of cream cheese transform into a decadent, high-end confection that tastes like it came from a professional chocolatier. Whether you are hosting a festive holiday party, a summer backyard BBQ, or just need a sweet fix on a Tuesday night, this recipe is your secret weapon. The combination of the crunchy chocolate cookie, the tangy richness of the cream cheese, and the snap of a high-quality chocolate coating creates a texture profile that is hard to beat. Get ready to become the most popular person at your next gathering.

Why You’ll Love This Recipe
This recipe is a favorite for several reasons, but mainly because of its incredible effort-to-reward ratio. First, it requires zero baking time, which means no hovering over a hot oven or worrying about timers. Second, the ingredient list is remarkably short—just three primary items that you likely already have or can find at any local grocery store. Furthermore, these Oreo balls are incredibly versatile; you can customize the chocolate coating, the cookie flavor, or the decorations to suit any theme or holiday. Finally, they are extremely freezer-friendly, making them the perfect “make-ahead” dessert for busy hosts who want to minimize stress on the day of an event.
What Is an Oreo Ball?
An Oreo ball is a “no-bake” truffle-style dessert that uses crushed sandwich cookies as its primary base. Unlike traditional chocolate truffles, which often involve a complex process of heating heavy cream and chocolate to create a ganache, Oreo balls rely on the moisture and fat of cream cheese to bind cookie crumbs into a pliable, rollable dough. Once chilled, these balls are dipped in melted chocolate or candy coating, which hardens into a crisp shell. While the classic version uses original Oreos and semi-sweet chocolate, the concept has evolved into hundreds of variations, ranging from Golden Oreo truffles to seasonal peppermint versions, all maintaining that signature dense, fudgy interior.
Ingredients Overview
To achieve the best results, the quality and type of your ingredients matter significantly.
- OREO Cookies (15.25 oz): A standard “Family Size” or traditional package is what you need. Do not use “Double Stuf” cookies, as the extra cream filling will make the dough too soft and greasy, causing the balls to lose their shape during the dipping process.
- Cream Cheese (8 oz): It is vital to use the full-fat, brick-style cream cheese. Avoid the whipped or spreadable versions sold in tubs, as they contain more air and moisture, which will ruin the consistency of your truffle centers. Ensure it is fully softened at room temperature to prevent lumps in your mixture.
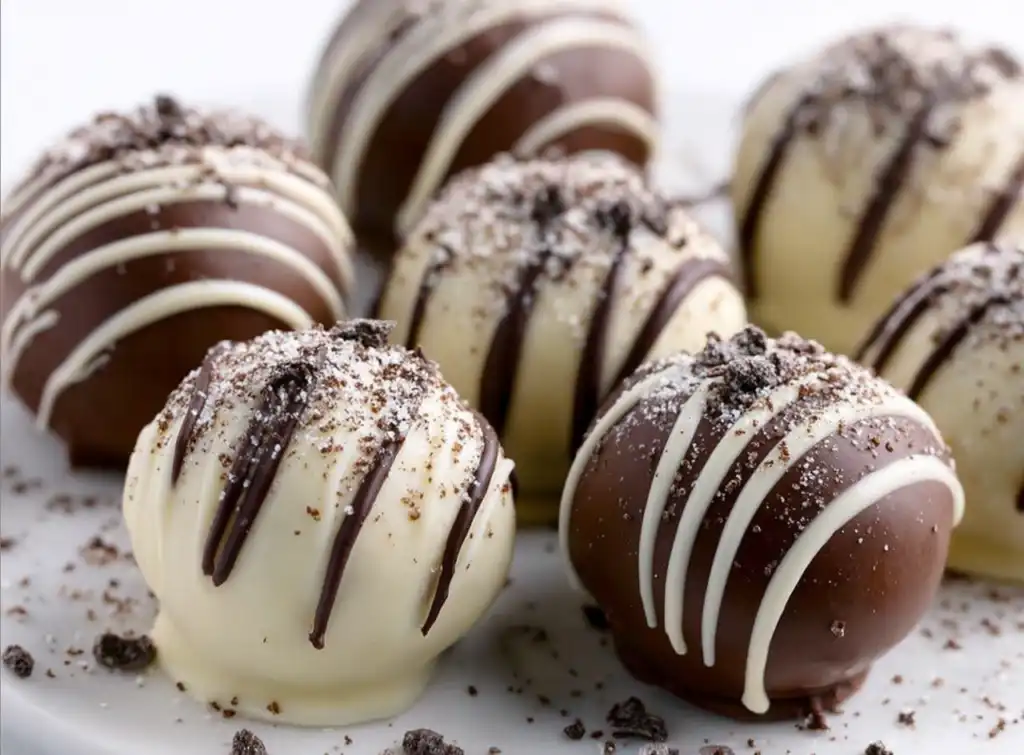
- Melting Chocolate (3 cups): You can use a mix of white and dark chocolate for variety. For the smoothest coating, I recommend using “melting wafers” (like Ghirardelli) or almond bark. These are formulated to melt smoothly and harden with a professional sheen. While chocolate chips can be used, they often require a teaspoon of coconut oil to reach the right dipping consistency and may not set as firmly.
Ingredient Substitutions & Tips
The beauty of this recipe lies in its adaptability. If you aren’t a fan of the classic chocolate Oreo, try using Golden Oreos for a vanilla-cake-like flavor, or Mint Oreos for a refreshing holiday twist. For those with dietary restrictions, many brands now offer gluten-free chocolate sandwich cookies that work perfectly in this recipe. If you find yourself without cream cheese, some bakers have successfully used mascarpone or even a thick chocolate frosting, though the classic tangy cream cheese provides the best balance to the sweet cookies. For the coating, you can substitute the melting chocolate with colorful candy melts to match a specific party theme, such as pink for a baby shower or red and green for Christmas.
Step-by-Step Instructions
- Prep the Crumbs: Begin by crushing the entire package of Oreo cookies. For the most professional results, use a high-powered blender or a food processor. You want a fine, sand-like texture with no large chunks. If you don’t have a processor, place the cookies in a heavy-duty gallon freezer bag and crush them with a rolling pin or meat mallet. Pro tip: Blend half the cookies at a time to ensure even crushing.
- Combine with Cream Cheese: In a large mixing bowl, combine the cookie crumbs with the softened cream cheese. You can use a stand mixer or a hand mixer on medium speed until no white streaks of cream cheese remain. The mixture should look like a dark, moist dough.
- Roll into Balls: Using a cookie scoop (about 1.5 tablespoons), portion out the dough. Roll each portion between your palms until smooth and round. Place them on a baking sheet lined with parchment paper or wax paper.
- The Essential Chill: This is the most important step! Place the baking sheet in the freezer for 20–30 minutes. Chilling the dough ensures that the balls don’t fall apart or lose their shape when they hit the warm melted chocolate.
- Melt and Dip: Melt your chocolate in a microwave-safe bowl. Heat in 30-second intervals, stirring in between, until completely smooth. Using a fork, lower a chilled ball into the chocolate, roll to coat, and lift out. Tap the fork gently on the edge of the bowl to let excess chocolate drip off before placing it back on the parchment paper.
- Decorate: Before the chocolate sets, drizzle with a contrasting chocolate color or sprinkle with reserved cookie crumbs. Let them set at room temperature or in the fridge until the shell is hard.
Expert Baking/Cooking Tips
To take your Oreo balls from “good” to “gourmet,” focus on the temperature. If your chocolate starts to thicken or “seize” while dipping, pop it back in the microwave for 10 seconds. Always use a fork for dipping rather than a spoon; the tines allow the excess chocolate to fall through, preventing a large “foot” of chocolate from forming at the base of your truffle. If you notice your dough is sticking to your hands while rolling, lightly grease your palms with a tiny amount of coconut oil or butter. Finally, always reserve about two tablespoons of the dry cookie crumbs before mixing with cream cheese to use as a beautiful, professional-looking garnish at the end.
Mastering the Chocolate Coating
The secret to a flawless, crack-free coating is avoiding extreme temperature shocks. If the Oreo balls are frozen solid and dipped into very hot chocolate, the shell is likely to crack as the center expands slightly while thawing. The goal is “chilled but not frozen.” If you find your chocolate is too thick to dip easily, add one teaspoon of vegetable shortening or coconut oil to the melted chocolate to thin it out without affecting the flavor. This creates a much more fluid consistency that will result in a thinner, more elegant shell. For a decorative finish, use a small sandwich bag with a tiny corner snipped off to create precise drizzles.
Serving Suggestions
Serve these Oreo balls chilled for the best texture. They look stunning arranged on a white ceramic platter or placed individually in mini paper cupcake liners. For holiday gifting, place 6–8 truffles in a decorative tin or a clear cellophane bag tied with a festive ribbon. They are also a fantastic addition to a “dessert charcuterie board,” alongside fresh strawberries, pretzels, and nuts. Because they are so rich, a little goes a long way, making them the perfect bite-sized treat.
Storage & Make-Ahead Tips
These treats are the ultimate make-ahead dessert. You can store them in an airtight container in the refrigerator for up to two weeks. If you want to prep them even further in advance, Oreo balls freeze beautifully. Place the finished truffles in a freezer-safe bag or container for up to two months. When you are ready to serve, simply transfer them to the refrigerator to thaw overnight. Always keep them cold until serving, as the cream cheese base can soften if left at room temperature for more than two hours.
FAQs
Q: Can I use Double Stuf Oreos?
A: It is highly recommended to stay with standard Oreos. The extra cream in Double Stuf versions alters the ratio of cookie to fat, which can result in a mushy truffle that won’t hold its shape or will cause the chocolate coating to slide off.
Q: Why is my chocolate coating cracking?
A: Cracking usually happens when there is a significant temperature difference between the cold ball and the warm chocolate. Try letting the balls sit at room temperature for 5 minutes after taking them out of the freezer before you begin the dipping process.
Q: Do I need to remove the cream filling from the Oreos?
A: No! The cream filling is part of what makes the dough delicious and helps bind it together. You crush the entire cookie—wafer and filling together.
Q: Can I make these vegan?
A: Yes! Standard Oreos are accidentally vegan. Simply use a vegan-friendly cream cheese brick and dairy-free melting chocolate wafers to make this recipe completely plant-based.
Making Oreo balls is a rite of passage for any home baker or dessert enthusiast. They prove that you don’t need a pantry full of ingredients or hours of free time to create something truly impressive. Once you master the basic technique of crushing, rolling, and dipping, the possibilities are endless. These little bites of heaven are sure to become a staple in your recipe box and a requested favorite at every family gathering for years to come.
Print3-Ingredient Oreo Balls

These 3-ingredient Oreo Balls (also known as Oreo Truffles) are the ultimate no-bake dessert. With a creamy center and a crisp chocolate shell, they are a guaranteed crowd-pleaser for holidays and parties.
- Prep Time: 40 minutes
- Cook Time: 0 minutes
- Total Time: 70 minutes
- Yield: 36 balls
- Category: Dessert
- Cuisine: American
Ingredients
OREO Cookies (standard size) – 15.25 oz
Cream cheese (brick style, softened) – 8 oz
Melting chocolate (white or dark) – 3 cups
Instructions
Crush OREO cookies in a blender or food processor until they reach a fine crumb consistency.
In a large bowl, mix the cookie crumbs with softened cream cheese until a uniform dough forms.
Use a cookie scoop to measure 1.5 TBSP portions and roll them into smooth balls.
Place the balls on a parchment-lined baking sheet and freeze for 20–30 minutes.
Melt the chocolate in the microwave in 30-second increments, stirring until smooth.
Using a fork, dip each chilled ball into the chocolate, let the excess drip off, and return to the parchment paper.
Optional: Drizzle with remaining chocolate and sprinkle with extra cookie crumbs before the coating sets.
Notes
• Do not skip the freezing step; it prevents crumbs from mixing into your chocolate coating.
• Use brick-style cream cheese, not the spreadable kind from a tub.
• Store in the refrigerator for up to 2 weeks or freeze for 2 months.


