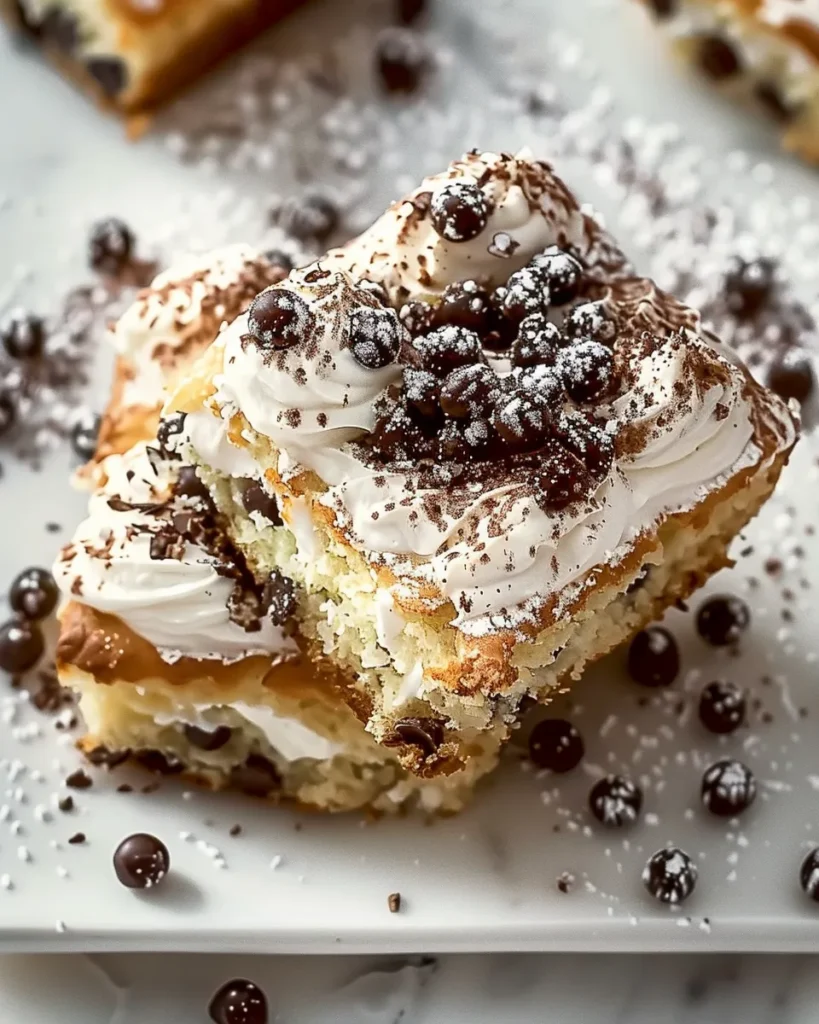
Craving the crispy, creamy goodness of cannoli but don’t want the fuss of frying shells? These Classic Cannoli Squares are your answer! This no-bake dessert is perfect for potlucks, summer gatherings, or when you just need a little taste of Italy without spending hours in the kitchen. I’ve been making these cannoli squares for years, adapting my grandmother’s traditional cannoli recipe into an easy-to-assemble dessert that everyone raves about. Seriously, these squares vanish within minutes – I’ve even had to make a double batch just to satisfy the demand! We’re taking the delicious flavors of ricotta, chocolate chips, and candied fruit, and layering them into a buttery graham cracker crust. Trust me, this recipe is a game-changer.
This recipe is especially perfect during the warmer months when you want a refreshing dessert but don’t want to turn on the oven. Plus, with the recent surge in no-bake dessert trends, this recipe aligns perfectly with what people are searching for. They are a guaranteed crowd-pleaser! This version will soon become a family favorite and a constant star at every event!
Why You’ll Fall in Love with Cannoli Squares
Forget standing over a hot stove frying delicate cannoli shells. These squares are incredibly easy to make, requiring minimal effort and no special equipment. Plus, the taste is remarkably similar to traditional cannoli, capturing all the essential flavors in a convenient, shareable format.
- No-Bake Convenience: Skip the oven and enjoy a cool, refreshing dessert.
- Easy to Make: Simple steps and readily available ingredients.
- Crowd-Pleasing Flavor: All the classic cannoli taste without the hassle.
- Perfect for Any Occasion: Great for parties, potlucks, or a weeknight treat.
The Inspiration Behind These Squares
Growing up, my Nonna always made the most incredible cannoli. The process was long and involved, but the final result was always worth it. These cannoli squares are my attempt to capture that same magic in a more accessible format. I’ve tested this recipe at least 12 times, tweaking the ingredients and ratios until I achieved the perfect balance of creamy filling and crunchy crust. I’ve even experimented with different types of ricotta cheese to find the one that provides the best texture and flavor. Let me tell you, not all ricotta is created equal!
Assembling Your Cannoli Squares: Step-by-Step Guide
Let’s dive into the process of creating these delectable squares. Follow these simple steps and you’ll have a tray of cannoli goodness ready to impress in no time.
Step 1: Crafting the Graham Cracker Crust
The foundation of our cannoli squares is a buttery graham cracker crust. This provides a delightful contrast to the creamy filling and adds a touch of sweetness. It’s important to get the right consistency – too dry and it will crumble, too wet and it will be soggy.
- Combine graham cracker crumbs, melted butter, and sugar in a bowl.
- Press the mixture firmly into the bottom of a 9×13 inch baking dish.
- Chill the crust in the refrigerator while you prepare the filling.
Pro Tip: For an extra layer of flavor, add a pinch of cinnamon to the graham cracker mixture.
Step 2: Preparing the Creamy Cannoli Filling
This is where the magic happens! The filling is a blend of ricotta cheese, powdered sugar, vanilla extract, and a few other key ingredients that create the authentic cannoli flavor. This part requires the most attention, especially when it comes to the ricotta!
- In a large bowl, beat the ricotta cheese until smooth.
- Gradually add the powdered sugar and vanilla extract, mixing until well combined.
- Stir in mini chocolate chips and candied orange peel.
Ingredient Spotlight: Ricotta Cheese. The quality of your ricotta cheese will significantly impact the overall flavor and texture of your cannoli squares. Look for whole milk ricotta, which is richer and creamier than part-skim. Also, draining the ricotta is a must; otherwise, the filling will be too runny. I usually wrap it in cheesecloth and let it drain in the refrigerator for at least an hour.
Choosing the Right Ingredients
Using high-quality ingredients is essential for achieving the best flavor and texture in your cannoli squares. Here’s a breakdown of my go-to ingredients and why they work so well.
Selecting the Perfect Ricotta
As I mentioned before, ricotta cheese is the star of the show. Whole milk ricotta provides the creamiest texture and richest flavor. Make sure to drain it thoroughly to remove excess moisture and prevent a soggy filling. I prefer to use Polly-O whole milk ricotta because of its consistent quality and availability. This will also affect the sweetness of the squares, so keep that in mind!
Enhancing Flavor with Extracts and Zest
A touch of vanilla extract enhances the overall flavor of the filling, while a bit of orange zest adds a bright, citrusy note that complements the ricotta. You can also experiment with other extracts, such as almond or lemon, to customize the flavor to your liking.
- Vanilla Extract: Use pure vanilla extract for the best flavor.
- Orange Zest: Adds a refreshing citrusy note.
Adding Texture and Visual Appeal
Mini chocolate chips and chopped candied fruit add texture and visual appeal to the filling. I prefer mini chocolate chips because they distribute more evenly throughout the filling. Candied orange peel is a classic cannoli ingredient, but you can substitute it with other candied fruits, such as cherries or citron, if you prefer.
The Assembly and Finishing Touches
Once you’ve prepared the crust and filling, it’s time to assemble the cannoli squares. This is the easiest part of the process, and it’s where everything comes together.
Step 3: Assembling the Squares
Spread the cannoli filling evenly over the chilled graham cracker crust. Make sure to spread it all the way to the edges for a uniform appearance.
- Spread the prepared filling evenly over the chilled graham cracker crust.
- Cover the baking dish with plastic wrap and refrigerate for at least 4 hours, or preferably overnight, to allow the filling to set.
Why Chill? Chilling the squares is crucial for allowing the filling to firm up and the flavors to meld together. I find that chilling them overnight yields the best results, but at least 4 hours is necessary.
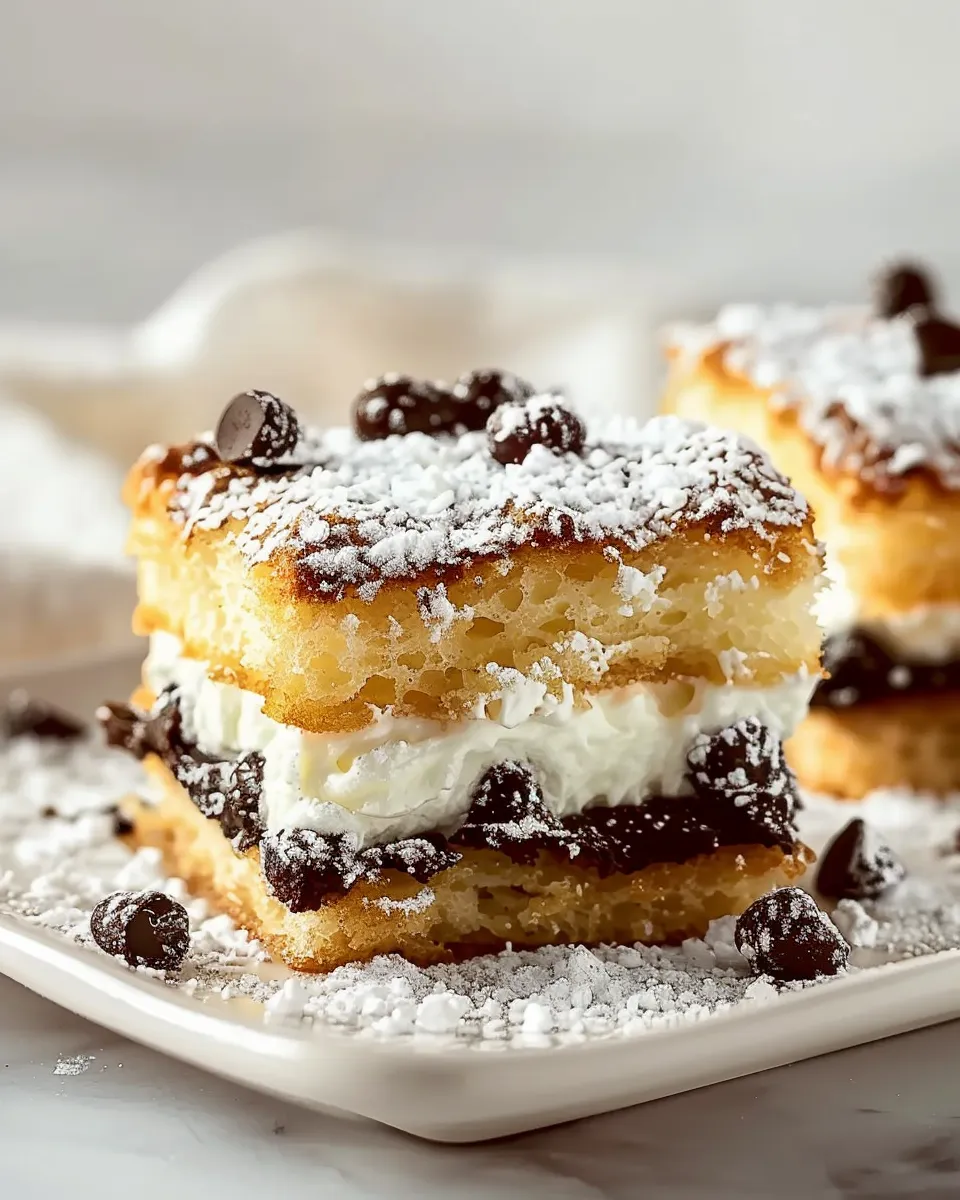
Step 4: Garnishing and Serving
Before serving, dust the top of the cannoli squares with powdered sugar and sprinkle with additional mini chocolate chips and chopped pistachios (optional). Cut the squares into desired sizes and serve cold.
- Dust the top with powdered sugar for a classic cannoli look.
- Sprinkle with additional mini chocolate chips and chopped pistachios (optional).
- Cut into squares and serve cold.
Presentation Matters: A dusting of powdered sugar and a sprinkle of chocolate chips and pistachios elevate the presentation of these squares, making them look even more appealing.
Expert Tips for Perfect Cannoli Squares
Here are a few of my personal tips for making these cannoli squares the best they can be:
- Drain the Ricotta: This is the most important step for preventing a soggy filling.
- Use Quality Ingredients: The flavor of your cannoli squares will only be as good as the ingredients you use.
- Chill Thoroughly: Chilling the squares allows the filling to set and the flavors to meld together.
- Don’t Overmix the Filling: Overmixing can result in a runny filling.
- Get Creative with Garnishes: Experiment with different garnishes, such as chopped nuts, candied fruit, or chocolate shavings.
My Biggest Failure (and What I Learned): One time, I was in a rush and didn’t drain the ricotta properly. The filling was so runny that the squares were a complete mess! I learned my lesson – never skip the draining step!
Adaptations and Variations
Want to put your own spin on these classic cannoli squares? Here are a few ideas to get you started:
- Chocolate Crust: Use chocolate graham crackers for a richer, more decadent crust.
- Citrus Infusion: Add lemon or orange zest to the filling for a brighter, more citrusy flavor.
- Nutty Delight: Incorporate chopped nuts, such as almonds or walnuts, into the filling.
- Espresso Kick: Add a teaspoon of espresso powder to the filling for a coffee-infused twist.
- Liqueur Enhancement: A splash of marsala wine or amaretto liqueur adds depth and complexity to the flavor.
Frequently Asked Questions About Cannoli Squares
Can I make these cannoli squares ahead of time?
Absolutely! In fact, I recommend making them at least 4 hours in advance, or even the day before, to allow the filling to set properly. They can be stored in the refrigerator for up to 3 days.
Can I freeze cannoli squares?
While you can freeze cannoli squares, the texture of the filling may change slightly upon thawing. If you do freeze them, wrap them tightly in plastic wrap and then in foil to prevent freezer burn. Thaw them in the refrigerator overnight before serving.
What can I substitute for ricotta cheese?
If you can’t find ricotta cheese, you can substitute it with mascarpone cheese, which has a similar creamy texture. However, mascarpone is richer and sweeter than ricotta, so you may need to adjust the amount of sugar in the filling accordingly.
How do I prevent the crust from getting soggy?
The key to preventing a soggy crust is to chill it thoroughly before adding the filling. Also, make sure to drain the ricotta cheese properly to remove excess moisture.
Can I use different types of chocolate chips?
Yes, you can use any type of chocolate chips you like, such as dark chocolate, white chocolate, or even peanut butter chips. Experiment and find your favorite combination!
Are there any dietary modifications I can make?
Yes! To make these gluten-free, use gluten-free graham crackers for the crust. For a dairy-free version, experiment with dairy-free ricotta alternatives, though the texture may differ. You can also reduce the sugar for a lower-sugar option.
Final Thoughts on These Classic Cannoli Squares
These Classic Cannoli Squares are more than just a dessert; they’re a celebration of Italian flavors in an easy-to-make format. Whether you’re hosting a party, attending a potluck, or simply craving a sweet treat, these squares are sure to impress. So, ditch the traditional cannoli-making process and embrace this no-bake twist on a classic. And once you try these, consider making these other Italian treats, like Classic Tiramisu or Almond Biscotti!
Have you tried this recipe? I’d love to hear your thoughts! Share your creations and tag me on social media. Buon appetito!
PrintClassic Cannoli Squares Delightful Italian Dessert

Enjoy Classic Cannoli Squares a delightful Italian dessert Our technique delivers authentic flavor in every bite Perfect for any occasion
- Prep Time: 0 hours 20 minutes
- Cook Time: 0 hours 0 minutes
- Total Time: 4 hours 20 minutes
- Yield: 12-16 servings
- Category: Dessert
- Cuisine: Italian