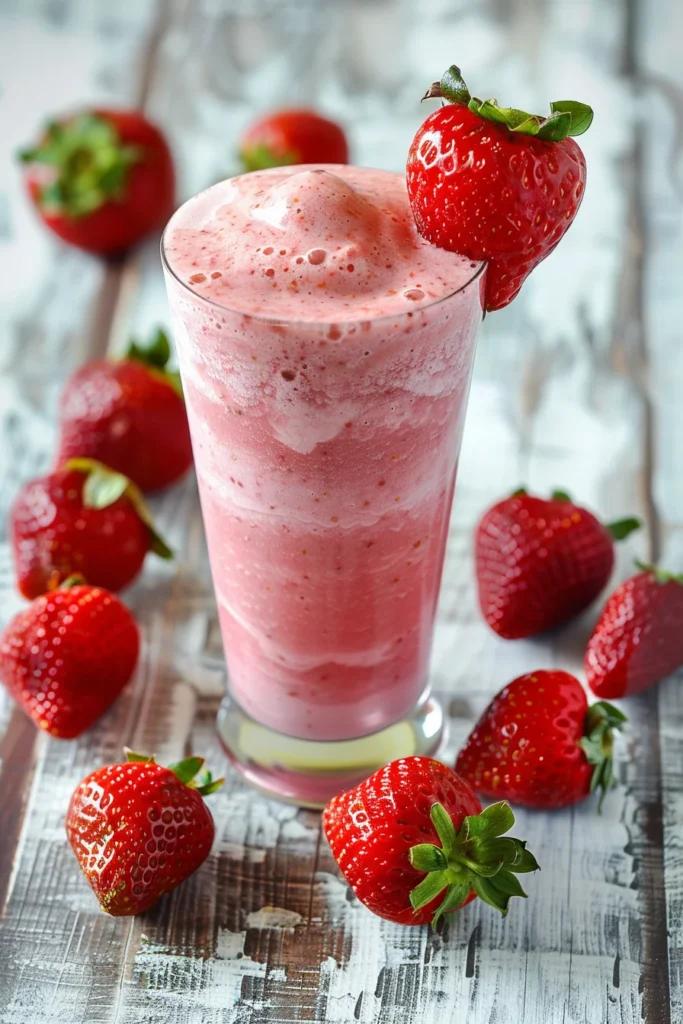
There is something inherently nostalgic about a cold, pink milkshake. Whether it reminds you of summer afternoons at a vintage diner or a quick treat after school, the strawberry milkshake remains a timeless classic. However, many store-bought versions are loaded with artificial syrups and excessive corn syrup. What if you could capture that same creamy, dreamy flavor in just three minutes using real fruit and simple ingredients? This recipe is designed for the modern, busy kitchen—balancing speed with the authentic taste of fresh strawberries. In this guide, we will walk you through the nuances of creating a perfect single-serve shake that is light, refreshing, and surprisingly wholesome. Grab your blender, and let’s dive into this vibrant, fruit-forward treat that the whole family will love.
Why You’ll Love This Recipe
You’ll love this recipe because it strikes the perfect balance between convenience and quality. Unlike traditional milkshakes that rely heavily on several scoops of high-calorie ice cream, this version uses fresh strawberries and ice to create a refreshing texture that isn’t overly heavy. It is incredibly versatile; you can whip it up in less time than it takes to drive to a fast-food joint. Plus, because it’s a single-serve portion, it’s the ultimate guilt-free indulgence for one. It’s also a fantastic “base” recipe—once you master the ratio of milk to fruit, the possibilities for customization are endless, allowing you to cater to various dietary needs without sacrificing flavor.
What Is a Strawberry Milkshake?
At its core, a strawberry milkshake is a blended beverage consisting of milk, a sweetening agent, and strawberries. While the “classic” American version often uses strawberry-flavored ice cream, the modern home-style version (like this one) often utilizes fresh or frozen fruit combined with chilled milk. This approach highlights the natural acidity and floral notes of the berries. By using fresh strawberries rather than syrup, you achieve a more complex flavor profile and a beautiful, natural pink hue. It sits somewhere between a traditional dessert and a fruit smoothie, making it appropriate for a mid-day snack or a light evening dessert that won’t leave you feeling weighed down.
Ingredients Overview
To create a professional-level milkshake at home, the quality of your ingredients is paramount.
- Milk (¾ cup): This provides the liquid base. While whole milk offers the creamiest mouthfeel due to its fat content, 2% or skim milk works perfectly well for a lighter version.
- Fresh Strawberries (3 large): Use the ripest berries you can find. Look for strawberries that are deep red all the way to the stem. The natural sugars in ripe fruit mean you can use less added sugar. Slicing them first ensures they blend evenly without leaving large chunks behind.
- Ice Cubes (3): Ice is the secret to the “shake” texture when you aren’t using ice cream. It aerates the milk and provides that essential frostiness. Three standard-sized cubes are usually enough to chill the drink without watering it down.
- White Sugar (1 tablespoon): This enhances the natural sweetness of the berries. If your strawberries are exceptionally sweet (peak summer season), you might even find you can reduce this to a teaspoon. The sugar also helps macerate the berries slightly during the blending process, releasing more of their juice.
Ingredient Substitutions & Tips
Customizing this recipe is easy and keeps things interesting. For a dairy-free or vegan version, soy milk is an excellent choice as it has a similar protein structure to cow’s milk, which helps it froth up. Almond milk provides a nutty undertone, while oat milk offers a natural sweetness and creamy texture. If you want to cut back on refined sugar, honey, agave nectar, or a sugar substitute like Splenda or Stevia work beautifully. Additionally, if you find yourself out of strawberries, blueberries or raspberries make for a fantastic “Berry Shake” swap using the exact same measurements. For an even thicker consistency, try using frozen fruit instead of ice.
Step-by-Step Instructions
- Prepare the Fruit: Start by washing your strawberries under cold water. Remove the green leafy tops (hulls) and slice the berries into quarters. Slicing is a small step that prevents the blender blades from getting stuck and ensures a smoother final product.
- Layer the Blender: Pour the ¾ cup of milk into the blender first. Adding liquid first creates a vortex that pulls the solid ingredients down toward the blades. Next, add the sliced strawberries and the tablespoon of sugar. Finally, drop in your three ice cubes.
- The Blending Process: Secure the lid tightly. If you are using a high-speed blender, start on the lowest setting and quickly ramp up to high. Blend for approximately 30 to 45 seconds. You are looking for the sound of the ice cubes to disappear—once the “clinking” stops and the mixture looks uniform and frothy, it’s done.
- The Consistency Check: Stop the blender and look at the texture. If you prefer a thinner shake, add a splash more milk and pulse. If you want it thicker, add one more ice cube and blend again.
- Serve Immediately: Pour the milkshake into a tall, chilled glass. The aeration in the milk will start to dissipate after a few minutes, so this drink is best enjoyed the moment it is made.
Expert Baking/Cooking Tips
- Chill the Glass: Put your serving glass in the freezer for 10 minutes before making the shake. This keeps the drink frosty until the very last sip.
- High-Speed Advantage: If you have a high-powered blender (like a Vitamix or Ninja), use it! These machines pulverize the strawberry seeds and ice so thoroughly that the texture becomes velvety smooth.
- Wash Berries Carefully: Never soak strawberries in water, as they act like sponges and will become waterlogged. A quick rinse and pat dry is all they need.
- Vanilla Extract: A tiny drop (¼ teaspoon) of pure vanilla extract can mimic the flavor of a classic ice cream shake without the extra calories.
The Secret to the Perfect Texture
The most common mistake people make with homemade milkshakes is the “ice-to-liquid” ratio. Too much ice makes it a slushie; too little makes it flavored milk. The secret to achieving that “diner-style” thickness without using ice cream is the use of frozen fruit. If you want a truly decadent, thick texture, freeze your strawberry slices for an hour before blending and omit the ice cubes entirely. The frozen fruit provides a much creamier structure than ice because the fruit fibers hold onto the air bubbles better, resulting in a thick, spoonable consistency that still tastes purely like fresh strawberries.
Serving Suggestions
A great milkshake is all about the presentation! Serve your strawberry shake in a classic hurricane glass or a Mason jar for a rustic look. Top with a dollop of whipped cream and a single fresh strawberry slice on the rim. For a modern twist, you can even add a sprig of fresh mint or a light dusting of cocoa powder. A wide straw is essential to enjoy the frothy texture comfortably.
Storage & Make-Ahead Tips
Milkshakes are best served immediately; however, if you have leftovers, you can pour them into popsicle molds and freeze them for a delicious fruit pop later. If you want to prep ahead, you can pre-slice your strawberries and keep them in a small container in the fridge or freezer. This reduces your “active” time to under 60 seconds when you’re ready to blend.
FAQs
1. Can I use frozen strawberries?
Absolutely! In fact, using frozen strawberries is highly recommended for a thicker, creamier shake. If you use frozen berries, you can omit the ice cubes entirely to prevent the drink from becoming too watery as it melts.
2. Is this recipe healthy?
Compared to traditional milkshakes made with ice cream, this version is much lower in fat and calories. It uses real fruit, providing a boost of Vitamin C and fiber. To make it even healthier, use a natural sweetener like honey or omit the sugar entirely.
3. Why is my milkshake too thin?
If your shake is too thin, it usually means there was too much milk or the ice cubes were too small. You can thicken it by adding more ice, more fruit, or even a tablespoon of Greek yogurt for added creaminess.
4. Can I make this in a food processor?
Yes, you can use a food processor if you don’t have a blender. However, it may not get the ice as finely crushed as a high-speed blender would, resulting in a slightly grainier texture.
5. How do I make it more colorful?
Natural strawberries can sometimes produce a pale pink color. For a more vibrant “Instagram-worthy” pink, you can add a tiny piece of a red beet or a few frozen raspberries, which have a stronger natural pigment.
Making a fresh strawberry milkshake doesn’t require a long list of ingredients or an expensive trip to the store. With just milk, berries, ice, and a bit of sugar, you can create a high-quality treat that rivals any cafe. This recipe is the perfect solution for those moments when you need a quick sweet fix that feels special. Give it a try today, and don’t be afraid to experiment with different milks and fruits to find your own perfect blend!
PrintEasy 3-Minute Strawberry Milkshake Recipe
A refreshing, creamy strawberry milkshake made with fresh berries and just a few simple pantry staples. Perfect for a quick snack or a light dessert.
- Prep Time: 3 minutes
- Cook Time: 0 minutes
- Total Time: 3 minutes
- Yield: 1 serving
- Cuisine: American
Ingredients
Milk – ¾ cup
Fresh strawberries, sliced – 3 large
Ice cubes – 3
White sugar – 1 tablespoon
Instructions
Add the milk, sliced strawberries, ice cubes, and sugar to a blender container.
Blend on high speed until the ice is completely crushed and the mixture is smooth and frothy.
Taste and adjust sweetness if necessary.
Pour into a tall glass and enjoy immediately while cold.
Notes
• Swap strawberries for blueberries or raspberries for a different fruit flavor.
• For a thicker, creamier texture, replace the ice cubes with 1/2 cup of frozen strawberries.
• Use a sugar substitute like Stevia or Splenda to reduce the glycemic index.
• Make it vegan by using soy, almond, or oat milk instead of dairy.