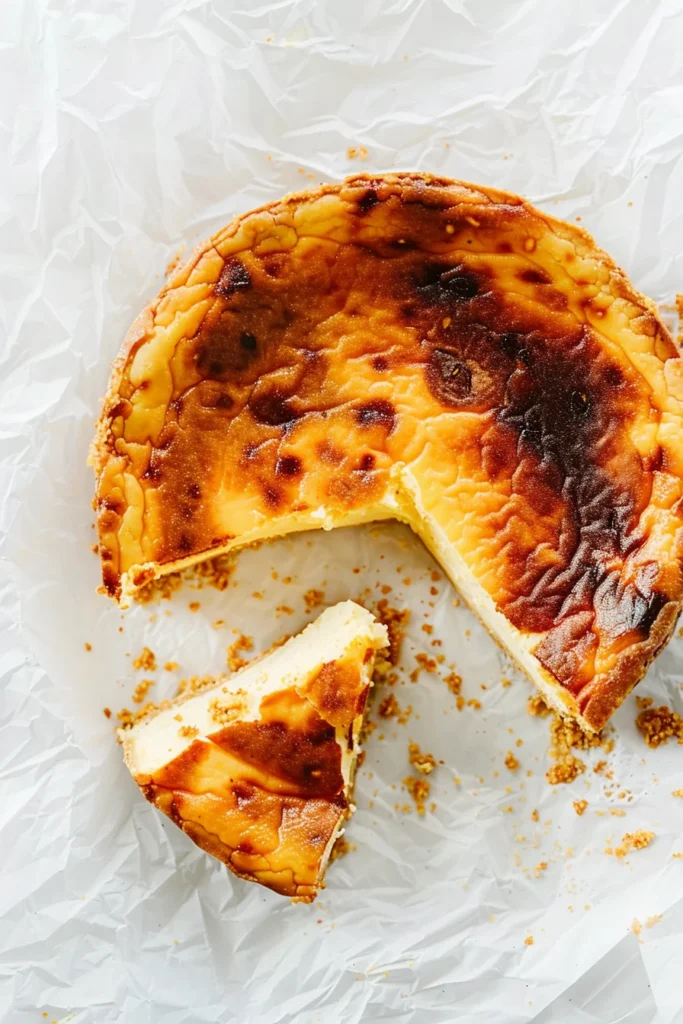
There is something inherently magical about a dessert that breaks every traditional rule of baking yet results in a masterpiece. Enter the San Sebastian Cheesecake. Unlike its New York cousin, which demands a gentle water bath and a pristine white surface, this Basque beauty thrives on high heat, scorched edges, and a “burnt” top that conceals a heart of pure, molten gold. Originating from the La Viña bar in Spain, this crustless wonder has taken the global culinary world by storm. If you are looking for a dessert that delivers a high visual impact with minimal effort, you have found it. In this guide, we will walk you through the nuances of achieving that perfect bitter-sweet caramelization and the signature “jiggle” that defines a true San Sebastian classic.
Why You’ll Love This Recipe
You will fall in love with this recipe because it is arguably the most “forgiving” cake you will ever bake. First, there is no crust, which means no fussing with graham cracker crumbs or chilling butter. Second, the “burnt” look is intentional. You don’t have to worry about cracks or browning—in fact, you want them! The high-heat method creates a natural Maillard reaction, giving the cheesecake a complex, caramel-like flavor that balances the richness of the cream cheese. Finally, it requires only four primary ingredients, making it a budget-friendly but high-end dessert that looks like it came straight from a Michelin-star pastry kitchen in Northern Spain.
What Is San Sebastian Cheesecake?
San Sebastian Cheesecake, also known as Basque Burnt Cheesecake, was born in the 1990s at a small bar called La Viña in the resort town of San Sebastián, Spain. Chef Santiago Rivera wanted to create a new type of cheesecake that could be baked daily with ease. The result was a recipe that omitted the crust and used a very high baking temperature. This technique purposefully scorches the exterior while leaving the interior incredibly soft, almost custard-like. It is fundamentally different from American cheesecakes because it contains no starch (in this version) and relies on heavy cream and eggs for its structural integrity and luxurious mouthfeel.
Ingredients Overview
To achieve the best results, the quality of your ingredients is paramount. Because this recipe is so simple, each component plays a leading role:
- Cream Cheese: You need full-fat, brick-style cream cheese. Do not use the spreadable kind from a tub. Brands like Philadelphia are the gold standard here because they have the specific fat-to-moisture ratio needed to set correctly while remaining creamy.
- Granulated Sugar: This provides the sweetness but, more importantly, it facilitates the caramelization of the top. The 150g specified ensures the cake isn’t cloyingly sweet but has enough sugar to “burn” beautifully under the high heat.
- Large Eggs: Eggs provide the structure. They act as the binder that holds the fat and liquid together. Using large eggs at room temperature ensures they emulsify perfectly into the cream cheese without breaking the batter.
- Heavy Cream: Often called double cream in some regions, this adds the necessary silkiness. With approximately 36% fat content, heavy cream ensures the center remains “lava-like” when served at room temperature.
Ingredient Substitutions & Tips
While this recipe is minimalist, you might need a few tweaks:
- Sugar Alternatives: You can use caster sugar for a finer texture, though standard granulated sugar works perfectly well. Avoid liquid sweeteners like honey or maple syrup, as they will alter the moisture content too much.
- The Cream Factor: If you cannot find heavy cream, you can use whipping cream, though the result may be slightly less stable.
- Room Temperature is Non-Negotiable: To avoid a lumpy cheesecake, your cream cheese must be very soft. If it’s cold, it will never fully integrate with the eggs, leaving you with white flecks in your finished cake.
Step-by-Step Instructions
1. Prepare Your Pan
Preheat your oven to 430°F (220°C). If you have a convection (fan) setting, use it, as it helps circulate the heat for even browning. Take a 6-inch round cake pan and line it with two large sheets of parchment paper. Let the paper overlap and hang over the edges by at least 2 inches. This gives the cheesecake room to rise (like a soufflé) and makes it easy to lift out.
2. Cream the Base
In a stand mixer or using a hand mixer, beat the two 8oz bricks of cream cheese with the 3/4 cup of sugar. Continue beating on medium speed until the mixture is light, fluffy, and completely lump-free. Use a spatula to scrape down the bottom of the bowl—unmixed cream cheese often hides there!
3. Incorporate the Eggs
Add your 4 eggs one at a time. This is a critical step for a smooth emulsion. Ensure the first egg is fully disappeared into the batter before adding the next. This prevents the batter from curdling.
4. Finish the Batter
Slowly pour in the 3/4 cup of heavy cream. Mix on low speed just until combined. You want to avoid incorporating too much air at this stage to keep the texture dense and creamy rather than airy.
5. The Bake
Pour the batter into the prepared tin. Bake for 25 to 30 minutes. Watch carefully after the 20-minute mark. You are looking for a deep, dark amber color on top.
6. The Jiggle Test
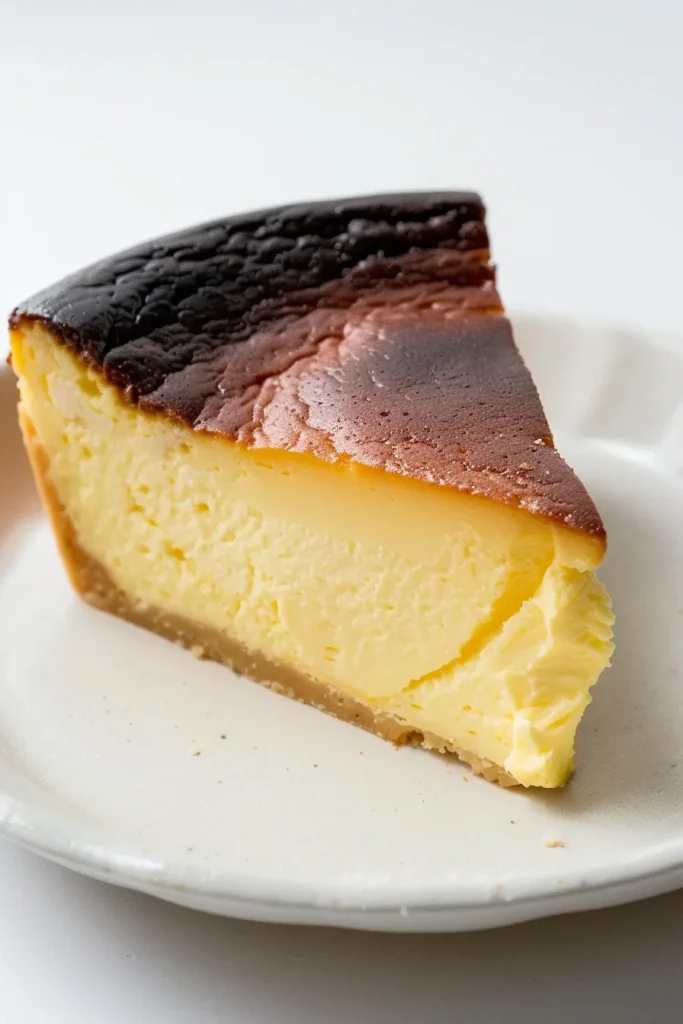
When you pull the pan out, the center should still look quite “wet” and jiggle significantly when shaken. This is the secret to the gooey center. Let it cool completely in the pan on a wire rack at room temperature.
Expert Baking Tips
- The Double Lining: Don’t try to make the parchment paper look neat. The rustic, wrinkled edges of the paper are part of the San Sebastian aesthetic and actually help the cake hold its shape as it cools.
- Temperature Control: Every oven is different. If your top isn’t browning by the 25-minute mark, you can turn on the broiler for the last 60 seconds—but watch it like a hawk!
- Scraping is Key: Many bakers fail because they don’t scrape the beaters and the bottom of the bowl. One lump of cold cream cheese can ruin the silky texture of the final slice.
The Importance of the “Jiggle”
The most common mistake beginners make with Basque cheesecake is overbaking it. Because there is no flour or cornstarch in this specific 4-ingredient version, the “set” comes purely from the eggs and the cooling process. When you remove the cake from the oven, it should look underdone in the middle. If it is firm to the touch, you have overbaked it, and it will have a texture closer to a standard New York cheesecake. The “jiggle” ensures that once the fats and proteins stabilize during the cooling process, the center remains soft, custardy, and luxurious.
Serving Suggestions
For the most authentic experience, serve the San Sebastian Cheesecake at room temperature. This allows the center to remain soft and “lava-like.” A sprinkle of high-quality flaky sea salt on top can beautifully contrast the sweet caramel notes. If you want to elevate the plate, serve it with a glass of Pedro Ximénez sherry or a handful of fresh tart berries to cut through the intense richness of the cream cheese.
Storage & Make-Ahead Tips
This cheesecake is an excellent make-ahead dessert. It can stay at room temperature for several hours. If you prefer a firmer, “fudgy” texture, store it in the refrigerator for up to 3 days. To store, keep it in its parchment paper and wrap the top tightly with plastic wrap to prevent it from absorbing fridge odors. Always let it sit out for 30 minutes before serving if you want that creamy texture back.
FAQs
Q: Why didn’t my cheesecake turn brown?
A: Your oven temperature may be too low, or you may not be using the convection setting. Make sure to use an oven thermometer to verify it has reached 430°F.
Q: Is this cheesecake gluten-free?
A: Yes! Unlike many other Basque recipes that use a tablespoon of flour, this specific 4-ingredient version is naturally gluten-free as it relies entirely on eggs for structure.
Q: Can I use a larger pan?
A: If you use an 8-inch or 9-inch pan, the cheesecake will be much thinner and will bake faster. For the tall, dramatic look and gooey center, a 6-inch pan with 3-inch sides is essential.
Q: My cheesecake collapsed after cooling. Is that normal?
A: Absolutely. It will rise like a soufflé in the oven and then sink as it cools. This creates the dense, creamy texture that the San Sebastian style is known for.
Mastering the San Sebastian Cheesecake is a rite of passage for any home baker. It teaches the importance of temperature and the beauty of “perfect imperfection.” Whether you serve it warm and oozy or chilled and creamy, this 4-ingredient wonder is guaranteed to be the star of your next dinner party. Embrace the burn, trust the jiggle, and enjoy a slice of Basque culinary history right in your own kitchen.
PrintSan Sebastian Cheesecake Recipe
This San Sebastian Cheesecake, also known as Basque Burnt Cheesecake, is the ultimate effortless dessert. With only four main ingredients and no crust to worry about, it relies on a high-heat baking method to achieve a stunning caramelized exterior and a rich, molten interior that melts in your mouth.
- Prep Time: 15 minutes
- Cook Time: 30 minutes
- Total Time: 45 minutes
- Yield: 8 slices
- Cuisine: Spanish
Ingredients
Cream cheese (2 x 8oz bricks) – 16 oz
Granulated sugar – 3/4 cup (150g)
Large eggs – 4 units
Heavy cream – 3/4 cup (180g)
Instructions
Preheat your oven to 430°F (220°C). For best results, use the convection/fan setting if available.
Line a 6-inch round cake pan (3 inches tall) with two layers of parchment paper, ensuring it extends 2 inches above the rim.
In a stand mixer or large bowl, beat the softened cream cheese and sugar together until completely smooth and fluffy.
Add the eggs one at a time, mixing thoroughly and scraping the bowl down between each addition.
Slowly pour in the heavy cream and mix on low speed until just combined.
Pour the batter into the prepared pan and bake for 25–30 minutes until the top is dark amber.
Remove from the oven while the center is still very wobbly.
Cool completely in the pan on a wire rack before unmolding.
Notes
• Ensure all ingredients, especially the cream cheese and eggs, are at true room temperature to prevent lumps.
• Do not be afraid of the dark color; the “burnt” top is what provides the signature caramel flavor.
• For a lava-like center, serve at room temperature. For a firmer, fudge-like texture, chill in the fridge overnight.