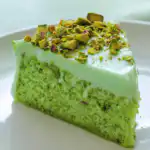
If you have ever attended a Midwestern potluck or a family holiday gathering, you have likely encountered the glorious “Lush” dessert. Whether you call it Pistachio Delight, Pistachio Pudding Dessert, or Watergate Lush, this 4-layer masterpiece is the epitome of vintage comfort food. It combines a warm, buttery walnut crust with a silky, sweet cream cheese layer, followed by the iconic vibrant green of pistachio pudding, all crowned with a fluffy cloud of whipped topping.
What makes this recipe stand out is the perfect balance of textures. You get the crunch of the toasted nuts, the density of the cheesecake-like layer, and the airy lightness of the pudding and whipped cream. It is refreshing, indulgent, and surprisingly easy to assemble. In this guide, I will walk you through the nuances of creating the perfect layers, ensuring your crust stays crisp and your pudding sets perfectly every single time.
Why You’ll Love This Recipe
This Pistachio Lush is a perennial favorite for several reasons. First, the flavor profile is incredibly nostalgic; the subtle almond-vanilla notes of the pistachio pudding evoke memories of classic celebrations. Second, it is a make-ahead marvel. In fact, it actually tastes better after a few hours in the fridge, making it the ideal stress-free dessert for entertaining.
Third, the texture contrast is addictive. Unlike many soft desserts, the baked walnut crust provides a sturdy, salty-sweet foundation that prevents the dish from feeling overly sugary. Finally, it is visually stunning. The distinct layers of white, green, and cream look beautiful when sliced, especially when finished with a garnish of toasted almonds. It’s a “maximum reward for minimum effort” kind of recipe.
What Is Pistachio Lush?
Pistachio Lush belongs to a family of “refrigerator desserts” that gained massive popularity in the 1960s and 70s. These desserts are characterized by their layered structure, typically starting with a shortbread or nut-based crust, followed by a cream cheese “glue,” a flavored pudding layer, and a whipped topping.
The name “Lush” refers to the rich, creamy, and decadent mouthfeel of the dessert. While chocolate and lemon versions are common, the pistachio version is often the most requested because of its unique color and sophisticated nutty flavor. It is sometimes confused with “Watergate Salad,” but while the flavor profile is similar, Pistachio Lush is a structured, baked-crust dessert rather than a stirred fruit salad.
Ingredients
To achieve the perfect Pistachio Lush, the quality and temperature of your ingredients are paramount. Here is what you will need:
- All-Purpose Flour: This forms the base of your shortbread-style crust.
- Stick Butter: Use cold, salted butter. The salt balances the sweetness of the upper layers, and the cold temperature ensures a flaky, rather than greasy, crust.
- Chopped Walnuts: These are mixed directly into the crust. They provide an earthy depth and a crunch that mimics a professional pastry base.
- Cream Cheese: It must be at room temperature. If it’s too cold, you will end up with lumps in your second layer.
- Confectioner’s Sugar: This provides sweetness and helps stabilize the cream cheese layer.
- Whipped Topping: You will use this in both the cream cheese layer (to lighten it) and as the final topping.
- Instant Pistachio Pudding: Ensure you buy instant pudding, not the “cook and serve” variety, as the latter will not set properly in this layered format.
- Whole Milk: For the richest pudding, use whole milk. 2% works, but the pudding layer will be slightly less stable.
- Toasted Almonds: These are the finishing touch, adding a professional look and a secondary nut flavor that complements the pistachio.
Ingredient Substitutions & Tips
If you need to pivot based on what is in your pantry, here are a few expert-tested substitutions:
- Nut Variations: If you aren’t a fan of walnuts, pecans make an excellent substitute for the crust. For the topping, pistachios are a natural fit if you want to double down on the primary flavor.
- Whipped Topping vs. Whipped Cream: While stabilized whipped topping (like Cool Whip) is traditional because it holds its shape for days, you can use homemade whipped cream. If using homemade, ensure you stabilize it with a bit of gelatin or extra powdered sugar so it doesn’t weep.
- Gluten-Free Option: You can substitute the all-purpose flour for a 1:1 gluten-free baking blend. Since the crust is shortbread-style, it translates very well to gluten-free versions.
Step-by-Step Instructions
- Prepare the Crust: Start by preheating your oven to 350°F (175°C). In a large mixing bowl, combine the flour and the cold, cubed butter. Use a pastry blender or two knives to “cut” the butter into the flour. You are looking for a texture that resembles coarse crumbs or small peas. Once the butter is evenly distributed, stir in the chopped walnuts.
- Bake and Cool: Press the mixture firmly into the bottom of a 13×9-inch baking dish. Bake for 20 minutes until the edges are just beginning to turn golden brown. Crucial Step: Allow the crust to cool completely to room temperature. If the crust is even slightly warm, the cream cheese layer will melt and become oily.
- The Cream Cheese Layer: In a medium bowl, beat the softened cream cheese and confectioner’s sugar until smooth. Gently fold in 1 cup of the whipped topping. This creates a “mousse” texture. Spread this evenly over the cooled crust, making sure to reach the edges to create a seal.
- The Pudding Layer: In another bowl, whisk together the two packages of instant pistachio pudding and the 3 cups of cold milk. Whisk vigorously for about 2 minutes. As soon as it starts to thicken (but before it’s fully set), pour it over the cream cheese layer and smooth it out.
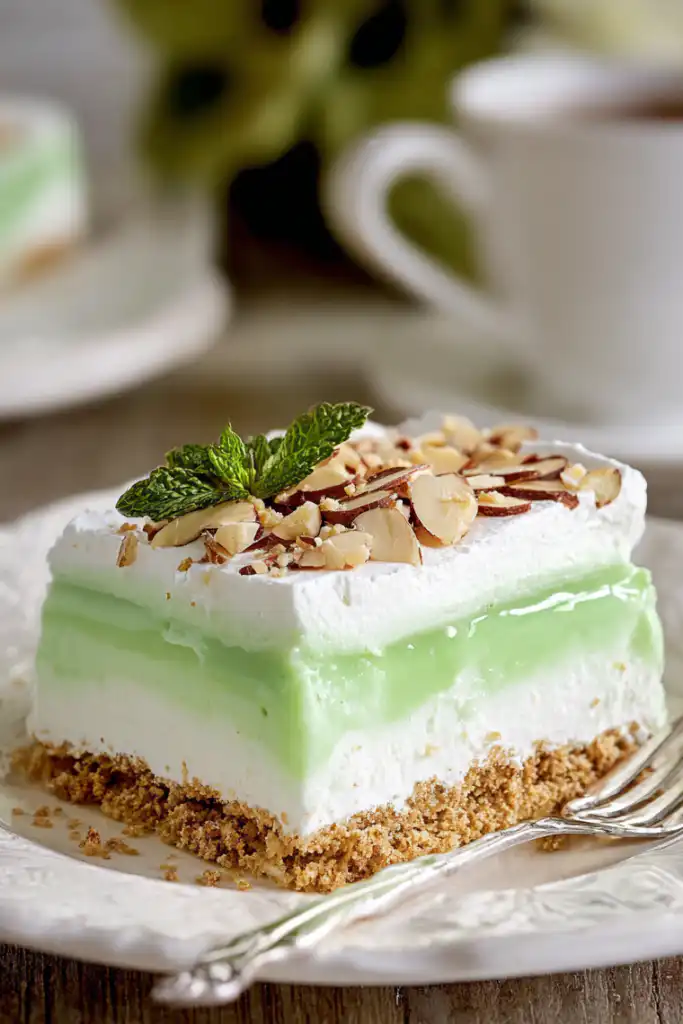
- Chill and Top: Place the dish in the refrigerator for at least 2-3 hours. This allows the layers to firm up so you can get clean slices. Just before serving, spread the remaining 2 cups of whipped topping over the pudding and sprinkle with toasted almonds.
Expert Baking/Cooking Tips
- The “Seal” Technique: When spreading the cream cheese layer, make sure to spread it all the way to the sides of the pan. This creates a barrier that prevents the pudding layer from seeping down and making the crust soggy.
- Toasting the Nuts: Never skip toasting your almonds! Place them in a dry pan over medium heat for 3-5 minutes until fragrant. It transforms the flavor from “raw” to “gourmet.”
- Clean Slices: To get those perfect, photo-ready squares, wipe your knife with a warm, damp cloth between every single cut.
- Pudding Consistency: Use slightly less milk than the pudding package calls for (as we do here with 3 cups for 2 packages) to ensure the layer is sturdy enough to hold its shape.
The Secret to Perfectly Defined Layers
The secret to a professional-looking Pistachio Lush lies in temperature management. Many home cooks rush the process, leading to “bleeding” layers. The crust must be cold, the cream cheese must be room temperature (to avoid lumps), and the milk for the pudding must be ice-cold.
Additionally, the chilling time is not a suggestion—it is a requirement. The 2-3 hour window allows the gelatin in the pudding and the fats in the cream cheese to bond, creating a structural integrity that allows the dessert to be lifted out of the pan in a solid, beautiful block. If you try to serve it too early, it will taste delicious but look like a “slump” rather than a “lush.”
Serving Suggestions
Serve this dessert chilled on chilled plates if possible. It pairs beautifully with a cup of strong black coffee or a light dessert wine like a Moscato d’Asti. For a festive touch, you can add a few fresh raspberries on top; the red against the green pudding creates a stunning visual contrast that is perfect for Christmas or St. Patrick’s Day.
Storage & Make-Ahead Tips
Storage: Store any leftovers in the refrigerator, covered tightly with plastic wrap or a lid, for up to 4 days.
Make-Ahead: You can make the crust and the first two layers up to 24 hours in advance. Add the final whipped topping and almonds just before serving to keep the topping looking fresh and the nuts crunchy. This recipe does not freeze well, as the pudding texture can become grainy upon thawing.
FAQs
Q: Can I use sugar-free pudding and whipped topping?
A: Yes! You can substitute sugar-free instant pistachio pudding and sugar-free whipped topping. The flavor will be slightly different, but the structure will remain largely the same.
Q: Why is my crust crumbling?
A: This usually happens if the butter wasn’t incorporated enough or if the crust wasn’t pressed firmly into the pan. Make sure to use the bottom of a measuring cup to pack the crust down tightly before baking.
Q: Can I use a different nut for the crust?
A: Absolutely. Pecans are the most popular alternative. For a nut-free version, you could use crushed golden Oreos or graham cracker crumbs mixed with butter.
Q: Does it matter if I use 1% or Skim milk?
A: The fat content helps the pudding set. If you use Skim milk, the pudding layer may be a bit softer and runnier. Whole milk is highly recommended for the best results.
Pistachio Lush is more than just a dessert; it’s a piece of culinary history that continues to delight generations. Its combination of salty, sweet, creamy, and crunchy makes it an irresistible addition to any menu. Whether you are making this for a summer barbecue or a winter holiday, its vibrant color and luscious texture are guaranteed to make it the star of the show. Give yourself plenty of time for the layers to set, and prepare for everyone to ask for the recipe!