When it comes to celebrating the women who raised us, a store-bought card just doesn’t cut it. We want something that says, “I spent time on this because you’re worth it.” Enter the Mother’s Day Cake not just any cake, but a “Deco” sponge cake that features a hand-piped design baked right into the surface.
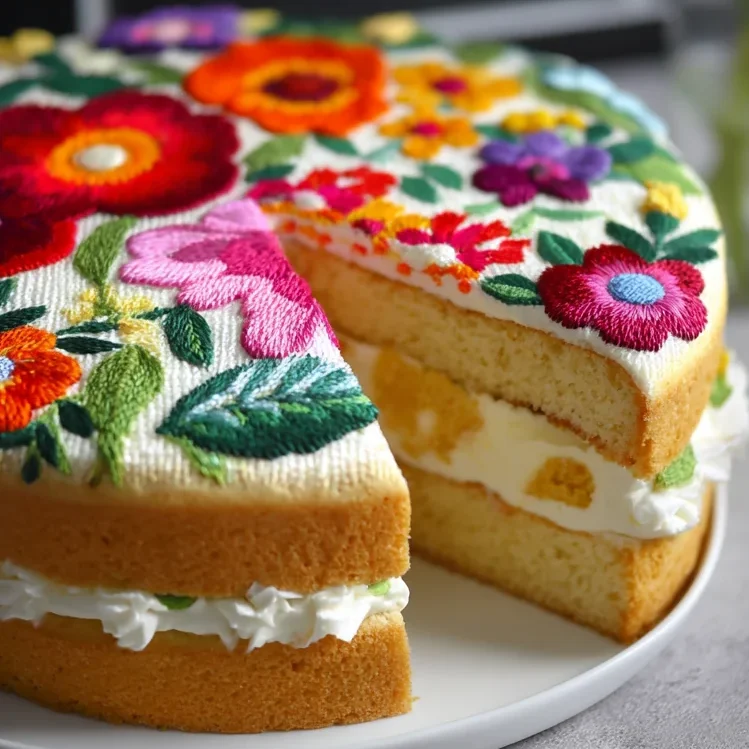
This cake is light, airy, and surprisingly simple once you master the technique of “drawing” with batter. It’s essentially a chiffon-style sponge that acts as a blank canvas for your creativity. Whether you want to pipe delicate flowers, a heartfelt “I Love You Mom,” or a chic polka-dot pattern, this recipe is your ticket to being the favorite child this year.
Why You’ll Love This Recipe
- Completely Customizable: You can trace any design you like! If you can draw it on parchment, you can bake it into a cake.
- Light as Air: Unlike heavy buttercream cakes, this sponge is fluffy and paired with a stabilized whipped cream that won’t weigh you down.
- The “Wow” Factor: When you peel back that parchment paper to reveal a perfect design, it feels like a magic trick.
- Perfect for Pinterest: This is a high-impact dessert that looks like it came from a high-end Japanese bakery.
Ingredient you will need
To get that perfect “edible art” look, the quality and type of ingredients you use matter. Here’s what you need to know:
- The Eggs: This recipe uses 6 eggs, separated. The yolks provide the structure and richness, while the whites (meringue) provide the lift. Make sure your eggs are at room temperature for the best volume.
- Cornstarch & Flour: Adding cornstarch to the all-purpose flour mimics “cake flour,” resulting in a tighter, finer crumb that’s easier to pipe onto.
- Food Gel (Crucial!): Do not use liquid food coloring. Liquid will change the consistency of the batter and cause your design to run. Gel colors are concentrated and keep the batter thick.
- Vinegar: A tiny bit of vinegar (or cream of tartar) helps stabilize the egg whites, ensuring those stiff peaks don’t collapse when you’re piping your masterpiece.
- Heavy Whipping Cream: Ensure it is very cold. This helps the cream whip up faster and hold its shape between the layers.
Step-by-Step Instructions
1. The Design Phase
Preheat your oven to 375°F. This is where the magic starts. Grease an 8-inch circular pan and cut a parchment circle to fit the bottom. Using an edible marker (or a dark pencil on the reverse side of the paper), trace your design. Place the parchment in the pan, design side down (if using pencil) or design side up (if using edible marker).
2. Prepare the Base Batter
Separate your eggs. In one bowl, whisk together the yolks, sugar, oil, milk, and vanilla. Sift in the flour and cornstarch. Whisk until it’s silky smooth. This is your “glue” for the meringue.
3. Achieve the Perfect Meringue
In a clean stand mixer bowl, whip the egg whites until frothy. Slowly stream in the vinegar and sugar. Continue whipping until you hit stiff peaks. You should be able to lift the whisk and have the point stand straight up without drooping.
4. Folding with Love
Gently fold the whites into the yolk mixture. Use a “cut and fold” motion. Do not stir! If you over-mix, the batter will become runny, and your piped design will blur into the rest of the cake.
5. Creating the Art
Take small portions of the batter and tint them with your gel colors. Transfer them to small piping bags. Pipe your outlines first, then fill them in with color.
Pro Tip: Once the design is piped, pop the pan into the fridge for about 5-8 minutes. This “sets” the design so that when you pour the rest of the batter over it, the colors don’t bleed.
6. The Bake
Pour the remaining uncolored batter over your design. Bake for 8-9 minutes. The cake should be springy to the touch. Immediately upon removing it from the oven, flip the cake onto a cooling rack and peel back the parchment paper to reveal your art!
Expert Tips for Best Results
- Don’t Overbake: These thin sponge layers bake incredibly fast. Start checking at 7 minutes. An overbaked sponge will be dry and may crack.
- The “Trace” Trick: If you aren’t an artist, print a simple floral design from the internet, place it under your parchment paper, and trace it. It’s like a coloring book for bakers!
- Cold Equipment: For the whipped cream filling, chill your metal bowl and whisk attachment in the freezer for 10 minutes before whipping. It makes a world of difference in stability.
- Peel Early: Peel the parchment paper off while the cake is still warm. If the cake cools completely with the paper on, the design might stick to the paper rather than the cake.
Variations and Substitutions
- Chocolate Version: Swap 2 tablespoons of flour for cocoa powder in the yolk mixture for a chocolate sponge base.
- Fruit Filling: While the whipped cream is delicious on its own, adding sliced strawberries or a layer of raspberry jam between the sponges takes this Mother’s Day Cake to the next level.
- Citrus Zest: Add a teaspoon of lemon or orange zest to the yolk batter for a bright, spring-inspired flavor profile.
Storage and Freezing
To Store: Because of the fresh whipped cream, this cake must be kept in the refrigerator. It will stay fresh for up to 3 days. Cover it loosely with plastic wrap or a cake dome to prevent it from absorbing fridge odors.
To Freeze: You can freeze the sponge layers (without the cream) for up to a month. Wrap them tightly in plastic wrap and then foil. Thaw at room temperature before filling with fresh whipped cream.
FAQ
Can I use liquid food coloring?
I highly recommend against it. Liquid coloring adds too much moisture, which can make your piped design “bleed” into the rest of the cake during the bake. Stick to gel colors for crisp lines.
My design is blurry, what happened?
This usually happens for two reasons: either the egg whites weren’t whipped to stiff peaks (making the batter too thin), or the batter was over-mixed during the folding process.
Can I make this as a rectangular sheet cake?
Yes! You can use the same technique on a parchment-lined cookie sheet to make a Deco Roll (Swiss roll) style cake.
Happy Mother’s Day!
Making a Mother’s Day Cake is more than just a baking project—it’s a memory in the making. Mom will be so touched by the effort you put into the hand-piped design. Don’t forget to snap a photo for Pinterest before you dive in!
PrintMother’s Day Cake Recipe

A stunning and light chiffon-style cake with a custom design baked directly into the sponge. Filled with cloud-like whipped cream, it’s the ultimate Mother’s Day surprise.
- Prep Time: 45
- Cook Time: 10
- Total Time: 55
- Yield: 8 servings
- Category: Dessert
- Method: Baking
- Cuisine: American
Ingredients
6 egg yolks
4 Tbsp. sugar
4 Tbsp. vegetable oil
4 Tbsp. whole milk
2 tsp. vanilla extract
1 cup all-purpose flour
6 egg whites
2 Tbsp. cornstarch
1/2 tsp. vinegar
4 Tbsp. sugar (for whites)
Food dye gel (not liquid)
2 cups heavy whipping cream
5 Tbsp. confectioners sugar
Dash of salt
2 tsp. vanilla
Instructions
1. Preheat oven to 375°F. Grease an 8″ circular pan and line with parchment. Trace your design onto the parchment with an edible marker.
2. Separate yolks and whites into two bowls.
3. Whisk yolks, sugar, oil, milk, and vanilla until combined.
4. Sift in flour and cornstarch; whisk until smooth.
5. Whip egg whites in a stand mixer until frothy. Slowly add vinegar and sugar, whipping to stiff peaks.
6. Gently fold egg whites into yolk batter without deflating.
7. Remove small amounts of batter, dye with food gel, and place in piping bags.
8. Pipe your design onto the parchment. Chill in fridge for 5-8 minutes.
9. Pour remaining batter over the chilled design. Bake for 8-9 minutes.
10. Flip cake out immediately and peel off parchment. Bake remaining batter for extra layers.
11. Whip heavy cream, confectioners sugar, salt, and vanilla to stiff peaks.
12. Assemble by layering plain cake, whipped cream, and the designed cake on top.
Notes
Use gel colors only to prevent thinning the batter.
Be extremely gentle when folding egg whites to keep the cake airy.
Peel parchment while the cake is warm to ensure a clean design.