There is something inherently nostalgic about an icebox pie. It takes me back to sweltering July afternoons at my grandmother’s house, where the hum of the window AC unit was the soundtrack to our lives and the reward for a day spent playing outside was always a cold, creamy slice of something pulled straight from the freezer.
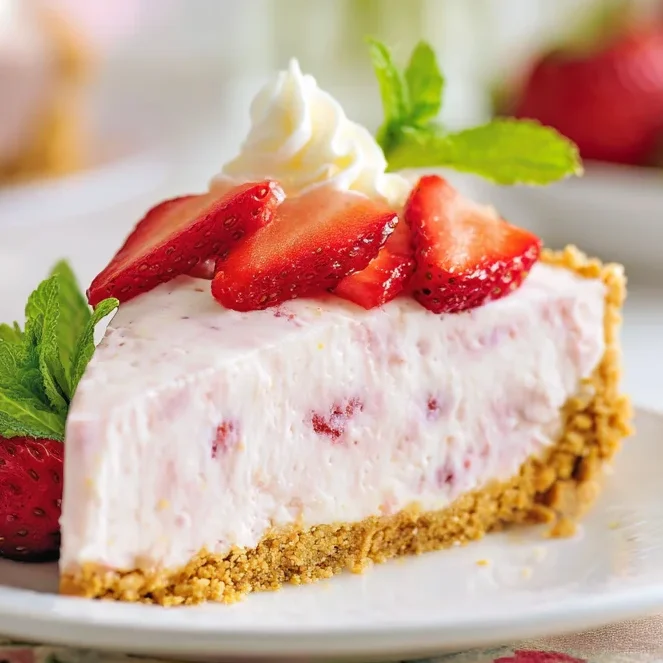
This No-Bake Frozen Strawberry Pie is exactly that kind of magic. It’s a vintage-inspired recipe that feels modern because it’s so incredibly simple. When the humidity hits and you can’t bear the thought of turning on the oven, this recipe is your best friend. With just five basic ingredients and a pre-made crust, you can whip up a dessert that looks like it came from a high-end bakery but tastes like home.
Whether you’re hosting a backyard barbecue, looking for the perfect 4th of July dessert, or just want a sweet treat to keep in the freezer for “emergencies,” this strawberry icebox pie is the answer. It’s light, refreshing, and has that perfect balance of tangy cream cheese and sweet summer berries.
Why You’ll Love This Recipe
- Only 5 Ingredients: No long grocery lists or complicated trips to specialty stores.
- Zero Baking Required: Keep your kitchen cool! The freezer does all the heavy lifting here.
- Make-Ahead Friendly: This pie needs to be made in advance, making it the ultimate stress-free dessert for entertaining.
- Irresistible Texture: It sits somewhere between a premium strawberry ice cream and a fluffy cheesecake.
- Customizable: Once you master the base, the flavor possibilities are endless.
Ingredient Notes
To get that perfect “mounded” look and silk-smooth texture, the quality and temperature of your ingredients matter. Here is what you’ll need:
- Graham Cracker Crust: I recommend using a nine-inch “deep dish” store-bought crust or making a homemade one. The deep-dish variety ensures you have plenty of room for that beautiful filling.
- Heavy Whipping Cream: Look for “heavy” cream rather than just “whipping” cream if possible; the higher fat content leads to more stable peaks and a creamier mouthfeel.
- Cream Cheese: You only need 4 ounces (half a standard block). Ensure it is softened to room temperature before you start beating it, or you’ll end up with tiny lumps in your pie.
- Sweetened Condensed Milk: This provides the sweetness and the structural “body” of the pie. Pro tip: Keep the can in the fridge for a few hours before using. Chilled condensed milk helps the filling set faster.
- Strawberry Puree:
- If using frozen: Look for strawberries frozen in syrup. Thaw them and pulse them in a blender.
- If using fresh: Hull about a pint of fresh berries, add 1/4 cup of granulated sugar, and let them sit for 10 minutes before blending. This “macerating” process draws out the juices and intensifies the flavor.
Step-by-Step Instructions
1. Prep and Chill
Start by making sure your pie shell and your liquid ingredients (cream and condensed milk) are very cold. A cold bowl and cold whisk attachments will also help your whipped cream reach its full potential much faster.
2. Whip the Cream
In a large bowl, beat the heavy whipping cream until stiff peaks form. You’ll know it’s ready when you lift the beaters and the cream stands straight up without drooping. Don’t overbeat, or you’ll end up with butter! Set this in the fridge immediately to stay cold.
3. Build the Base
In a separate large bowl, beat your softened cream cheese until it’s completely smooth. Slowly pour in the chilled sweetened condensed milk and the strawberry puree. Beat on medium speed until the color is uniform and the mixture is well-incorporated.
4. The Gentle Fold
This is the most important step for a light, airy pie. Take your whipped cream out of the fridge and gently fold it into the strawberry mixture using a rubber spatula. Use a “figure-eight” motion. You want to combine them without deflating all the air you just whipped into the cream.
5. Fill and Freeze
Pour the mixture into your graham cracker crust. If you’ve kept everything cold, the filling should be thick enough to mound slightly in the center. Smooth it out with your spatula and place it immediately into the freezer. Let it freeze for a minimum of 4 hours, though overnight is best.
Expert Tips for Best Results
- Temperature Control: I cannot stress this enough—keep it cold! If your filling gets too warm during the mixing process, it will be runny and won’t mound up in the crust.
- Room Temp Cream Cheese: While the liquids should be cold, the cream cheese must be soft. If it’s cold, it won’t incorporate into the condensed milk, and you’ll have white specks of plain cream cheese throughout your pink pie.
- The 10-Minute Rule: Before serving, set the pie on the counter for 10 minutes. This allows the edges to soften just enough that your knife slides through easily, giving you those clean, Instagram-worthy slices.
- Use a Hot Knife: To get those perfect slices, dip your knife in a tall glass of hot water and wipe it dry between every single cut.
Variations and Substitutions
- Chocolate Strawberry: Use a chocolate cookie crust (like Oreo) instead of graham cracker. The combination of chocolate and strawberry is a classic for a reason!
- Mixed Berry: Swap the strawberry puree for a raspberry or blackberry puree. Just be sure to strain out the seeds if you’re using raspberries for a smoother texture.
- Lemon Twist: Add a tablespoon of fresh lemon zest and a teaspoon of lemon juice to the filling to brighten up the strawberry flavor.
- Dairy-Free: While I haven’t tested it personally, many readers have had success using coconut whipping cream and a sweetened condensed coconut milk alternative.
Storage and Freezing
This pie is designed to live in the freezer!
- To Store: If you have leftovers, cover the pie tightly with plastic wrap and then a layer of aluminum foil to prevent freezer burn.
- Longevity: It will stay fresh and delicious for about a week. After that, the texture may start to become a bit icier, but it’s still perfectly safe (and tasty) to eat!
FAQ
Can I use Cool Whip instead of heavy cream?
You can, but the flavor and texture will be different. Freshly whipped cream provides a much richer, cleaner dairy flavor and a more “homemade” feel. If you use Cool Whip, you can skip the whipping step and just fold in an 8-ounce tub.
My pie didn’t set firmly. What happened?
The most common culprit is not whipping the cream to stiff peaks or using “liquid” (un-whipped) cream. Another reason could be using strawberries that were too watery without enough sugar to bind them. Ensure you follow the chilling instructions strictly!
Do I have to use a deep-dish crust?
This recipe makes a generous amount of filling. A standard 9-inch crust might overflow. If you only have a standard crust, just put the extra filling into a small ramekin and freeze it as a “chef’s treat!”
Conclusion
This No-Bake Frozen Strawberry Pie is the epitome of effortless summer elegance. It’s a crowd-pleaser that requires minimal effort but delivers maximum flavor. The next time you see a pint of beautiful red strawberries at the farmer’s market, grab them and make this pie—your future self (and your family) will thank you!
Happy “baking” (or rather, freezing)! If you make this, don’t forget to tag me on Instagram or pin this to your favorite dessert board on Pinterest. I love seeing your creations!
PrintNo-Bake Frozen Strawberry Pie
A vintage-style frozen strawberry icebox pie that is ultra-creamy, refreshing, and requires zero time in the oven. Perfect for hot summer days!
Ingredients
1 nine-inch graham cracker crust (deep dish recommended)
1 cup heavy whipping cream
4 ounces cream cheese, softened to room temperature
1 14-ounce can sweetened condensed milk, well-chilled
1 1/2 cups pureed strawberries (frozen in syrup or fresh with 1/4 cup sugar added)
Instructions
1. Ensure all your liquid ingredients and the pie shell are well-chilled before starting.
2. In a chilled glass bowl, whip the heavy cream until stiff peaks form. Place this in the refrigerator to keep cold while you prep the rest.
3. In a separate large mixing bowl, beat the cream cheese until smooth and creamy. Slowly beat in the chilled sweetened condensed milk and the strawberry puree until the mixture is uniform.
4. Gently fold the chilled whipped cream into the strawberry mixture using a spatula until no white streaks remain.
5. Pour the filling into the graham cracker crust. If you have kept everything cold and worked quickly, the filling will mound up beautifully above the rim.
6. Place the pie immediately into the freezer. Let it set for at least 4 hours, or ideally overnight.
7. Remove the pie from the freezer about 10 minutes before you plan to slice it. This allows it to soften just enough for a clean cut.
Notes
For the best texture, use a high-fat heavy whipping cream.
If using fresh strawberries, hull them and pulse in a blender with the sugar until smooth before measuring.
Keep leftovers wrapped tightly in plastic wrap or foil in the freezer for up to one week.