Every Halloween, my kitchen turns into a little spooky science lab, and these Perfect Nutter Butter Cookies are always the star experiment! I just adore how simple they are to make, and they bring so much joy to everyone who sees them. There’s something so magical about transforming a classic cookie into an adorable, ghostly treat. They’re a must-have for our Halloween celebrations, and I bet they’ll become a favorite in your home too!
Why You’ll Love This Perfect Nutter Butter Cookies
- They’re incredibly easy and fun to make, perfect for all skill levels!
- The adorable ghost design is a huge hit, especially with kids.
- You get that classic Nutter Butter peanut butter flavor with a sweet, crisp candy coating.
- They’re ideal for Halloween parties, school treats, or just a fun afternoon project.
Ingredients You’ll Need
- Nutter Butter sandwich cookies: These are the star of the show! There’s no substitute for that iconic peanut butter sandwich cookie.
- White melting candies: These give your ghosts their smooth, white coating. Candy melts are designed to melt smoothly and harden nicely, so I don’t recommend substituting with white chocolate chips, which can be finicky.
- Decorative candy eyes: These are essential for bringing your little ghosts to life! You can usually find them in the baking aisle or craft stores.
- Mini semi-sweet chocolate chips: We use these for the ghost’s mouth. Mini chips work best for scale, but if you only have regular, you could carefully cut them smaller.
How to Make Perfect Nutter Butter Cookies Step by Step
Let’s get started on these adorable treats! First, you’ll want to get your baking sheet ready. Just grab a piece of wax paper and lay it down – this is going to be the perfect spot for your dipped cookies to dry and harden without sticking. It makes cleanup a breeze too!
Next up, it’s time to melt your white candy. Pop your white melting candies into a small microwave-safe bowl. Now, this is important: heat them in short bursts, about 30 seconds at a time, at 50% power. After each interval, give them a good stir. This gentle heating prevents them from burning and keeps them nice and smooth. It usually takes about 4-5 minutes, but keep an eye on them – you want silky smooth, not scorched!
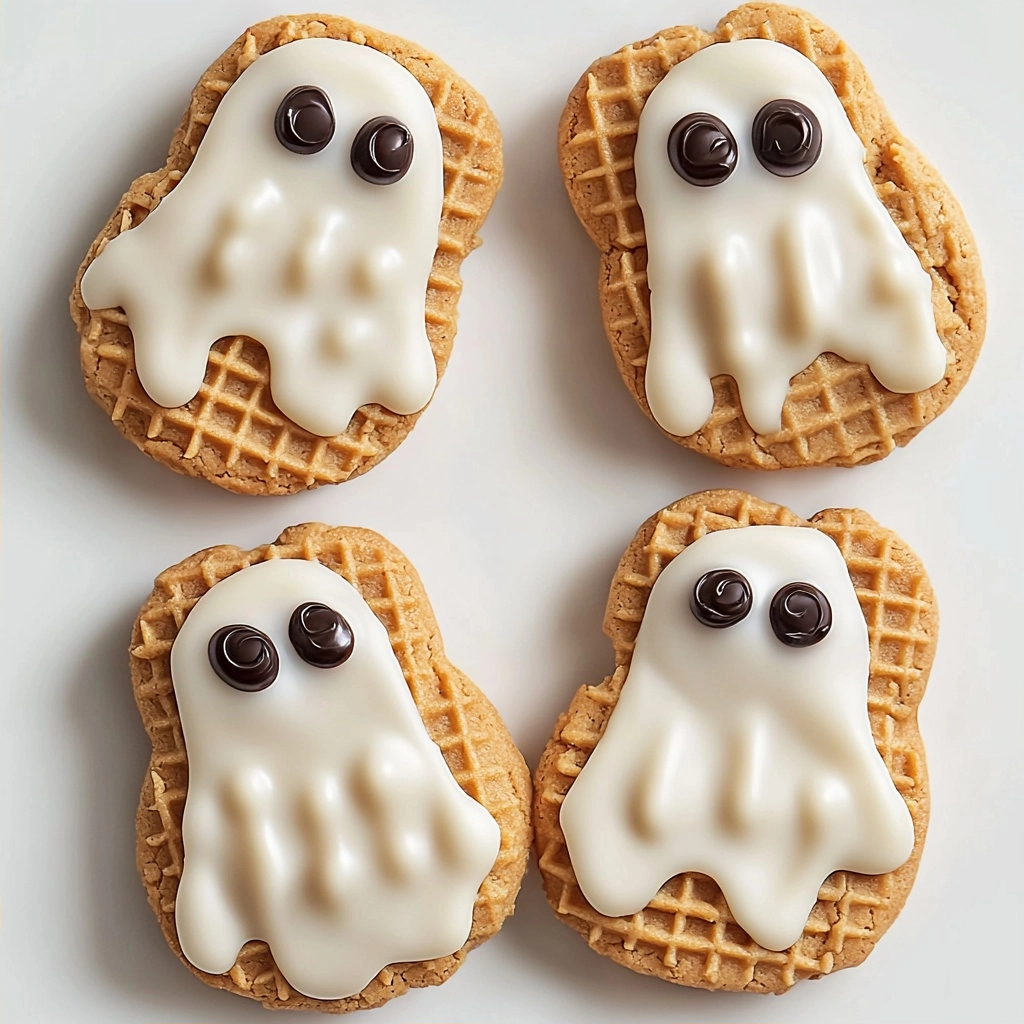
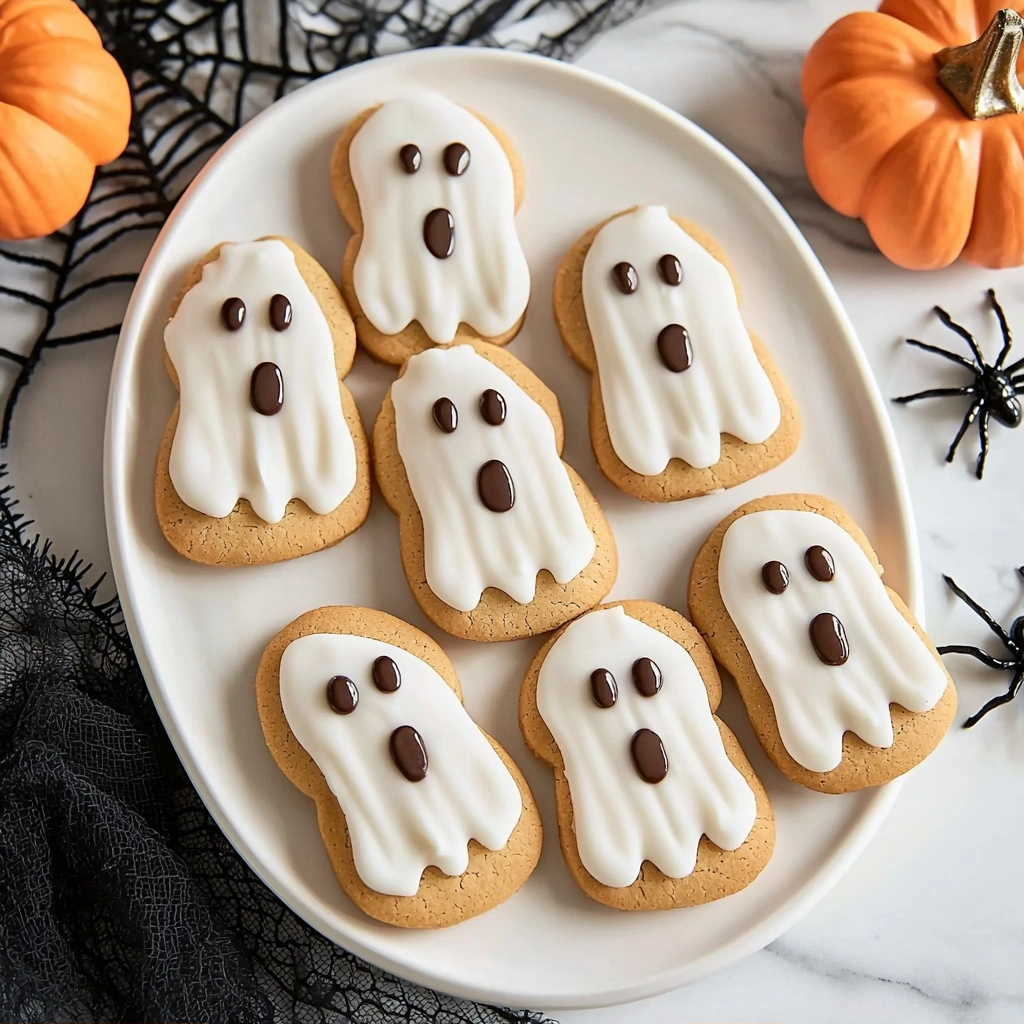
Now for the fun part! Hold a Nutter Butter cookie and dip it into the melted white candy. You want to cover about 70-75% of the cookie, leaving a little bit of the bottom exposed. Let any extra candy drip off – a gentle tap on the side of the bowl helps here. While that coating is still wet, quickly press two candy eyes and one mini chocolate chip onto the upper coated part. This is where your ghost comes to life! Place your decorated cookie onto the wax paper. Repeat with all your cookies, then let them sit for just 5-10 minutes. This short wait lets the candy harden, and then they’re ready to enjoy!
My Top Tips for Success
- I always use wax paper on my baking sheet; it’s a lifesaver for easy removal and cleanup.
- Trust me on this one: melt your candy melts slowly and at 50% power. It prevents scorching and keeps them smooth.
- Work quickly once your cookies are dipped! The candy coating sets fast, so get those eyes and mouths on right away.
- If your candy starts to thicken while you’re working, give it another quick 15-20 second zap in the microwave and stir well.
Common Mistakes to Avoid
- Overheating candy melts: This can make them seize up and become clumpy. Heat slowly, stir often, and use 50% power.
- Not letting excess candy drip off: This can lead to thick, uneven coatings that take longer to set. Gently tap the cookie to remove excess.
- Waiting too long to add decorations: The candy coating hardens quickly. Place the eyes and chocolate chips while the coating is still wet and tacky.
- Skipping the wax paper: Your cookies will stick to the baking sheet, making them hard to remove without damage.
How to Store Perfect Nutter Butter Cookies
- Room Temperature: Store in an airtight container at room temperature for up to 1 week.
- Refrigerator: Not recommended, as condensation can affect the candy coating.
- Freezer: Not recommended for decorated cookies, as thawing can cause condensation and affect the candy coating.
Frequently Asked Questions
Can I use white chocolate chips instead of candy melts?
While you can, I don’t recommend it. White chocolate chips tend to be much thicker and can be harder to work with for dipping, and they don’t always harden as nicely as candy melts do.
My candy melts are too thick. What can I do?
If your candy melts are too thick, you can add a tiny bit of coconut oil or vegetable shortening (about 1/2 teaspoon at a time) and stir it in. This will thin them out to a dippable consistency.
How far in advance can I make these?
You can make these Perfect Nutter Butter Cookies up to a week in advance. Store them in an airtight container at room temperature, and they’ll stay fresh and adorable.
Can kids help make these?
Absolutely! This is a fantastic recipe for kids to help with, especially adding the candy eyes and chocolate chip mouths. Just handle the hot melted candy yourself.
I hope these Perfect Nutter Butter Cookies bring as much joy and spooky fun to your kitchen as they do to mine. They are such a simple way to create something truly special for Halloween! If you make them, I’d love to hear how they turned out and see your adorable ghost creations!
PrintPerfect Nutter Butter Cookies

These adorable ghost-shaped Nutter Butter cookies are incredibly easy to make and perfect for a fun Halloween treat!
- Prep Time: 15
- Cook Time: 5
- Total Time: 20
- Yield: 12 cookies
- Category: Dessert
- Method: No-Bake
- Cuisine: American
Ingredients
- 12 Nutter Butter sandwich cookies
- 1 cup white melting candies
- 24 decorative candy eyes
- 12 mini semi-sweet chocolate chips
Instructions
- Line a baking sheet with wax paper.
- Place the wax paper-lined baking sheet aside.
- Place white melting candies in a small microwave-safe bowl.
- Microwave the candies in 30-second intervals at 50% power.
- Stir the candies between each interval to promote even melting.
- Continue heating and stirring for about 4-5 minutes, or until smooth.
- Hold one Nutter Butter sandwich cookie.
- Dip the cookie into the melted white candies, covering about 70-75% of it.
- Allow excess candy coating to drip off the cookie.
- Gently tap the cookie against the side of the bowl if needed.
- While the white candy coating is still wet, press two decorative candy eyes onto the upper coated part of the cookie.
- Press one mini semi-sweet chocolate chip onto the upper coated part of the cookie to create a ghost mouth.
- Place the decorated cookie onto the wax-paper-lined baking sheet.
- Repeat dipping and decorating with the remaining Nutter Butter cookies.
- Let the cookies set on the baking sheet for 5-10 minutes.
- Serve once the candy coating has hardened.
Notes
Melt candy melts slowly at 50% power to prevent scorching.
Work quickly when adding decorations, as the candy sets fast.
If candy thickens, microwave for 15-20 seconds and stir.
Use wax paper for easy removal of cookies.