
Welcome, cookie lovers! Are you ready to discover a dessert that’s as enchanting to look at as it is delightful to eat? We’re diving into the world of Chocolate Cherry Cookies – a recipe that promises to be your new favorite for any occasion. Imagine: a rich, fudgy chocolate cookie base, studded with vibrant, sweet maraschino cherries, all topped with a luscious, glossy chocolate-cherry glaze that’s simply irresistible.
These aren’t just any cookies; they’re a symphony of flavors and textures, designed to bring a little bit of magic to your everyday and a whole lot of cheer to your holiday table. Forget complicated bakes; this recipe is surprisingly straightforward, delivering professional-looking, bakery-quality cookies right from your own kitchen. Whether you’re a seasoned baker or just starting your culinary journey, get ready to impress everyone (including yourself!) with these show-stopping treats.
Why You’ll Fall in Love with These Chocolate Cherry Cookies
There are cookies, and then there are these cookies. What makes our Chocolate Cherry Cookies truly stand out? Let me count the ways!
- Irresistible Flavor Combination: The deep, slightly bitter notes of cocoa perfectly complement the bright, sweet-tart burst of maraschino cherries. It’s a classic pairing that never disappoints, elevated to cookie perfection.
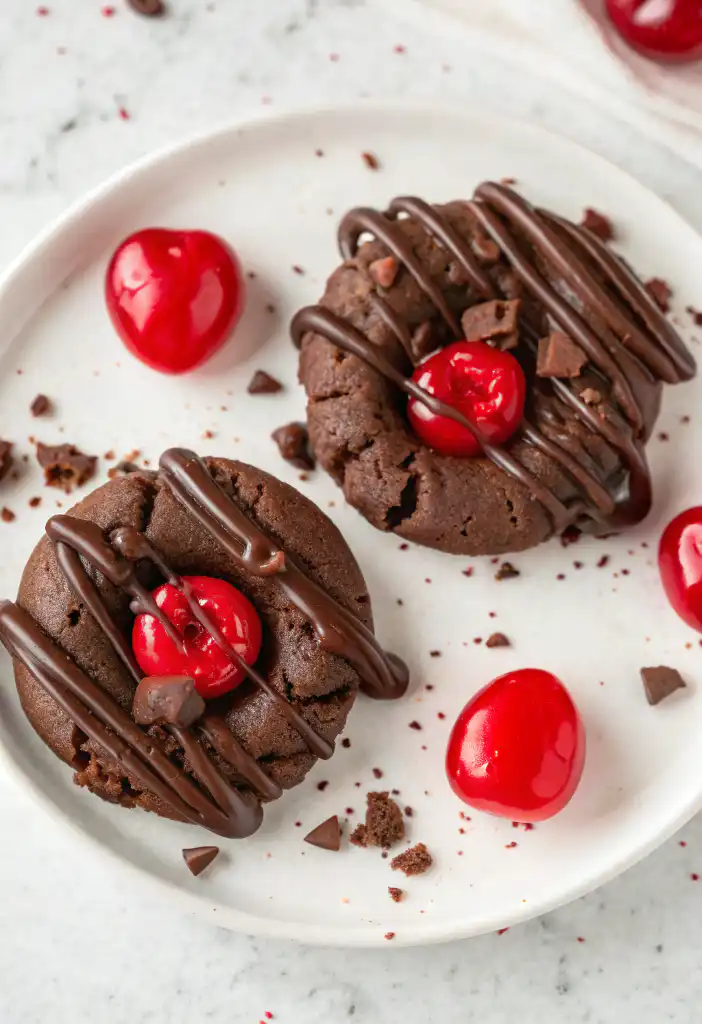
- Beautiful Presentation: Each cookie is a miniature work of art. The deep chocolate hue, the striking crimson of the cherry, and the elegant drizzle of the shiny glaze make them incredibly photogenic and utterly appealing. They’re a feast for the eyes before they even reach your palate.
- Surprisingly Easy to Make: Don’t let their gourmet appearance fool you. This recipe breaks down the process into simple, manageable steps, ensuring success even for novice bakers. With clear instructions and our expert tips, you’ll be whipping up batches in no time.
- Perfect for Any Occasion: While they shine during the holiday season with their festive colors, these cookies are versatile enough for any celebration – birthdays, potlucks, bake sales, or simply a cozy night in with a cup of coffee.
- Chewy, Fudgy Texture: We’ve perfected a cookie base that’s moist, tender, and beautifully chewy. It holds its shape perfectly while offering that satisfying bite we all crave in a great cookie.
- That Glaze! Oh, the glaze! Made with semi-sweet chocolate chips, sweetened condensed milk, and a touch of maraschino cherry juice, it’s not just a topping; it’s a creamy, dreamy, extra layer of flavor and luxurious texture that ties the whole cookie together.
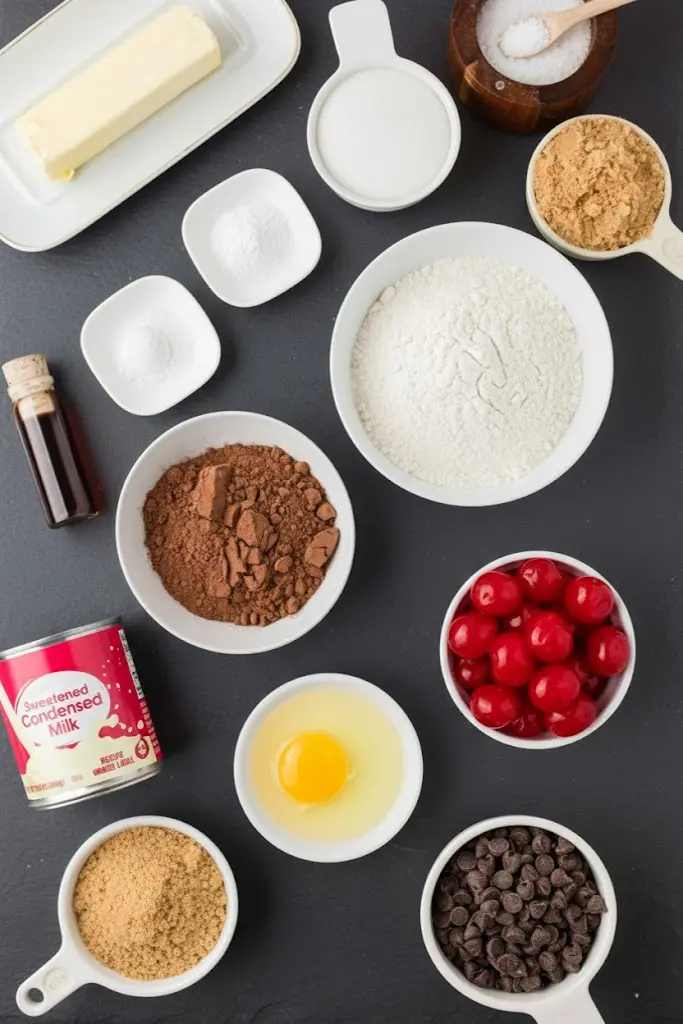
The Secret to the Best Chocolate Cherry Cookies: Key Ingredients & Their Roles
Crafting the perfect cookie starts with understanding your ingredients. Each component in this recipe plays a crucial role in achieving that delightful flavor and texture.
Maraschino Cherries: The Star of the Show
These vibrant red beauties are non-negotiable for that classic chocolate cherry cookie experience.
- Why blot them dry? Maraschino cherries come packed in syrup, and excess moisture can negatively impact your cookie dough, leading to a flatter, less desirable texture. A quick pat with a paper towel ensures they integrate beautifully without making your dough too wet.
- Cherry Juice: Don’t discard that juice! It’s the secret ingredient for our glaze, infusing it with extra cherry flavor and a lovely pinkish hue.
Cocoa Powder: For That Rich Chocolatey Depth
We recommend using a good quality unsweetened cocoa powder.
- Natural vs. Dutch-Processed: While natural cocoa powder is fine, Dutch-processed cocoa powder will give you a darker, richer color and a smoother, less acidic chocolate flavor, which pairs wonderfully with the sweetness of the cherries and glaze. Either will work, but for a truly decadent chocolate, go Dutch!
Butter: The Foundation of Flavor and Texture
Our recipe calls for salted butter, softened.
- Softened Butter is Key: This is crucial for proper creaming with the sugars. Cold butter won’t incorporate air effectively, leading to dense cookies. Melted butter will make your cookies spread too much. Softened butter should be pliable but still cool to the touch. If you only have unsalted butter, simply increase the added salt in the recipe to about ¾ to 1 teaspoon, depending on your preference.
Sugars (Light Brown & Granulated): The Perfect Sweetness and Chewy Texture
- Light Brown Sugar: Adds moisture and contributes to the chewy texture and a subtle caramel note. Make sure it’s packed when measuring!
- Granulated Sugar: Provides crispness to the edges and sweetness, ensuring the cookies aren’t overly soft. The combination gives the ideal balance.
Sweetened Condensed Milk: The Magic in the Glaze
This thick, sweet milk is the hero of our glaze.
- It melts beautifully with chocolate chips, creating a glossy, rich, and incredibly smooth topping that sets perfectly. It’s the easiest way to make a decadent glaze without needing powdered sugar.
Leavening Agents: Baking Powder & Baking Soda
- Baking Powder: Provides lift and contributes to a softer, cake-like texture.
- Baking Soda: Reacts with the acidic cocoa powder (if using natural cocoa) and brown sugar to help the cookies spread and create a tender crumb. The combination ensures a perfectly balanced rise and spread.
Essential Equipment for Cookie Success
Having the right tools makes all the difference in the kitchen, especially when baking. Here’s what you’ll need for these Chocolate Cherry Cookies:
- 1 Tablespoon Cookie Scoop: This is a game-changer! It ensures uniform cookie size, which means even baking and professional-looking results.
- Cookie Sheets: You’ll need two, ideally light-colored ones. Darker sheets can cause the bottoms of cookies to brown too quickly.
- Pre-Cut Parchment Paper Sheets: A true lifesaver for easy cleanup and preventing sticking. It also helps with even baking. Silicone baking mats (Silpat) work great too.
- Small Bowl: For whisking your dry ingredients.
- Large Mixing Bowl: For combining wet and dry ingredients.
- Electric Mixer (Handheld or Stand Mixer with Paddle Attachment): Essential for creaming the butter and sugars until light and fluffy, which is vital for the cookie’s texture.
- Small Saucepan: For melting the glaze ingredients gently over low heat.
- Wire Rack: For cooling the cookies completely before glazing. This prevents sogginess and helps the glaze set properly.
- Piping Bag (optional, but recommended): For a neat, controlled drizzle of the glaze. A Ziploc bag with a tiny corner snipped off works just as well!
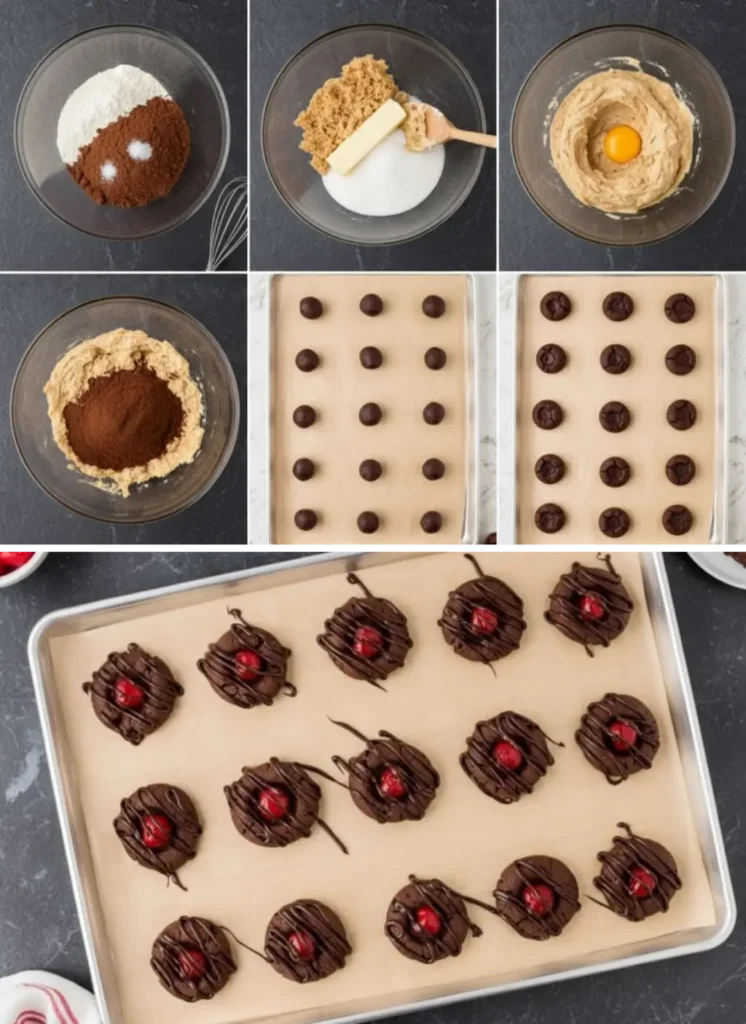
Step-by-Step: How to Make Chocolate Cherry Cookies (A Visual Guide to Perfection)
Let’s break down the baking process, ensuring every step is clear and easy to follow.
Part 1: Crafting the Chocolate Cherry Cookie Dough
- Preheat and Prepare: Begin by preheating your oven to 350°F (175°C). Line two baking sheets with parchment paper. This step is key for easy removal and consistent baking.
- Whisk Dry Ingredients: In a small bowl, combine the all-purpose flour, unsweetened cocoa powder, salt, baking powder, and baking soda. Whisk them together thoroughly. This prevents pockets of leavening agents or salt in your finished cookies. Set this bowl aside.
- Cream Butter and Sugars: In your large mixing bowl, using an electric mixer (stand or handheld), cream together the softened salted butter, packed light brown sugar, and granulated sugar. Beat on medium-high speed for 2-3 minutes until the mixture is light, fluffy, and pale in color. This process incorporates air, which is crucial for a tender cookie.
- Add Egg and Vanilla: Scrape down the sides of the bowl. Add the room temperature large egg and vanilla extract. Mix on medium speed until fully incorporated, about 1 minute. Don’t overmix here, just until everything comes together.
- Combine Wet and Dry: Gradually add the dry ingredient mixture to the wet ingredients. Do this in 2-3 additions, mixing on low speed just until combined after each addition. Crucial Tip: Stop mixing as soon as no dry streaks remain. Overmixing at this stage can develop too much gluten, resulting in tough cookies. The dough will be thick and slightly sticky. Scrape down the bowl and gently form the dough into a ball to make scooping easier.
- Scoop and Shape: Using a 1 tablespoon cookie scoop, portion out the dough. Roll each portion gently between your palms to form a smooth ball. Place 12 dough balls evenly spaced on each prepared baking sheet.
- Add Cherries: Take a ½ teaspoon measuring spoon, or use your clean thumb or index finger, to create a small indentation in the center of each cookie dough ball. Carefully place one blotted-dry maraschino cherry into each indentation. Gently press it in so it’s nestled in the dough.
Part 2: Baking and Cooling Your Cookies
- Bake to Perfection: Bake the cookies for 10-12 minutes. You’ll know they’re done when the edges are set, and the tops look slightly cracked but the centers are still a bit soft. Do not overbake! This is key for a chewy cookie.
- Cooling Time: Remove the cookie sheets from the oven. Let the cookies cool on the baking sheet for 5 minutes. This allows them to firm up slightly before you move them. After 5 minutes, carefully transfer them to a wire rack to cool completely. Important: Ensure they are completely cool before applying the glaze; otherwise, the glaze will melt and run off.
Part 3: Whipping Up the Luscious Chocolate Cherry Glaze
- Melt Glaze Ingredients: In a small saucepan, combine the semi-sweet chocolate chips and sweetened condensed milk. Place the saucepan over very low heat. Stir frequently until the chocolate chips are fully melted and the mixture is smooth, glossy, and well combined. This should take just a few minutes. Avoid high heat, which can scorch the chocolate.
- Add Cherry Juice: Remove the saucepan from the heat. Stir in 1 tablespoon of the maraschino cherry juice. Assess the consistency. If you prefer a thinner glaze that drizzles more easily, add up to an additional 1 tablespoon of cherry juice, stirring well after each addition until your desired consistency is reached.
- Glaze the Cookies: Transfer the warm glaze to a piping bag with a small round tip, or a sturdy Ziploc bag with a tiny corner snipped off. Alternatively, you can simply use a small spoon to drizzle the glaze over each completely cooled cookie. Get creative with your drizzle pattern!
- Set the Glaze: Allow the glazed cookies to sit at room temperature for about 10 minutes, or until the glaze has set and is no longer sticky. Then, they are ready to serve and enjoy!
Expert Tips & Tricks for Flawless Chocolate Cherry Cookies
Achieving cookie perfection is all about the details. Here are some pro tips to ensure your Chocolate Cherry Cookies turn out absolutely flawless every time:
- Room Temperature Ingredients are Non-Negotiable (Mostly): While I mentioned it’s not a huge deal if your egg isn’t perfectly room temperature, it truly helps with emulsification. For butter, it’s essential. Softened butter creams with sugar to incorporate air, which creates a lighter, fluffier cookie. Cold butter will result in a dense cookie, and melted butter will make them spread excessively.
- Don’t Overmix the Dough: Once you add the flour mixture, mix just until combined. Overmixing develops gluten, which leads to tough, less tender cookies. A few streaks of flour are better than overmixing!
- Blot Those Cherries! Seriously, don’t skip this step. Excess liquid from the maraschino cherries can throw off the dough consistency, causing your cookies to spread too much or become soggy.
- Parchment Paper is Your Best Friend: It prevents sticking, aids in even baking, and makes cleanup a breeze. Plus, sliding cookies off a sheet of parchment paper onto a cooling rack is far gentler than prying them off a bare pan.
- Achieve the Right Glaze Consistency: The amount of cherry juice you add to the glaze is flexible. Start with 1 tablespoon, then slowly add more if you want a thinner, more free-flowing drizzle. If it’s too thin, you can add a tiny bit more melted chocolate (ensure it’s cooled slightly) to thicken it.
- Cool Completely Before Glazing: Patience is a virtue here! Glazing warm cookies will cause the glaze to melt and run, creating a messy rather than a beautiful finish.
- Invest in a Cookie Scoop: Seriously, it’s not just for aesthetics. Uniformly sized cookies bake evenly, meaning no burnt edges or raw centers.
- Don’t Overbake: These cookies are meant to be chewy and soft in the center. They might look slightly underdone when you pull them out, but they will continue to cook slightly on the hot baking sheet. Look for set edges and slightly cracked tops.
Flavor Variations & Customization Ideas
While these Chocolate Cherry Cookies are perfect as they are, don’t be afraid to experiment!
- Nutty Twist: For added crunch and flavor, fold in ½ cup of finely chopped pecans or walnuts into the cookie dough along with the dry ingredients.
- White Chocolate Drizzle: Instead of or in addition to the chocolate-cherry glaze, melt some white chocolate and drizzle it over the cooled cookies for an elegant contrast.
- Almond Extract Boost: For an even more pronounced cherry-almond flavor (a classic pairing with cherries!), add an extra ¼ teaspoon of almond extract to the cookie dough along with the vanilla.
- Mini Chocolate Chips: Add ½ cup of mini semi-sweet or milk chocolate chips to the cookie dough for an extra burst of chocolate in every bite.
- Orange Zest: A tiny bit of orange zest (1 teaspoon) in the cookie dough can brighten the flavors beautifully, adding a subtle citrus note.
- Sprinkle Fun: Before the glaze sets, sprinkle some festive holiday sprinkles, edible glitter, or finely chopped pistachios for an extra pop of color and texture.
Storage & Freezing Instructions (Keep Your Cookies Fresh!)
So you’ve baked a batch (or two!) of these delightful cookies. Here’s how to keep them fresh and delicious for as long as possible:
- Room Temperature Storage: Once the glaze has fully set, store the Chocolate Cherry Cookies in an airtight container at room temperature. They will stay fresh and soft for up to 3-4 days.
- Refrigeration: If you prefer a slightly firmer cookie or need to store them longer, you can keep them in an airtight container in the refrigerator for up to a week. Let them come to room temperature for about 15-20 minutes before serving for the best texture.
- Freezing Baked Cookies (with Glaze): These cookies freeze beautifully! Once the cookies are completely cooled and the glaze is fully set, arrange them in a single layer on a baking sheet and flash freeze for about 30 minutes (this prevents them from sticking together). Then, transfer the frozen cookies to a freezer-safe airtight container or heavy-duty freezer bag. Separate layers with parchment paper to protect the glaze. They can be frozen for up to 2-3 months. Thaw at room temperature for a few hours before serving.
- Freezing Cookie Dough: You can also prepare the cookie dough ahead of time and freeze it. Form the dough balls (without the cherries), then arrange them on a parchment-lined baking sheet and flash freeze until solid. Transfer the frozen dough balls to a freezer-safe bag and freeze for up to 3 months. When ready to bake, place frozen dough balls on a baking sheet, create the indentation, add the cherry, and bake as directed, adding 1-2 minutes to the bake time.
Frequently Asked Questions About Chocolate Cherry Cookies
Here are answers to some common questions you might have about making these delightful cookies:
What are maraschino cherries?
Maraschino cherries are a type of preserved, sweetened cherry, typically made from light-colored sweet cherries (like Royal Ann or Rainier). They are brined, dyed a bright red (or sometimes green or yellow), and then steeped in a sugar syrup, often flavored with almond extract. They are famous for their use in cocktails and desserts, adding a sweet, fruity flavor and a striking pop of color.
Can I use fresh cherries instead of maraschino cherries in this recipe?
For this specific recipe, maraschino cherries are highly recommended. Fresh cherries contain significantly more moisture, which would alter the dough’s consistency and lead to a very different (likely flat and wet) cookie. The sweetness and texture of maraschino cherries are also quite distinct and integral to the intended flavor profile of these cookies. If you wish to use fresh cherries, you’d need a different recipe specifically formulated for them.
How long do these cookies stay fresh?
When stored in an airtight container at room temperature, these Chocolate Cherry Cookies will remain fresh and delicious for 3-4 days. If you refrigerate them, they can last up to a week, though they might become a bit firmer. Always ensure the glaze is fully set before storing.
Can I make the cookie dough ahead of time?
Absolutely! You can prepare the cookie dough up to 2-3 days in advance. Store it covered tightly with plastic wrap in the refrigerator. When ready to bake, let it sit at room temperature for about 15-20 minutes to soften slightly before scooping and proceeding with the recipe. As mentioned above, you can also freeze the dough balls for longer storage.
Why are my cookies flat or spread too much?
Several factors can contribute to cookies spreading too much:
- Butter too warm/melted: Ensure your butter is softened, not melted or greasy.
- Overmixing the dough: Too much mixing develops gluten, leading to flatter cookies.
- Too little flour: Ensure accurate measurements (use a kitchen scale if possible).
- Oven temperature issues: An oven that isn’t hot enough can cause cookies to spread before setting.
- Cherries not blotted dry: Excess moisture from the cherries.
- Not chilling dough (if a recipe calls for it): This recipe doesn’t strictly require chilling, but if your kitchen is very warm, a brief chill (20-30 minutes) can help.
The Perfect Pairing: What to Serve with Your Chocolate Cherry Cookies
These decadent cookies are fantastic on their own, but they also pair wonderfully with a variety of beverages and desserts.
- Classic Milk: A tall, cold glass of milk is the quintessential cookie companion, offering a refreshing contrast to the rich flavors.
- Coffee or Espresso: The deep chocolate and cherry notes sing alongside a freshly brewed cup of coffee or a strong espresso, perfect for an afternoon pick-me-up or after-dinner treat.
- Tea: For a lighter pairing, a cup of black tea or even a fruit-infused herbal tea can be delightful.
- Vanilla Ice Cream: Warm up a cookie slightly and serve it alongside a scoop of creamy vanilla ice cream for an indulgent dessert experience.
- Hot Chocolate: Double down on the chocolate goodness by pairing these cookies with a steaming mug of hot chocolate, especially cozy during colder months.
Ready to Bake? Share Your Chocolate Cherry Cookie Creations!
There you have it – everything you need to bake a batch of the most delicious and visually stunning Chocolate Cherry Cookies you’ve ever made. From the perfectly chewy chocolate base to the bright pop of maraschino cherries and that glorious, glossy glaze, every bite is a little piece of heaven.
These cookies aren’t just a recipe; they’re an experience waiting to happen. Whether you’re making them for a special occasion, to gift to loved ones, or simply to treat yourself (you deserve it!), they’re guaranteed to bring smiles and satisfy even the most discerning sweet tooth.
So, gather your ingredients, follow these steps, and get ready to fill your home with the incredible aroma of freshly baked chocolate and cherry. Don’t forget to snap a picture of your creations and share them with us! We can’t wait to see your irresistible Chocolate Cherry Cookies. Happy baking!
PrintChocolate Cherry Cookies with Glaze
Chocolate Cherry Cookies are full of maraschino cherries, maraschino cherry juice, a chocolate cookie base, and a sweetened condensed milk cherry glaze over top. They’re so pretty and so delicious!
- Prep Time: 15
- Cook Time: 10
- Total Time: 45
- Yield: 24
- Category: Cookies, Dessert
- Method: Baking
- Cuisine: American
Ingredients
1½ cups all-purpose flour
1/2 cup unsweetened cocoa powder
½ teaspoon salt (I use kosher salt or sea salt)
½ teaspoon baking powder
¼ teaspoon baking soda
1/2 cup (1 stick) salted butter softened
1/2 cup packed light brown sugar
1/2 cup granulated sugar
1 large egg room temperature
2 teaspoons vanilla extract
22 maraschino cherries (blotted dry with paper towel)
1/2 cup semi-sweet chocolate chips
1/2 cup sweetened condensed milk
1–2 tablespoons maraschino cherry juice (from the jar of cherries)
Instructions
1. Preheat the oven to 350℉ (175°C). Prepare two baking sheets by lining them with parchment paper. Set aside.
2. In a small bowl, add the flour, unsweetened cocoa powder, salt, baking powder, and baking soda. Whisk until combined. Set aside.
3. In large mixing bowl using an electric mixer, or use the bowl of a stand mixer fitted with the paddle attachment, cream together the butter, light brown sugar, and sugar until light & fluffy (at least 2-3 minutes).
4. Add in the egg and vanilla extract, and mix until the ingredients are fully incorporated.
5. Gradually add the dry ingredients (from the small bowl) into the larger bowl of wet ingredients, mixing on low speed after each addition just until combined. The dough will be thick and slightly sticky. Scrape down the bottom and sides of the bowl and form the dough into a large ball to make it easier to scoop.
6. Use a 1 tablespoon cookie scoop (or measuring spoon) to create cookie balls. Use your hands to roll them into round balls. Place 12 dough balls per cookie sheet.
7. Use a 1/2 teaspoon measuring spoon, or your clean thumb or index finger, to create a small indentation in the center of each cookie dough ball. Place one blotted dry maraschino cherry into the center of each indentation.
8. Bake the cookies for 10-12 minutes, until the edges are set and the tops look slightly cracked.
9. Remove the cookies from the oven and allow them to cook on the baking sheet for 5 minutes before transferring them to a wire rack to cool completely before glazing.
10. In a small saucepan, over low heat, melt the semisweet chocolate chips and the sweetened condensed milk. Stirring frequently until smooth and glossy.
11. Stir in 1 tablespoon of the maraschino cherry juice. Add up to an additional 1 tablespoon of maraschino cherry juice depending on your preferred consistency.
12. Transfer the chocolate cherry glaze to a piping bag with a small tip, a ziplock bag with the corner snipped, or a spoon, and drizzle the chocolate cherry frosting over top each cookie.
13. Allow the frosting to set at room temperature for about 10 minutes before serving.
Notes
**Butter:** If using unsalted butter, increase the salt to about 3/4 teaspoon or up to 1 teaspoon depending on preference. Make sure the butter is softened to avoid lumps of butter and to help the mixture be smoother.
**Egg:** Place the egg out at room temperature for up to 30 minutes before baking the cookies. I don’t always remember to use a room temperature egg and it’s not a big deal. A room temperature egg just helps all the ingredients blend together more smoothly.
*I recommend using parchment paper but you could also use a silpat baking liner or cooking spray.


