
Nothing signals the arrival of spring quite like the appearance of those iconic gold-wrapped chocolate eggs on store shelves. But what if you could recreate that nostalgic, gooey magic in your own kitchen? These Homemade Chocolate Creme Eggs are not just a copycat; they are an upgrade. By using high-quality milk chocolate and a fresh, buttery fondant filling, you achieve a level of flavor and texture that mass-produced candy simply can’t match. This recipe uses a clever mini-muffin tin technique, making it accessible for home bakers of all levels without requiring specialized egg molds. Get ready to impress your friends and family with a treat that looks professional but tastes like home.
Why You’ll Love This Recipe
You are going to fall in love with this recipe because it strikes the perfect balance between fun and flavor. Unlike store-bought versions that can sometimes feel overly waxy or cloyingly sweet, these homemade eggs use real butter and vanilla, resulting in a creamy, melt-in-your-mouth experience. This recipe is also incredibly versatile; you can swap the milk chocolate for dark or white chocolate depending on your preference. Plus, it’s a fantastic family activity! Kids love helping with the piping and watching the “yolk” appear in the center of the egg. It’s a rewarding, no-bake project that yields a large batch, perfect for gifting in Easter baskets or sharing at spring gatherings.
What Is a Chocolate Creme Egg?
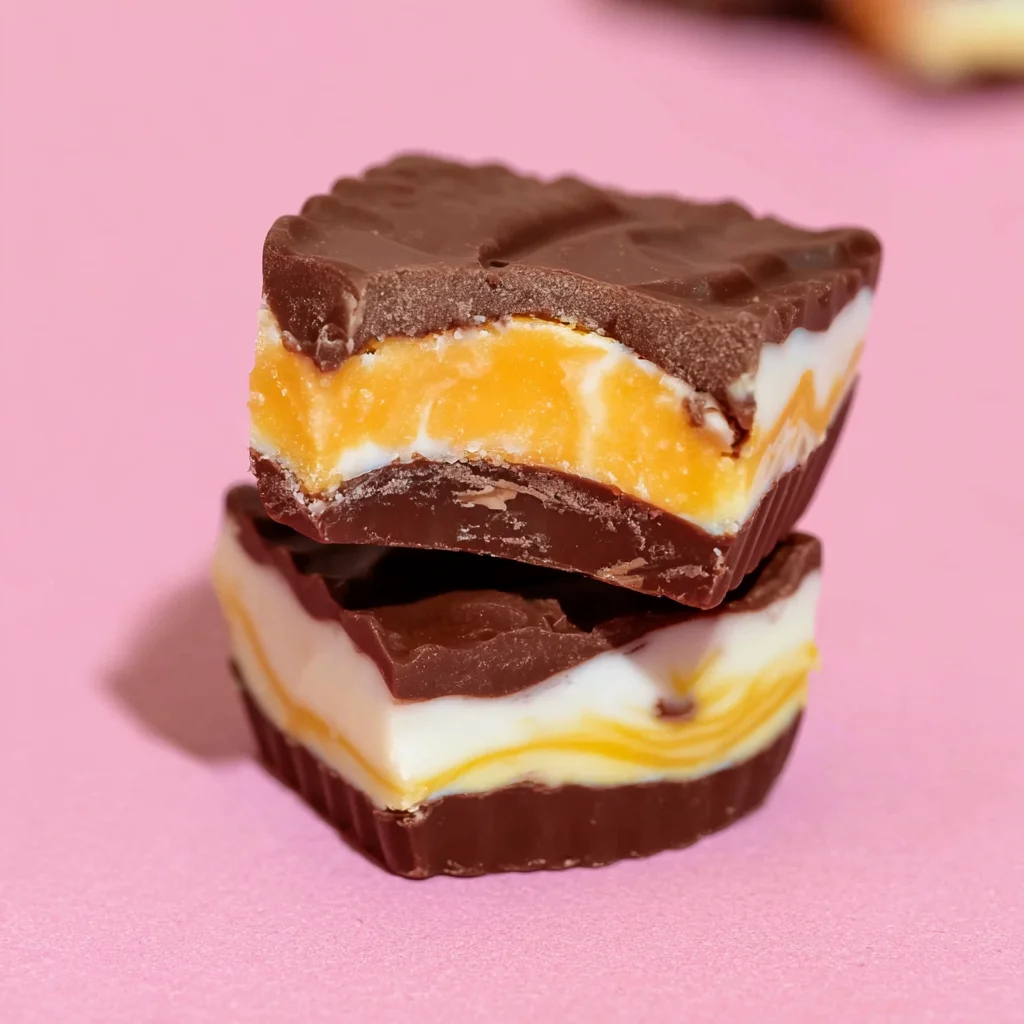
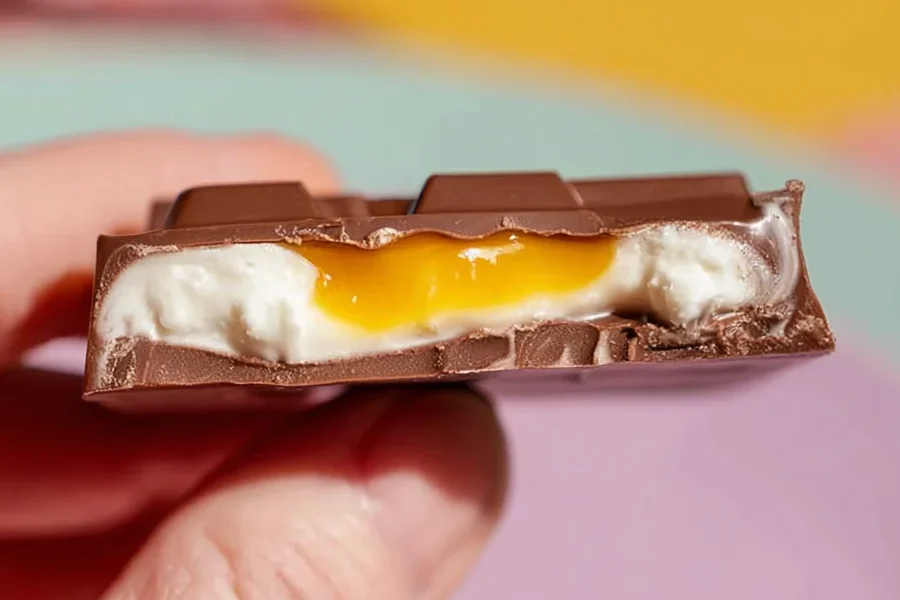
A Chocolate Creme Egg is a traditional confectionery treat most famous during the Easter season. It consists of a thick, protective chocolate shell that houses a soft, semi-liquid fondant filling. The hallmark of a true creme egg is the visual surprise inside: the white “albumen” and the yellow or orange “yolk,” both made of the same sweet fondant but colored differently to mimic a real egg. This recipe replicates that iconic contrast using a simple mixture of butter, corn syrup, and powdered sugar. The result is a “mock yolk” that is structurally sound enough to stay in place but soft enough to provide that signature gooey “pull” when you take a bite.
Ingredients Overview
To achieve the perfect homemade creme egg, you’ll need a few pantry staples and some specific candy-making essentials:
- Milk Chocolate: This recipe calls for 32 ounces (two 16 oz packages). It is crucial to use a high-quality melting chocolate or high-grade chocolate chips to ensure a smooth finish and a satisfying “snap” when bitten.
- Light Corn Syrup: This is the secret to the gooey, flowing texture of the fondant. It prevents the sugar from crystallizing, keeping the center smooth.
- Butter: Softened unsalted butter adds a richness and creaminess to the filling that sets it apart from store-bought versions.
- Powdered Sugar: Also known as confectioners’ sugar, this provides the bulk and sweetness of the filling.
- Gel Food Coloring: Specifically orange and yellow. Gel colors are preferred over liquid drops because they are highly concentrated and won’t change the consistency of your fondant.
- Vanilla Extract & Salt: These are essential for balancing the sweetness and adding depth of flavor.
Ingredient Substitutions & Tips
If you want to put a unique spin on these eggs, there are several easy substitutions. For a more sophisticated palate, try using a 70% dark chocolate shell to contrast the sweet filling. If you are looking for a dairy-free option, you can substitute the butter with a high-quality vegan butter stick and use dairy-free chocolate. For the filling, if you don’t have corn syrup, some bakers use honey or agave, though this will slightly alter the flavor profile. Pro Tip: Always sift your powdered sugar! Even small lumps can clog your piping tips and create an uneven texture in the “egg white” portion of your candy.
Step-by-Step Instructions
- Prep the Molds: Line 48 mini muffin cups with parchment paper liners. This ensures easy removal and a clean finish.
- The First Layer: Melt 16 ounces of milk chocolate in the microwave in 20-second increments. Pipe a thin layer into the bottom of each liner. Tap the pan firmly on the counter to level the chocolate.
- Create the Fondant Base: In a stand mixer, cream the softened butter and corn syrup. Add the milk, vanilla, and salt. Gradually mix in the powdered sugar until a stiff, smooth dough forms.
- The “Yolk” Secret: Separate about one-third of the mixture. Stir in the orange and yellow gel food coloring until you achieve a vibrant “egg yolk” hue.
- Piping the Centers: Load the white fondant into a piping bag with a 1/2-inch opening. Pipe a generous layer over the set chocolate. Then, use a smaller bag for the orange fondant to pipe a small “yolk” dot right in the center.
- The Final Seal: Melt the remaining 16 ounces of chocolate. Pipe it over the fondant, ensuring you reach the edges of the liner to “trap” the filling inside.
- Setting the Eggs: Tap the pan one last time to smooth the top. Refrigerate for at least 30 minutes. This cold snap helps the chocolate contract slightly from the liner, making them easy to pop out.
Expert Baking Tips
To get that professional, glossy look, avoid overheating your chocolate. If chocolate gets too hot, it can “bloom” (develop white streaks). Melt it slowly and stir frequently. If your fondant mixture feels too soft to pipe, place the bowl in the refrigerator for 10 minutes to firm up. Another expert trick: use a toothpick to swirl the orange “yolk” slightly if you want a more marbled, realistic interior look. When tapping the pans, don’t be afraid to be firm—this is the only way to remove air bubbles that might cause the chocolate shells to crack later.
Customizing Your Shapes and Sizes
While this recipe is designed for mini muffin tins for ease of use, you can certainly use silicone egg molds for a more traditional shape. If using molds, you will want to “paint” the chocolate onto the sides of the mold with a pastry brush, let it set, then fill with fondant and seal. You can also make “Jumbo” eggs using standard-sized muffin tins, but be aware that the ratio of chocolate to filling will change, and they will require a longer setting time in the refrigerator. For a festive touch, drizzle the finished eggs with colored white chocolate or add a pinch of sea salt to the top.
Serving Suggestions
These Homemade Chocolate Creme Eggs are best served at room temperature to allow the center to reach its maximum gooey potential. Arrange them on a pastel-colored platter for an Easter brunch dessert, or wrap individual eggs in colorful foil to mimic the classic store-bought look. They also make incredible toppings for Easter-themed cupcakes or brownies—simply press a finished egg into the frosting of a chocolate cupcake for a decadent, over-the-top treat.
Storage & Make-Ahead Tips
These candies are perfect for making in advance. You can store them in an airtight container at room temperature for up to two weeks, or in the refrigerator for up to a month. If you live in a warm climate, refrigeration is recommended to prevent the chocolate from softening. For long-term storage, you can freeze them for up to three months; just be sure to thaw them in the refrigerator overnight before bringing them to room temperature to prevent the chocolate from “sweating.”
FAQs
Q: Can I use liquid food coloring instead of gel?
A: It is not recommended. Liquid coloring adds moisture, which can make the fondant too runny to pipe properly. Gel provides the best color without changing the texture.
Q: Why did my chocolate shell crack?
A: This usually happens if the chocolate layer is too thin or if the fondant filling expanded slightly. Make sure your chocolate seal reaches the very edges of the paper liner.
Q: Can I make these without a stand mixer?
A: Yes, you can use a hand mixer or even mix by hand with a sturdy wooden spoon, though it will require some significant elbow grease as the fondant becomes quite stiff.
Q: How do I get the “pull” in the filling?
A: The corn syrup is the key ingredient for that gooey “pull.” Ensure you don’t over-add powdered sugar, which can make the center too crumbly
Making your own Homemade Chocolate Creme Eggs is a rewarding experience that elevates a seasonal classic into a gourmet delight. Whether you are looking for the perfect DIY Easter gift or simply want to satisfy a nostalgic craving, this recipe delivers on every front. The combination of the snappy shell and the buttery, flowing center is truly irresistible. Give this recipe a try this spring, and you may never go back to the store-bought version again!
PrintChocolate Creme Eggs
Indulge in the nostalgia of Easter with these Homemade Chocolate Creme Eggs. This recipe creates a perfectly snappy milk chocolate shell filled with a smooth, gooey vanilla fondant. By using a mini muffin tin, you get the perfect portion size every time without the need for expensive candy molds. The secret ‘yolk’ in the center makes these a show-stopping treat for kids and adults alike!
Ingredients
2 pkgs (16 oz each) milk chocolate, melted and divided
1 cup light corn syrup
1/2 cup butter, softened
2 tsp vanilla extract
6 cups powdered sugar
1/2 tsp salt
2 Tbsp milk
2 drops orange gel food coloring
1 drop yellow gel food coloring
Instructions
1. Line 48 mini muffin cups with parchment paper liners.
2. In a microwave-safe bowl, microwave 16 ounces of milk chocolate on HIGH power for 30 seconds. Stir well. Continue melting in 20-second increments until chocolate is melted and smooth.
3. Pour melted chocolate into a piping bag. Snip off the tip and pipe a thin layer into the bottoms of the liners. Tap the pan on the counter to distribute evenly.
4. In a stand mixer, beat butter and corn syrup together. Add milk, vanilla, and salt. Slowly add powdered sugar until stiff.
5. Spoon 2/3 of the creme into a piping bag. Color the remaining 1/3 with orange and yellow gel coloring and put in a separate bag.
6. Pipe a thick layer of white creme into the chocolate-lined cups.
7. Pipe a small dot of orange creme into the center of the white creme. Tap the pan to smooth.
8. Melt the remaining 16 ounces of chocolate and pipe over the top, sealing to the edges.
9. Refrigerate for 30 minutes until set.
Notes
Use high-quality milk chocolate for the best flavor.
Ensure your butter is truly softened to avoid lumps in the fondant.
Gel food coloring is essential for the vibrant ‘yolk’ color without thinning the filling.


