
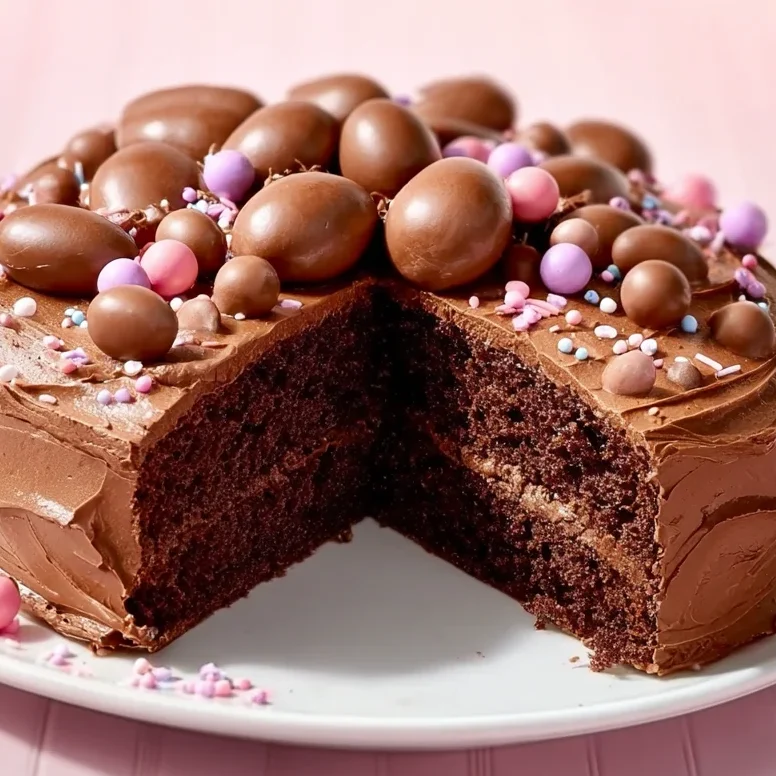
If you are looking for that one spectacular dessert to anchor your Easter table, you can officially stop scrolling. This Chocolate Easter Egg Cake is everything a holiday dessert should be: rich, velvety, and topped with a milk chocolate frosting so smooth it looks like it came from a Parisian patisserie. What makes this cake stand out from your average chocolate sponge is the “blooming” technique. By whisking the cocoa powder into boiling water before adding it to the batter, we unlock a deeper, more intense chocolate flavor that cocoa powder alone just can’t achieve. Coupled with the caramel notes of firmly packed brown sugar, this cake is sophisticated enough for adults but chocolatey enough to make the kids go back for seconds. The crowning glory is the “eating-quality” milk chocolate frosting. This isn’t a sugary buttercream; it’s a silky ganache that sets into a thick, fudge-like consistency. Topped with a mountain of milk chocolate Easter eggs, it’s a celebration of all things cocoa. Let’s get baking!
Why You’ll Love This Recipe
- Deep Chocolate Flavor: The combination of bloomed cocoa and a rich chocolate ganache provides layers of cocoa depth.
- Incredible Texture: The mix of self-raising and plain flour, along with milk and butter, creates a sturdy yet tender crumb.
- Bakery-Standard Frosting: Using real chocolate and cream instead of powdered sugar results in a professional, glossy finish.
- The “Wow” Factor: Piling the chocolate eggs in the center creates a beautiful, festive aesthetic that requires zero advanced decorating skills.
- Perfect for Gifting: This cake stays moist for days, making it an excellent choice if you need to bake a day in advance.
Ingredient
For a cake this rich, the quality of your chocolate is the most important factor. Here is what you need to know:
- Cocoa Powder: Use a high-quality Dutch-processed cocoa if you can find it. It has a smoother, less acidic taste that pairs perfectly with the brown sugar.
- Boiling Water: This is the secret to “blooming” the cocoa. It dissolves any lumps and releases the aromatic fats within the cocoa powder.
- Firmly Packed Brown Sugar: This adds moisture and a hint of molasses flavor that makes the chocolate taste even richer.
- Self-Raising and Plain Flour: We use a combination of both to get the perfect rise while maintaining a dense, fudge-like structure.
- Eating-Quality Milk Chocolate: For the frosting, avoid compound chocolate or “melts.” Look for a high-quality block of milk chocolate (like Lindt or Cadbury) that you would happily eat on its own.
- Thickened Cream: Also known as heavy whipping cream. This provides the fat content needed to turn that melted chocolate into a spreadable frosting.
Step-by-Step Instructions
1. Bloom the Cocoa
Start by combining your cocoa powder and boiling water in a small bowl. Whisk until it is perfectly smooth and glossy. Set this aside to cool while you prep the rest of the batter. If you add it while it’s still piping hot, it could scramble your eggs!
2. Cream the Base
Preheat your oven to a moderately slow 160°C (140°C fan-forced). Grease a deep 22cm round pan and line the base with parchment paper. In your mixer, beat the softened butter and brown sugar until it’s pale and fluffy. Add your eggs one at a time, beating well after each addition.
3. Mix the Batter
Sift together your flours and bicarbonate of soda. Gently stir these into the butter mixture, alternating with the milk, vanilla, and that cooled cocoa mixture. Pour the silky batter into the prepared pan.
4. The Low and Slow Bake
Bake for approximately 1 hour and 10 minutes. Because we are baking at a slightly lower temperature, the cake rises evenly without cracking. Let it stand in the pan for 10 minutes before turning it onto a wire rack to cool completely.
5. Make the Ganache Frosting
While the cake cools, combine your chopped milk chocolate and thickened cream in a small saucepan over very low heat. Stir until it is completely smooth. Transfer it to a bowl and refrigerate, stirring frequently, until it reaches a thick, spreadable consistency.
6. Decorate
Spread that luscious frosting all over the top and sides of the cake. Pile your small milk chocolate Easter eggs in the center and scatter your colored decorations (sprinkles or pearls) around the edges for a festive pop of color.
Expert Tips for Best Results
- The Low Temperature: Do not be tempted to turn the oven up to 180°C. The “moderately slow” temp is what keeps this cake from drying out during its long bake time.
- Frosting Patience: Don’t let the frosting sit in the fridge and forget about it, or it will become too hard to spread. Stirring it frequently helps it cool evenly and stay smooth.
- Room Temperature Ingredients: Make sure your eggs and milk are at room temperature. This ensures the batter emulsifies perfectly and won’t curdle.
- Sift Your Flours: Sifting isn’t just about lumps; it aerates the flour, which is especially important for a dense chocolate cake to prevent it from feeling “heavy.”
Variations and Substitutions
- Dark Chocolate Twist: Swap the milk chocolate in the frosting for 70% dark chocolate for a more bittersweet, adult-friendly version.
- Nutty Crunch: Fold 1/2 cup of toasted, chopped hazelnuts into the batter for a “Ferrero Rocher” style flavor profile.
- Gluten-Free: This cake works well with a high-quality 1:1 gluten-free flour blend. Just ensure your self-raising GF flour has enough leavening agent.
- White Chocolate Eggs: Use a mix of white, dark, and milk chocolate eggs for a beautiful “trio of chocolate” look on top.
Storage and Freezing
To Store: Because of the cream in the frosting, this cake is best kept in an airtight container in a cool spot or the refrigerator. It will stay moist for 3–4 days. If refrigerated, let it sit at room temperature for 30 minutes before serving to soften the ganache. To Freeze: You can freeze the un-frosted cake for up to 3 months. Wrap it tightly in two layers of plastic wrap. The frosting is best made fresh, but the cake itself freezes beautifully.
FAQ
Q: Can I use a regular 20cm pan? A: This recipe makes a lot of batter. If you use a smaller 20cm pan, make sure it is quite deep, as the cake will rise significantly. You may also need to increase the bake time by 5–10 minutes. Q: My frosting is too hard to spread. What do I do? A: If the ganache has over-set in the fridge, just let it sit on the counter for 15 minutes or give it a very quick (5-second) burst in the microwave and stir. Q: Why do I need bicarbonate of soda and self-raising flour? A: The bicarbonate of soda reacts with the cocoa and brown sugar to give an extra boost of lift and a darker color, while the self-raising flour provides the primary structure.
Final Thoughts
There is nothing quite as satisfying as a homemade chocolate cake, especially one as grand as this. It’s a labor of love that pays off in every rich, fudge-like bite. Whether you’re celebrating Easter or just a very special Sunday, this cake is guaranteed to be the highlight of the day.


