
There is something undeniably magical about a perfectly executed Pavlova. It sits on the dessert table like a fluffy, edible cloud—ethereal, elegant, and topped with a vibrant crown of seasonal fruits. While many home bakers feel intimidated by the prospect of whipping egg whites into submission, the truth is that a Classic Pavlova is one of the most rewarding and straightforward desserts you can master. The secret lies in the contrast: a fragile, whisper-thin crust that shatters at the touch of a spoon, revealing a center so soft and light it mimics the texture of a gourmet marshmallow. Whether you are hosting a summer garden party or looking for a sophisticated gluten-free finale to a dinner party, this Pavlova recipe is your ticket to culinary success. Let’s dive into the science and soul of this iconic meringue masterpiece.
Why You’ll Love This Recipe
You will fall in love with this recipe because it balances simplicity with high-impact results. Unlike heavy cakes or dense pastries, the Pavlova is incredibly light, making it the ideal palate cleanser after a rich meal. It is naturally gluten-free, which makes it an inclusive choice for guests with dietary restrictions without ever feeling like a compromise. Furthermore, the prep work is relatively quick, requiring only a handful of pantry staples. The long, slow bake time is mostly hands-off, allowing the oven to do the heavy lifting while you focus on other tasks. Plus, the customization options are endless, letting you adapt the toppings to whatever fruit is currently in peak season.
What Is Pavlova?
Pavlova is a meringue-based dessert named after the Russian ballerina Anna Pavlova. It was created in her honor during one of her tours to Australia and New Zealand in the 1920s. To this day, both nations claim the Pavlova as their national dish, leading to a friendly but spirited trans-Tasman debate. Unlike a traditional French meringue, which is crisp and dry all the way through, a Pavlova includes the addition of cornstarch and acid (like vinegar). This chemical reaction is what creates the “marshmallow” interior that defines the dish. It is structurally unique—a delicate shell holding a soft heart, usually topped with unsweetened whipped cream to balance the sweetness of the meringue.
Ingredients Overview
The beauty of a Pavlova lies in how six simple ingredients transform into a complex architectural wonder.
- Egg Whites: Use four large egg whites. It is critical that they are at room temperature to ensure maximum volume. Ensure not a single drop of yolk enters the bowl, as fat prevents the whites from foaming.
- Table Salt: Just a pinch (1/8 teaspoon) helps to stabilize the protein structure of the egg whites.
- Granulated Sugar: One cup of sugar provides the structure and sweetness. Granulated sugar works best as it dissolves steadily during the whipping process.
- Vanilla Extract: A teaspoon of high-quality vanilla adds an aromatic depth that prevents the meringue from tasting purely like sugar.
- White Balsamic or Cider Vinegar: The acid is the secret weapon. It slows down the drying process of the egg proteins, ensuring the center remains soft rather than brittle.
- Cornstarch: Two teaspoons of cornstarch work in tandem with the vinegar to create that signature chewy, marshmallow-like texture. It helps stabilize the meringue and prevents “weeping” or moisture beads from forming.
Ingredient Substitutions & Tips
While the core recipe is scientific, there is some room for adjustment. If you don’t have white balsamic or cider vinegar, plain white distilled vinegar or even lemon juice will work perfectly as the acidic component. For the sugar, superfine (caster) sugar is often preferred by professionals because it dissolves faster, but standard granulated sugar works beautifully if added slowly. If you are looking for a different flavor profile, you can swap the vanilla extract for almond or lemon extract. Ensure your cornstarch is fresh; if it’s been in the pantry for years, it may lose its thickening power, which is essential for the internal structure.
Step-by-Step Instructions
1. Preparation and Setup: Start by preheating your oven to 300°F. Preparation is key for meringue. Line a flat baking sheet with parchment paper. Use a 9-inch cake pan as a stencil to trace a circle on the paper with a pencil, then flip the paper over so the pencil mark is on the bottom. This gives you a guide without getting lead on your food.
2. Whipping the Whites: In a stand mixer fitted with a whisk attachment, ensure the bowl is spotlessly clean. Start beating the egg whites on medium-low speed until they become frothy and covered in small bubbles. Add the salt. Increase the speed to medium-high.
3. The Sugar Stream: As soft peaks begin to form (the whites will hold their shape but the tips will slump over), begin adding the sugar. Do this very slowly—about one tablespoon at a time. This patience ensures the sugar dissolves and doesn’t weigh down the air bubbles you’ve worked so hard to create.
4. Achieving Stiff Peaks: Once all the sugar is in, turn the mixer to high. Beat for about 2-3 more minutes. You are looking for “stiff, shiny peaks.” When you lift the whisk, the meringue should stand straight up like a mountain peak and look like glossy marshmallow fluff.
5. The Final Fold: Stop the mixer. Sprinkle the vanilla, vinegar, and cornstarch over the meringue. Use a large silicone spatula to gently fold these in. Do not stir vigorously; you want to maintain the air.
6. Shaping and Baking: Spoon the mixture onto your parchment circle. Use the back of a spoon to push it to the edges and create a “well” or “nest” in the center. Slide it into the oven and immediately reduce the heat to 250°F. Bake for 90 minutes.
7. The Cool Down: This is the most important step. Turn the oven off and walk away. Leave the Pavlova inside with the door closed (or cracked slightly with a wooden spoon) for at least an hour. This slow cooling prevents the shell from collapsing or cracking excessively.
Expert Baking Tips
The biggest enemy of a Pavlova is humidity. On a rainy or very humid day, the sugar in the meringue will actually pull moisture out of the air, leading to a “weeping” Pavlova that feels sticky or soft. Always try to bake on a dry day. Secondly, cleanliness is non-negotiable. Even a microscopic amount of grease on your whisk or bowl will prevent the egg whites from reaching their full volume. Wipe your bowl with a paper towel dampened with a little lemon juice or vinegar before starting to ensure it is perfectly stripped of oils. Finally, resist the urge to peek! Opening the oven door during the bake causes temperature fluctuations that lead to cracks.
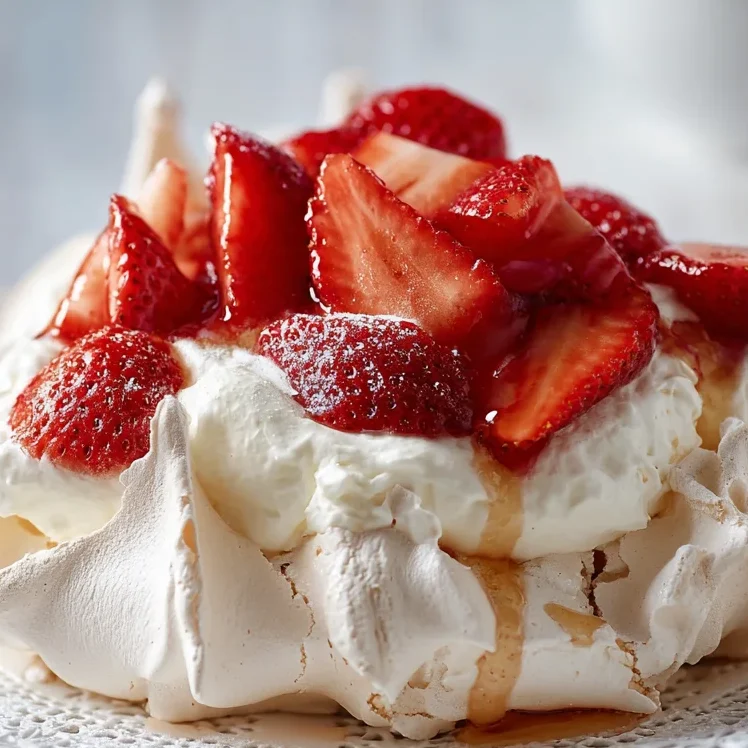
The Art of Topping Your Pavlova
The Pavlova is a blank canvas. Traditionally, it is topped with a generous layer of unsweetened or lightly sweetened whipped cream. Because the base is quite sweet, the cream provides a necessary creamy, fatty balance. From there, the sky is the limit. In the summer, fresh passionfruit pulp, strawberries, and kiwifruit are the classic Australian choice. In the winter, try pomegranate arils and a drizzle of dark chocolate. For a sophisticated touch, use lemon curd and fresh raspberries. Always wait until the very last moment before serving to add the cream and fruit, as the moisture will begin to soften the crisp shell immediately.
Serving Suggestions
To serve, place the cooled Pavlova base on a flat cake stand or large plate. Gently pile on your whipped cream and fruit. When slicing, use a long, serrated knife and use a gentle sawing motion to minimize shattering the crust. It is perfectly normal—and actually quite charming—for the crust to crack and crumble slightly as you cut it. That “rustic” look is part of the Pavlova’s authentic appeal.
Storage & Make-Ahead Tips
A Pavlova base can be made up to 24 hours in advance if stored in a cool, dry place in an airtight container. Do not refrigerate the plain meringue base, as the moisture in the fridge will turn it into a sticky mess. However, once you have added the whipped cream and fruit, the dessert must be eaten within 1-2 hours. Leftovers (if there are any!) can be kept in the fridge, but the meringue will lose its crunch.
FAQs
Can I use liquid egg whites from a carton?
It is generally not recommended. Most carton egg whites are pasteurized, which changes the protein structure and makes it difficult to achieve the stiff, stable peaks required for a Pavlova.
How do I know if the sugar is fully dissolved?
Rub a small amount of the whipped meringue between your thumb and forefinger. If it feels gritty, keep beating. It should feel completely smooth and silky.
Why did my Pavlova turn brown?
If the meringue is more than a pale cream color, your oven may be running hot. Use an oven thermometer to verify the temperature, as even a 10-degree difference can caramelize the sugar.
Is it okay if my Pavlova has cracks?
Yes! Even professional chefs expect some cracking. It’s part of the dessert’s character. As long as it hasn’t completely collapsed, it will taste delicious.
Can I make mini Pavlovas with this recipe?
Absolutely. Simply dollop smaller circles onto the parchment. Reduce the baking time to about 45-60 minutes depending on their size.
Baking a Classic Pavlova is a rite of passage for any home baker. It teaches patience, the importance of temperature, and the beauty of simple ingredients. While it may seem delicate, it is surprisingly forgiving once you understand the basic science of the meringue. Follow these steps, keep your bowl clean, and let the oven do its slow-cooking magic. You’ll be rewarded with a show-stopping dessert that tastes like a sweet, crispy, marshmallow dream.
PrintClassic Pavlova

A classic Pavlova with a perfectly crisp outer shell and a signature marshmallow-soft interior.
Ingredients
4 large egg whites
1/8 teaspoon table salt
1 cup granulated sugar
1 teaspoon vanilla extract
1 teaspoon white balsamic or cider vinegar
2 teaspoons cornstarch
Instructions
1. Preheat oven to 300°. Line a sheet pan with parchment paper, trace a 9-inch circle in the center, and turn the paper over.
2. In the clean bowl of a standing mixer with a whisk attachment, beat egg whites until frothy.
3. Add salt and continue beating. As soft peaks form, slowly add sugar in a thin stream, beating as you go.
4. Once sugar is incorporated, beat on high speed until firm, shiny peaks begin to form, about 2 more minutes.
5. Stop beating; then gently fold in vanilla, vinegar, and cornstarch with a spatula.
6. Spoon the meringue into the center of the traced circle and spread it out to the edges, creating a shallow well in the middle.
7. Put into the oven, reduce heat to 250°, and bake 1-1/2 hours.
8. Turn off the oven, leaving meringue inside until it turns crisp and pale, but still a bit soft inside, about 1 hour.
9. Remove from oven and let cool completely.
Notes
Ensure your mixing bowl is completely grease-free.
Use room temperature egg whites for better volume.
Avoid making this on high-humidity days.


