
Prepare to embark on a culinary journey to a tropical paradise, right from your kitchen! If the mere mention of coconut stirs your soul, then this Creamy Coconut Cake is not just a recipe; it’s a destiny. Forget dry, bland cakes – this masterpiece redefines moistness and richness, bursting with authentic coconut flavor in every single bite.
Imagine a soft, tender crumb, infused with a luxurious blend of sweetened condensed coconut milk and coconut cream, then crowned with a cloud-like, intensely coconutty buttercream. This isn’t just a cake; it’s an experience, a celebration of all things coconut, guaranteed to transport you to sun-drenched beaches with its irresistible aroma and taste. Whether you’re a seasoned baker or a curious beginner, our comprehensive guide will walk you through creating a dessert that’s not just delicious, but truly unforgettable.
Why This Creamy Coconut Cake Will Become Your New Obsession
There are coconut cakes, and then there’s this Creamy Coconut Cake. What sets it apart and makes it an absolute must-try? It’s the meticulous layering of coconut flavor and texture, ensuring every forkful is a revelation:
- Triple Coconut Threat: We don’t just use one form of coconut; we use three! Sweetened condensed coconut milk for unparalleled moisture and sweetness, rich coconut cream for depth and body, and desiccated coconut for texture and intensified aroma. This trifecta guarantees an explosion of tropical flavor.
- Unrivaled Moistness: The secret lies in our unique technique of soaking the freshly baked cake with a coconut milk mixture. This ensures a cake so moist it practically melts in your mouth, retaining its tenderness for days. No more dry, crumbly cake woes!
- Velvety Coconut Buttercream: A light, fluffy buttercream infused with vanilla and coconut extracts, often enhanced with a touch of the cake’s soaking liquid, makes for an irresistibly creamy topping that perfectly complements the cake’s richness.
- A Showstopper for Any Occasion: From birthdays to holiday gatherings or simply a weekend treat, this cake is visually stunning and universally loved. Its elegant simplicity makes it adaptable to various garnishes.
- Surprisingly Achievable: While the results are impressive, our detailed instructions and expert tips break down each step, making this gourmet-level dessert accessible to home bakers of all skill levels.
This isn’t just baking; it’s crafting an edible piece of art that promises pure indulgence.
The Secret to Unrivaled Moistness: An E-E-A-T Deep Dive
As an experienced recipe developer, I’ve found that the pursuit of the perfectly moist cake is a baker’s eternal quest. For this Creamy Coconut Cake, our secret weapon against dryness is a two-pronged approach centered around coconut products.
Expertise in Action: Most traditional cakes rely on dairy milk or buttermilk for moisture. However, coconut-based liquids offer a unique advantage. Sweetened condensed coconut milk, with its high sugar and fat content, is a humectant – it attracts and retains moisture, keeping the cake soft and tender long after baking. Its sweetness also means less added sugar is needed in the batter itself.
Then comes the coconut cream soak. After the cake is partially cooled, we generously douse it with a mixture of leftover condensed coconut milk and coconut cream. This allows the cake to absorb this rich, flavorful liquid like a sponge. The overnight refrigeration then facilitates a thorough permeation, transforming a good cake into an extraordinarily moist and tender one. This isn’t just adding liquid; it’s infusing every cell of the cake with creamy, tropical goodness, building flavor and texture.
My Experience: I’ve experimented with countless coconut cake recipes, often finding them lacking in that truly intense coconut flavor and the desired moistness. The revelation came when I started incorporating both condensed coconut milk into the batter and as a post-bake soak. It transformed the cake from merely ‘coconut-flavored’ to ‘a coconut experience.’ The overnight chill is non-negotiable; trust me, the wait is worth every single moist crumb.
This method elevates the cake beyond mere sweetness, creating a complex texture that is both delicate and substantial, a testament to thoughtful ingredient selection and precise technique.
Essential Ingredients for Your Tropical Masterpiece
Crafting the perfect Creamy Coconut Cake begins with understanding the role each ingredient plays. Quality matters here, especially when you’re aiming for such a rich, authentic flavor.
- Unsalted Butter (Softened): Essential for both the cake and buttercream. Softened butter creams beautifully with sugar, incorporating air that gives the cake its light texture. For buttercream, it forms the creamy base. Always use unsalted to control the salt content.
- Caster Sugar: Its fine granules dissolve easily, contributing to a smooth batter and tender cake.
- Sweetened Condensed Coconut Milk: This is a star ingredient. It provides rich sweetness and moisture to the cake, and is crucial for the soaking liquid that gives our cake its signature creaminess. Don’t confuse it with regular canned coconut milk!
- Eggs: Act as a binder, provide structure, and contribute to richness and lift. Ensure they are at room temperature for better emulsification.
- Self-Raising Flour: Pre-mixed with leavening agents (baking powder and a pinch of salt), it ensures a consistent rise. If you only have plain flour, you can easily make your own self-raising flour by adding 1.5 teaspoons of baking powder and 1/4 teaspoon of salt per 1 cup (125g) of plain flour.
- Desiccated Coconut: Provides texture, chewiness, and an intense, concentrated coconut flavor in the cake batter.
- Coconut Cream (from a can): The thick, rich component of canned full-fat coconut milk. It adds luxurious creaminess to both the cake soak and can be used in the buttercream.
- Vanilla Extract & Coconut Extract: These enhance and amplify the natural coconut flavor, adding layers of aromatic depth to the buttercream.
- Powdered Sugar (Sifted): Absolutely vital for a smooth, lump-free buttercream. Sifting removes any clumps.
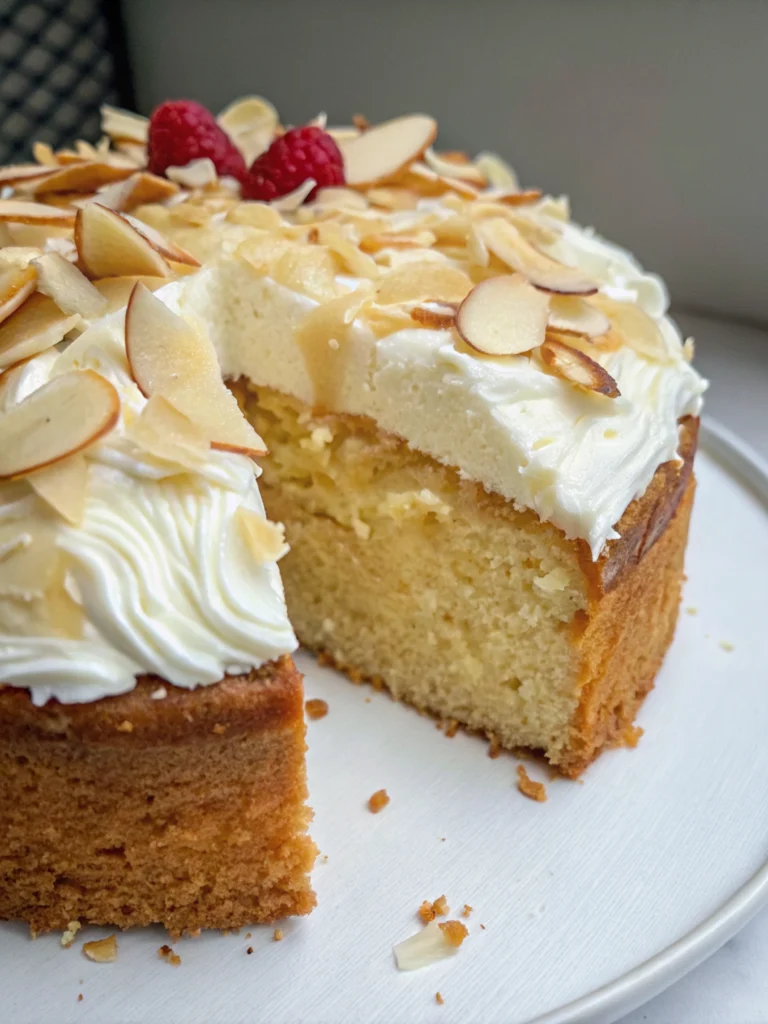
- Toasted Coconut Flakes (Optional): A fantastic garnish that adds visual appeal, a lovely crunch, and a deeper, nuttier coconut flavor.
Step-by-Step Guide to Baking the Perfect Creamy Coconut Cake
Follow these precise steps to create a showstopping Creamy Coconut Cake that will impress everyone.
Coconut Cake
- Prepare Your Baking Environment: Preheat your oven to 170°C (340°F). Crucially, grease an 8-inch round cake pan thoroughly and line the bottom with parchment paper. This meticulous preparation prevents sticking, especially with such a moist cake.
- Cream Butter and Sugar: In a large mixing bowl, combine the softened unsalted butter, caster sugar, and half of the can of sweetened condensed coconut milk. Beat this mixture using an electric handheld beater (or stand mixer) until it becomes noticeably pale, light, and wonderfully creamy. This process incorporates air, essential for a tender cake.
- Combine Wet and Dry: To the creamed mixture, add the self-raising flour, eggs, desiccated coconut, and 240g of the thick coconut cream (from the can). Beat again on a medium speed until all ingredients are just fully combined. Be careful not to overmix, as this can lead to a dense cake. Stop as soon as no dry streaks of flour remain.
- Bake to Perfection: Pour the beautifully smooth batter into your prepared 8-inch pan. Bake for 55 to 60 minutes. The cake is ready when a wooden skewer or toothpick inserted into the center comes out clean.
- Initial Cool Down: Once baked, remove the cake from the oven and let it cool in the pan for about 10 minutes. This allows the cake to set slightly before the next crucial step.
- Prepare the Soaking Mixture: While the cake is cooling, combine the remaining sweetened condensed coconut milk and the rest of the coconut cream in a small bowl. Stir well to mix.
- The Moistness Secret (Soak!): After the initial cooling, and while the cake is still warm (but not hot), use a skewer or fork to poke numerous holes across the entire surface of the cake. Generously pour about 3/4 of the prepared coconut cream mixture evenly over the top, ensuring it seeps into all the holes.
- Overnight Transformation: Set the cake aside in its pan to cool completely to room temperature, allowing it to fully soak up the delicious mixture. Once cool, cover the pan with plastic wrap and place it in the refrigerator overnight. This overnight chill is crucial for maximum moisture absorption and flavor development.
Coconut Buttercream
- Optional Toasted Coconut Flakes: If you desire toasted coconut flakes for garnish, preheat your oven to 170°C (340°F). Spread a handful of coconut flakes on a baking sheet and toast for 3-5 minutes, watching them closely as they can burn quickly. Let them cool completely.
- Whip the Butter: In a clean bowl, beat the softened unsalted butter with a handheld electric beater until it becomes pale, light, and fluffy.
- Create the Creaminess: Gradually add the sifted powdered sugar to the whipped butter, beating slowly at first to avoid a sugar cloud, then increasing speed until fully incorporated. Mix in the vanilla extract and coconut extract.
- Optional Flavor Boost: For an extra intense coconut flavor and a marginally softer buttercream, you can add 1-2 tablespoons of the remaining coconut cream mixture (from the cake soak) to the buttercream. Beat until the buttercream is light, fluffy, and smooth.
- Release the Cake: Carefully remove the chilled cake from its pan. You may need to run a thin knife around the edges of the cake to loosen it, especially due to the moist, slightly sticky nature of the soaked cake. Invert onto a serving plate.
- Frost and Garnish: Evenly spread the luscious coconut buttercream on top of the cake with an offset spatula. If using, sprinkle the cooled toasted coconut flakes generously over the top.
- Serve and Enjoy!: Slice your magnificent Creamy Coconut Cake into generous pieces and savor every tropical, creamy bite!
Pro-Tips for a Flawless Creamy Coconut Cake
Achieving bakery-quality results at home is all about those small, expert details. Here are my tried-and-true tips for an absolutely flawless creamy coconut cake:
- Pan Choice & Cake Removal is Key:
- Springform Pan Advantage: I highly recommend an 8-inch springform pan. It makes cake removal effortless, which is a blessing for such a moist and delicate cake.
- Round Cake Pan Caution: If using a standard round cake pan, be extra careful during extraction. The coconut cream soak makes the cake slightly stickier. After running a thin knife around the edges to loosen, invert the pan while supporting the cake’s top with your hand. Gently rock and sway the cake back and forth until it loosens and can be lifted out smoothly. Patience here prevents breakage!
- Maximizing Coconut Flavor: You’ll have a small amount of the coconut cream/condensed milk mixture left after soaking the cake. Don’t waste it! Adding 1-2 tablespoons of this mixture to your buttercream not only intensifies the coconut essence but also contributes to a silkier, softer buttercream texture. It’s a game-changer!
- Toasted Coconut Flakes – Optional but Recommended: This step is entirely optional, but toasting the coconut flakes brings out a deeper, nuttier flavor and adds a delightful textural contrast. Just watch them like a hawk in the oven; they go from perfectly golden to burnt in seconds!
- Room Temperature Ingredients: This cannot be stressed enough, especially for butter and eggs. Room temperature ingredients emulsify much better, creating a smooth, homogenous batter that holds air more effectively, leading to a lighter, more tender cake. Take them out of the fridge at least an hour before you plan to bake.
- Do Not Overmix: Once you add the flour, mix only until just combined. Overmixing develops the gluten in the flour too much, leading to a tough, dense cake.
- The Power of the Chill: The overnight refrigeration isn’t just a suggestion; it’s a critical step. It allows the cake to fully absorb the soaking liquid, intensifying flavor and ensuring peak moistness. This cake is even better the next day!
Troubleshooting Your Coconut Cake: Common Problems Solved
Even expert bakers encounter hiccups. Here’s how to tackle common issues you might face with your Creamy Coconut Cake:
- My cake is dry! What went wrong?
- Overbaking: The most common culprit. Ovens vary, so start checking for doneness a few minutes before the minimum bake time. A skewer inserted into the center should come out clean, but not bone-dry.
- Skipped the Soak: The coconut milk mixture soak is essential for this recipe’s signature moistness. Don’t skip it!
- The cake is gummy or dense.
- Overmixing the Batter: After adding the flour, mix only until just combined. Excessive beating develops gluten, leading to a tough, dense texture.
- Too Much Liquid: Ensure you’re measuring ingredients accurately, especially the coconut cream and condensed milk.
- My buttercream is runny or gritty.
- Runny: This usually means the butter was too warm, or too much liquid was added (e.g., if you added the full coconut mixture). If it’s too warm, chill it briefly in the fridge and then beat again.
- Gritty: This is typically due to not sifting your powdered sugar. Sifting is crucial for a smooth consistency. Also, ensure your butter is properly creamed first.
- The cake stuck to the pan!
- Insufficient Greasing/Lining: Always grease your pan thoroughly and line the bottom with parchment paper. For extra sticky cakes, a light dusting of flour over the greased and lined pan can also help.
- Removing Too Early: Ensure the cake has cooled sufficiently (at least 10 minutes in the pan, then completely before inverting for frosting) before attempting to remove it. A warm cake is more fragile.
Customization & Variations: Make it Your Own
While this Creamy Coconut Cake is perfect as is, feel free to get creative and personalize it!
- Add-ins for Extra Texture: Fold in 1/2 cup of chopped macadamia nuts or white chocolate chips into the batter for an extra layer of flavor and texture.
- Citrus Zest: For a brighter, more complex flavor profile, add the zest of one lime or half an orange to the cake batter or buttercream.
- Fruity Topping: Garnish with fresh berries like raspberries or sliced mango for a beautiful color contrast and burst of freshness.
- Gluten-Free Option: You can experiment with a 1:1 gluten-free baking flour blend in place of self-raising flour, but results may vary slightly in texture.
Serving Suggestions & Pairings
This Creamy Coconut Cake is a star on its own, but it pairs beautifully with:
- A strong cup of coffee or a delicate black tea.
- A tropical iced tea or a light, fruity cocktail.
- A side of fresh fruit salad, especially with pineapple or mango, to balance the richness.
Storage and Make-Ahead Tips
One of the beauties of this cake is how well it stores and even improves with time!
- Make Ahead: As detailed, the cake benefits greatly from overnight chilling to soak up the coconut liquid. You can bake the cake up to 2-3 days in advance and keep it unfrosted (covered) in the refrigerator. Frost on the day of serving.
- Storage: Once frosted, store the cake in an airtight container in the refrigerator for up to 3-4 days. Allow it to come to room temperature for about 30 minutes before serving for the best flavor and texture.
- Freezing: You can freeze slices (or the whole cake, unfrosted) wrapped tightly in plastic wrap and then foil for up to 2-3 months. Thaw in the refrigerator overnight before frosting or serving.
Frequently Asked Questions (FAQ)
Q: Why is my coconut cake dry?
A: A dry coconut cake is often a sign of overbaking. Ensure you follow the recommended baking time and test for doneness with a skewer. Our recipe actively combats dryness by incorporating a rich coconut milk and cream soak, so be sure not to skip this crucial step! Overmixing the batter can also lead to a drier, tougher crumb by developing gluten too much.
Q: Can I make this creamy coconut cake ahead of time?
A: Absolutely! This Creamy Coconut Cake is ideal for making ahead. The overnight refrigeration step is actually essential for the cake to fully absorb the coconut milk mixture, making it incredibly moist and flavorful. You can bake the cake and refrigerate it (unfrosted, tightly covered) for up to 2-3 days, or frosted for 1-2 days before serving. The flavors truly meld and deepen over time.
Q: What’s the difference between coconut cream and sweetened condensed coconut milk?
A: Coconut cream is the thick, rich part that separates and rises to the top of canned full-fat coconut milk when left undisturbed. It’s unsweetened and has a very high fat content, contributing richness and body. Sweetened condensed coconut milk, on the other hand, is a vegan alternative to traditional condensed milk, made by cooking down coconut milk with sugar until it reaches a thick, syrupy consistency. It provides sweetness and intense moisture to our cake. They are not interchangeable.
Q: How do I prevent the cake from sticking to the pan?
A: Proper pan preparation is key! Always grease your pan thoroughly (even if it’s non-stick) and line the bottom with parchment paper. For extra insurance, especially with a moist cake like this, lightly flour the greased and lined pan. Using an 8-inch springform pan can also significantly simplify the removal process. If using a standard round pan, run a thin, flexible knife around the edges after the cake has cooled slightly before inverting it onto your hand or a wire rack.
Q: Can I use regular condensed milk instead of condensed coconut milk?
A: While you could use regular sweetened condensed milk, the resulting cake would lose some of its distinctive tropical coconut flavor and would no longer be suitable for vegan diets. For the true “Creamy Coconut Cake” experience as intended by this recipe, using sweetened condensed coconut milk is highly recommended for its unique taste profile and consistency.
Indulge in Your Tropical Dream!
There you have it – the ultimate guide to baking a Creamy Coconut Cake that will forever change your perception of this classic dessert. Its unmatched moistness, layers of authentic coconut flavor, and velvety buttercream make it an extraordinary treat for any occasion.
Don’t just dream of tropical beaches; bring them to life in your kitchen! Gather your ingredients, follow our expert steps, and prepare to delight your senses. We’re confident this recipe will become a cherished favorite in your baking repertoire.
Baked this cake? We’d love to hear about your experience and see your beautiful creations! Share your thoughts and photos in the comments below, or tag us on social media. Happy baking!
PrintLusciously Creamy Coconut Cake Recipe
Condensed coconut milk, coconut cream and desiccated coconut all combined to make a coconut lover’s dream cake, but let’s not forget the delicious creamy coconut buttercream icing!
- Prep Time: 25 Min
- Cook Time: 60 Min
- Total Time: 13 H 25 M
- Yield: 16 Slices
- Category: Dessert, Cake
- Method: Baking, Creaming, Frosting
- Cuisine: American, Tropical
Ingredients
175g Unsalted Butter (Softened)
75g Caster Sugar
320g Can Sweetened Condensed Coconut Milk
3 Eggs
225g Self Raising Flour
1/4 Cup Desiccated Coconut
125g Unsalted Butter (Softened)
1 Tsp Vanilla Extract
1/2 Tsp Coconut Extract
250g Powdered Sugar (Sifted)
A Handful of Toasted Coconut Flakes (Optional)
Instructions
1. Preheat the oven to 170°C. Grease and line a round 8-inch pan with parchment paper.
2. Place the butter, sugar and half the can of condensed milk in a bowl. Beat together using an electric handheld beater until pale and creamy.
3. Add the flour, eggs, desiccated coconut and 240g of the coconut cream, beat again until fully combined.
4. Pour the mixture into the prepared pan and bake for 55 to 60 minutes. Set aside to cool slightly (About 10 minutes).
5. Combine the rest of the condensed milk and coconut cream in a small bowl.
6. Once the cake has slightly cooled, using a skewer, poke holes into the cake and pour about 3/4 of the coconut cream mixture (You can use some of the remaining mixture in the coconut buttercream icing or smoothies).
7. Set aside to completely cool/soak the mixture in. Place in the refrigerator overnight.
8. Optional* If you are adding toasted coconut flakes. Preheat the oven to 170°C and toast the coconut flakes for about 3-5 minutes.
9. Beat the butter with a handheld electrical beater until pale.
10. Add the sifted powdered sugar, vanilla and coconut extract (You can add 2 Tbsp of the coconut cream mixture from earlier to intensify the coconut essence and also contribute to a marginally softer texture) beat until nice and fluffy.
11. Carefully remove the cake from the pan, you may need to run a knife around the corners.
12. Evenly spread the buttercream on top of the cake with a spatula and sprinkle toasted coconut flakes on top.
13. Slice the cake into as many pieces as you like and enjoy!
Notes
Removing cake from pan: You can also opt for an 8-inch springform pan, as it will significantly simplify the cake removal process. Yet, in case you decide to go with a round cake pan, exercise caution during the cake extraction. I found it necessary to carefully slide a knife around the edges due to the slight stickiness caused by the coconut cream mixture. After running the knife through, invert the pan while safeguarding the cake’s top with your hand, then gently sway the cake back and forth until it loosens and can be lifted out smoothly.
Coconut Cream/Condensed Coconut Milk Mixture: Given that you are utilizing only 3/4 of the mixture for the cake itself, you have the option to allocate 2 tablespoons of said mixture towards preparing the delectable coconut buttercream frosting. This addition will not just intensify the coconut essence but also contribute to a marginally softer texture.
Toasted coconut flakes: This part is completely optional if you don’t want to add the coconut flakes, you can simply just skip this step.


