
As the flowers begin to bloom and the weather warms, there is no better way to celebrate the arrival of spring than with a batch of freshly baked cookies. These Easter Bunny M&M Cookies are more than just a dessert; they are a delightful kitchen project that brings the whole family together. With their soft, buttery base and whimsical bunny faces made from pastel candies, they are guaranteed to be the star of any Easter brunch or school party. The beauty of this recipe lies in its simplicity—using pantry staples to create something that looks professionally decorated. Whether you are an experienced baker or a novice looking for a fail-proof holiday treat, these cookies offer the perfect balance of chewy texture and festive charm. Get ready to hop into the kitchen and create some magic!
Why You’ll Love This Recipe
You will fall in love with these Easter Bunny M&M Cookies because they combine a classic, reliable sugar cookie dough with a creative, modern twist. Unlike complex royal icing decorations that take hours to dry, these “bunny” decorations take only seconds to assemble. The recipe uses a high butter-to-sugar ratio, ensuring a melt-in-your-mouth experience that is far superior to store-bought dough. Furthermore, the use of pastel M&Ms provides that iconic spring aesthetic without needing artificial dyes or messy frostings. It is a one-bowl-friendly method that minimizes cleanup while maximizing the “wow” factor for your guests. Plus, the clever trick of using halved M&Ms for ears is a total game-changer for holiday baking!
What Is An Easter Bunny M&M Cookie?
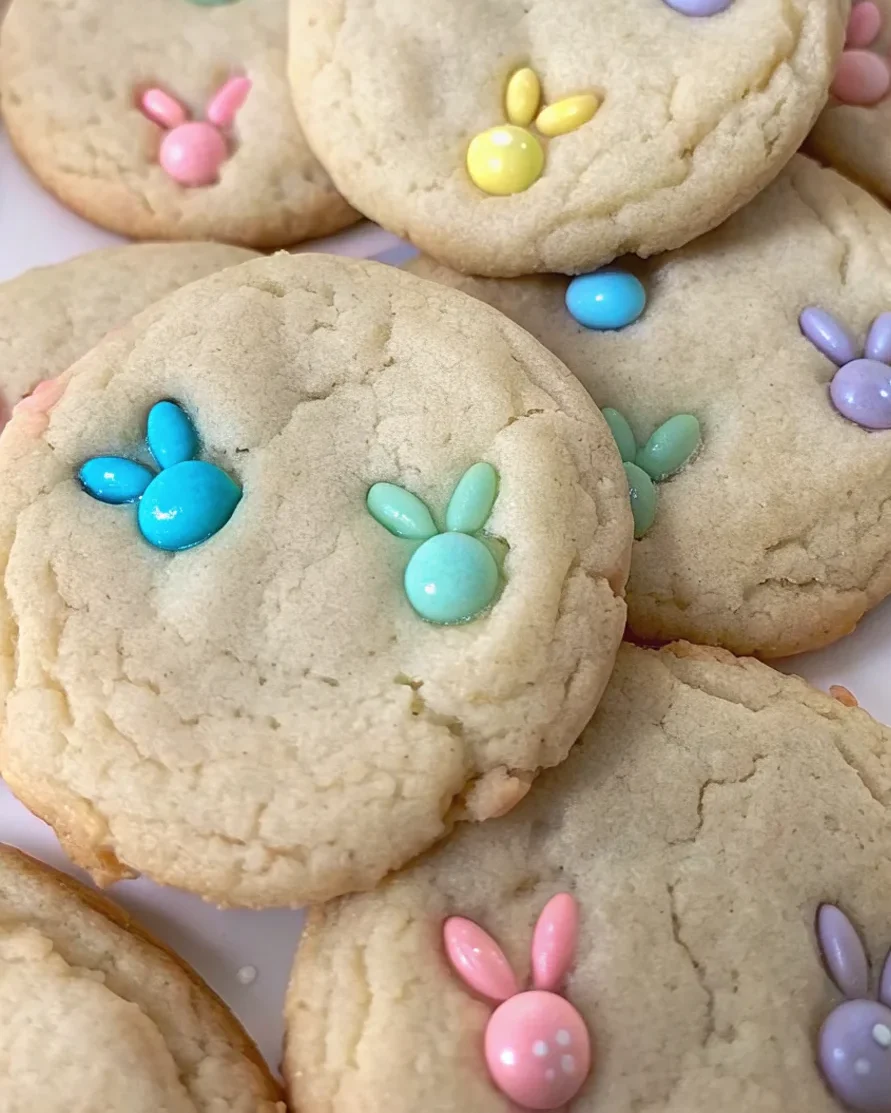
At its core, the Easter Bunny M&M Cookie is an elevated soft-baked sugar cookie designed specifically for the spring season. While traditional M&M cookies fold the candies into the dough before baking, this version uses a “post-bake” assembly method. This technique ensures that the pastel candy shells remain vibrant and uncracked, while the cookie itself remains thick and soft. The “bunny” look is achieved by placing one whole M&M as the face and two halves as the ears. It is a minimalist yet highly recognizable design that captures the essence of Easter. By flattening the dough into disks before baking, we create the perfect canvas for our candy bunnies to sit upon.
Ingredients
To create the perfect cookie, the quality of your ingredients matters. This recipe relies on:
- Unsalted Butter: This is the foundation of the cookie’s flavor. Ensure it is softened to room temperature so it creams perfectly with the sugar.
- White Granulated Sugar: Provides sweetness and helps the edges get that slightly crisp, golden finish.
- Large Egg: Acts as the binder, giving the cookie structure and a rich mouthfeel.
- Pure Vanilla Extract: Essential for that classic “bakery” scent and depth of flavor. Avoid imitation vanilla if possible.
- All-Purpose Flour: The structural backbone. Measuring by weight (grams) is always recommended for the most consistent results.
- Baking Powder & Soda: A combination of both ensures the cookies rise just enough to be fluffy while maintaining a chewy center.
- Salt: A half-teaspoon is vital to balance the sweetness of the sugar and the candy coating.
- Pastel M&M’s: These are the star of the show. The seasonal colors (pink, blue, yellow, and lavender) provide the perfect Easter palette. You will use whole ones for the faces and sliced ones for the bunny ears.
Ingredient Substitutions & Tips
If you find yourself missing an ingredient, don’t worry! You can substitute the all-purpose flour with a 1:1 gluten-free baking blend (ensure it contains xanthan gum) for a gluten-sensitive option. If you prefer a slightly deeper flavor, you can replace half of the white sugar with light brown sugar, though this will result in a darker cookie that might hide the pastel colors. For a dairy-free version, use a high-quality vegan butter stick. A pro tip for the M&Ms: if you can’t find the pastel “Easter” variety, regular M&Ms work just as well for a vibrant, year-round “bear” or “bunny” look. Just ensure your butter is never melted, as this will cause the cookies to spread too thin.
Step-by-Step Instructions
- Prep the Candy: Before you even turn on the oven, take a sharp, non-serrated knife and carefully slice several M&Ms in half. These will be your bunny ears. Do this ahead of time so you aren’t rushing while the cookies are hot.
- Preheat and Prep: Set your oven to 350℉ (175℃). Line your large baking sheets with parchment paper. This prevents sticking and ensures the bottoms don’t brown too quickly.
- Creaming: In your stand mixer, beat the softened butter and sugar for at least 2-3 minutes. You want the mixture to look pale and fluffy. This aeration is what makes the cookies soft.
- Wet Ingredients: Add the egg and vanilla extract. Mix on medium speed until the batter looks smooth and homogenous.
- Dry Ingredients: Whisk the flour, baking powder, baking soda, and salt in a separate bowl. With the mixer on low, gradually add the dry ingredients to the wet. Stop as soon as the last streak of flour disappears.
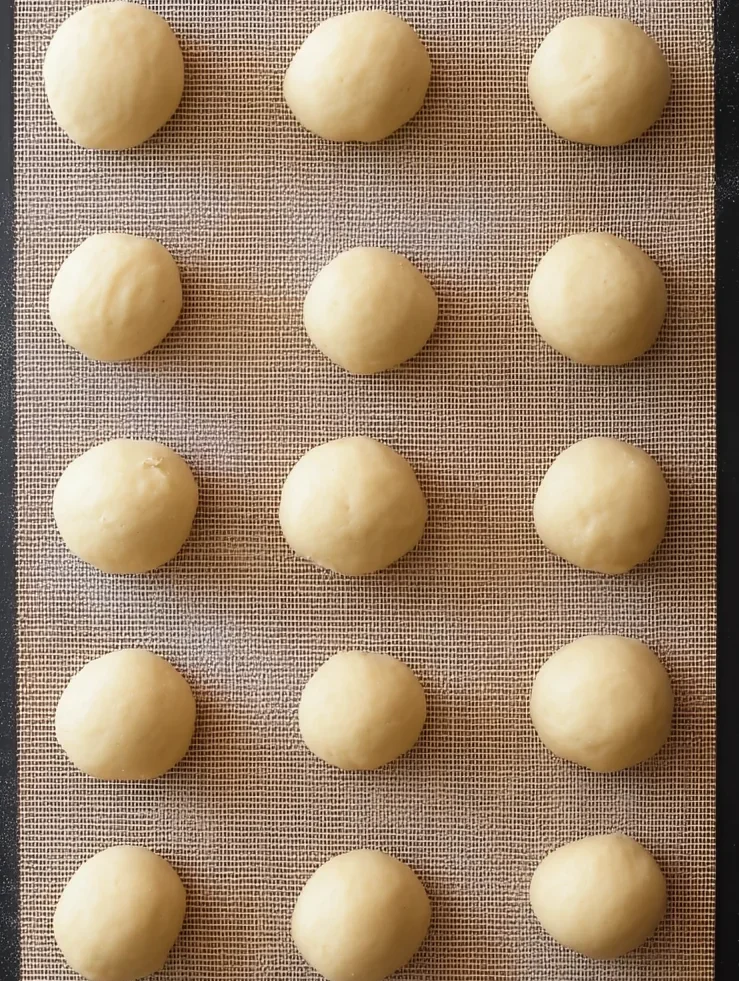
- Shape and Flatten: Scoop two tablespoons of dough and roll into a smooth ball. Place them 2 inches apart on the sheet. Use the bottom of a glass to gently press them into disks about 1/2 inch thick.
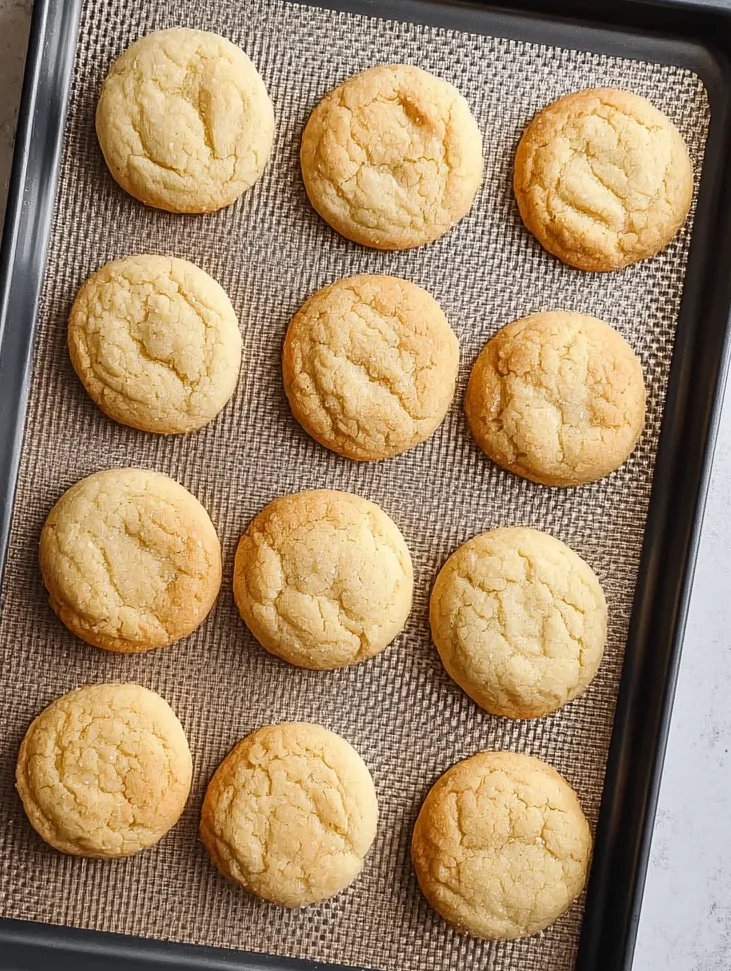
- Bake: Slide the tray into the center rack for 9-11 minutes. The cookies should look set on the edges but still appear slightly underdone in the center.
- Decorate: This is the critical step! Let the cookies cool for 2 minutes. While they are still warm and soft, press one whole M&M into the center and two halves above it. The residual heat will “glue” the candy to the cookie without melting the shell.
Expert Baking Tips
To achieve “bakery-style” perfection, always use room temperature eggs and butter; this ensures the emulsion doesn’t break. When slicing the M&Ms, use a gentle sawing motion rather than pressing straight down to prevent the candy shell from shattering. Another secret is the “pan bang” method—if your cookies look too puffy, gently tap the baking sheet on the counter immediately after taking them out of the oven to deflate them slightly. Finally, never overbake! These cookies will continue to firm up as they cool on the baking sheet. If they look “done” in the oven, they are likely overbaked.
The Secret to Perfect M&M Bunny Placement
The timing of adding your M&Ms is the difference between a cute cookie and a melted mess. If you add the M&Ms before baking, the chocolate will expand, cracking the beautiful pastel shells, and the colors may bleed into the dough. If you wait until the cookies are completely cold, the candies won’t stick. The “sweet spot” is the 2-minute mark after the tray leaves the oven. At this point, the cookie is still malleable enough to accept the candy but cool enough that the chocolate inside the M&M stays solid. This ensures your bunnies look crisp, clean, and professional every single time.
Serving Suggestions
Serve these delightful cookies on a white ceramic platter to let the pastel colors pop. they pair wonderfully with a cold glass of milk or a hot cup of herbal tea. For an extra festive touch, place them in individual cellophane bags tied with a ribbon to include in Easter baskets. They also make a fantastic centerpiece when arranged around a bowl of chocolate eggs or nestled into edible “grass” for a dessert display.
Storage & Make-Ahead Tips
These cookies stay fresh and soft for up to 5 days when stored in an airtight container at room temperature. To keep them extra soft, place a slice of white bread in the container; the cookies will absorb the moisture from the bread. You can also freeze the baked cookies (without the M&Ms) for up to 3 months. If you want to prep ahead, the dough can be refrigerated for 48 hours before baking.
FAQs
Can I use chocolate chips instead of M&Ms?
While you can use chocolate chips for flavor, they won’t provide the distinct “bunny” shape that the flat M&Ms offer. If you must use chips, try to find the “mega” chips for the face and mini chips for the ears.
Why did my M&Ms crack?
Cracking usually happens if the cookies are too hot when the candies are applied, or if the candies were baked in the oven. Stick to the 2-minute cooling rule for the best results.
Can I make these cookies smaller?
Yes! You can use one tablespoon of dough instead of two. Just reduce the baking time to 7-8 minutes and ensure you have enough halved M&Ms for the smaller “bunny” faces.
How do I get perfectly round cookies?
Use a round cookie cutter that is slightly larger than the cookie. Immediately after baking, place the cutter over the cookie and gently “scoot” it in a circular motion to pull in any uneven edges.
These Easter Bunny M&M Cookies are the perfect blend of whimsy and flavor. They prove that you don’t need a pantry full of specialty tools to create a memorable holiday dessert. With just a few simple ingredients and a little bit of creativity, you can whip up a batch of treats that will bring smiles to faces of all ages. Happy baking, and may your spring be filled with sweetness and joy!
PrintEaster Bunny M&m Cookies

These Easter Bunny M&M Cookies are the ultimate spring treat. Featuring a soft-baked sugar cookie base and a clever M&M decoration technique, they are as fun to make as they are to eat!
Ingredients
1 cup Butter, softened
1 ½ cup White Granulated Sugar
1 Large Egg
1 teaspoon Pure Vanilla Extract
2 ¾ cups All-Purpose Flour
1 teaspoon Baking Powder
½ teaspoon Baking Soda
½ teaspoon Salt
1 bag Pastel M&M’s (for faces and ears)
Instructions
1. Prepare the ‘ears’ by slicing half of your M&Ms in half vertically using a sharp knife.
2. Preheat your oven to 350℉ and line a baking sheet with parchment paper or a silicone mat.
3. In the bowl of an electric mixer, cream together the softened butter and granulated sugar until light and fluffy.
4. Add the egg and vanilla extract, continuing to mix until fully incorporated.
5. In a separate medium bowl, whisk together the flour, baking powder, baking soda, and salt.
6. Slowly pour the dry ingredients into the mixer on low speed until the dough just comes together.
7. Scoop two tablespoons of dough at a time and roll into balls. Place on the baking sheet and flatten slightly into disks.
8. Bake for 9-11 minutes or until the edges are just set but the tops still look soft.
9. Let the cookies cool for exactly 1-2 minutes on the pan. Gently press one whole M&M into the center for the face and two halves above it for the ears.
Notes
Do not add the M&Ms before baking or the colors will bleed and the candy shells may crack.
Ensure the butter is room temperature but not melted for the best cookie texture.
Use a serrated knife to gently saw the M&Ms in half to avoid shattering the shells.


