
The arrival of spring brings a craving for bright colors, festive gatherings, and, of course, delicious treats that don’t require hours in a hot kitchen. These Easter Egg Rice Krispie Treats are the perfect solution for busy parents and holiday hosts alike. Combining the nostalgic, gooey crunch of a classic marshmallow treat with a festive seasonal twist, these egg-shaped delights are as fun to make as they are to eat. Whether you are stuffing them into Easter baskets or serving them at a backyard brunch, their vibrant candy-dipped edges and shimmering sprinkles make them an instant hit. In this guide, we will walk you through the professional secrets to achieving that perfect, soft-pull texture and the best techniques for shaping and decorating your cereal treats like a pro.
Why You’ll Love This Recipe
You will absolutely adore this recipe because it strikes the perfect balance between simplicity and visual appeal. First and foremost, it is a no-bake dessert, meaning you can whip these up without touching the oven—ideal for those unpredictable spring days. The addition of extra miniature marshmallows at the end creates “pockets of goo” that elevate the texture far beyond store-bought versions. Furthermore, the customization options are endless; you can swap colors, sprinkles, and even cereal types to suit any occasion. It is a kid-friendly activity that yields professional-looking results every single time, making it a high-reward project for minimal effort.
What Is An Easter Egg Rice Krispie Treat?
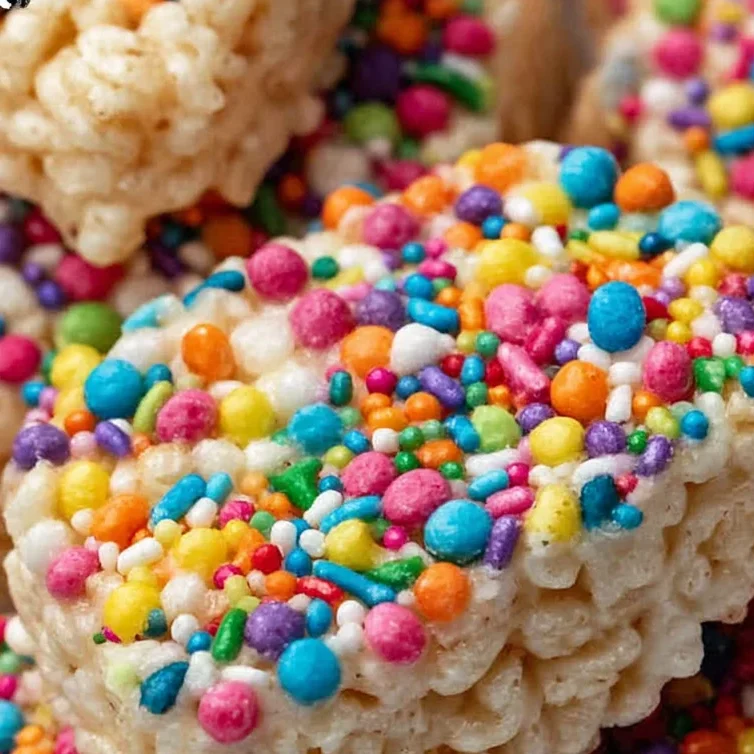
An Easter Egg Rice Krispie Treat is a festive iteration of the classic American marshmallow cereal bar. Traditionally made by combining puffed rice cereal with melted butter and marshmallows, this version is specifically molded into oval “egg” shapes using cookie cutters. To add a holiday flair, the treats are partially submerged in melted candy wafers—often in pastel shades like turquoise, pink, or lavender—and finished with a flourish of sprinkles. This transformation turns a standard lunchbox snack into a gourmet-looking holiday centerpiece that celebrates the iconography of the spring season while remaining approachable and nostalgic.
Ingredients
To create the ultimate Easter treat, quality and freshness are paramount. Here is a breakdown of what you’ll need:
- Butter or Margarine: This provides the essential fat that keeps the treats soft and adds a rich, savory backbone to the sweetness of the marshmallows.
- Marshmallows (The Star Component): We use a two-pronged approach. Regular marshmallows are melted down to create the structural “glue,” while miniature marshmallows are added later to provide those iconic, soft white clouds of texture throughout the bar. Pro Tip: Always use a fresh, unopened bag. Older marshmallows lose their moisture and will result in a hard, brittle treat.
- Rice Krispies Cereal: The classic toasted rice cereal provides the necessary “snap, crackle, and pop.” Ensure your cereal is fresh for maximum crunch.
- Turquoise Candy Melts: These are vanilla-flavored wafers designed for easy melting and dipping. They provide a smooth, matte finish that sets quickly at room temperature.
- Candy Sprinkles: Choose a mix of nonpareils, sanding sugar, or festive shapes to add texture and visual excitement.
Ingredient Substitutions & Tips
If you find yourself missing an ingredient, don’t worry! You can easily adapt this recipe. If you don’t have turquoise candy melts, high-quality white chocolate chips dyed with oil-based food coloring work beautifully. For a dairy-free version, substitute the butter with a vegan buttery spread and ensure your marshmallows are gelatin-free. Want to change the flavor profile? Add a teaspoon of vanilla extract or a pinch of sea salt to the melted marshmallow mixture to enhance the depth of the sweetness. For an extra crunch, you can even substitute half of the Rice Krispies with Cocoa Krispies for a “chocolate soil” egg effect.
Step-by-Step Instructions
- Melt the Base: Begin by placing your butter in a large saucepan over low heat. Patience is key here; high heat can scorch the butter and toughen the marshmallows. Once the butter is liquid, add the regular marshmallows. Stir constantly with a silicone spatula until the mixture is smooth and glossy.
- Incorporate the Cereal: Remove the pan from the heat immediately. This prevents the sugar from over-caramelizing. Fold in the Rice Krispies cereal and the extra mini marshmallows. Stir gently but thoroughly until every grain of cereal is coated in marshmallow goodness.
- The Pressing Technique: Lightly coat a 9×13-inch pan with cooking spray. Transfer the mixture to the pan. Expert Secret: Do not pack the mixture down hard. Use wet hands or a greased spatula to gently pat it into a 1/2-inch thick layer. Over-packing leads to hard, dense treats.
- Cutting the Shapes: Once slightly cooled but still pliable, use an egg-shaped cookie cutter to stamp out your treats. If the cutter sticks, dip it in water or spray it with non-stick spray between cuts.
- The Finishing Touch: Melt your candy melts in the microwave in 30-second intervals. Dip the bottom third of each egg into the melted candy, allow the excess to drip off, and immediately press into a bowl of sprinkles. Let them set on a wire rack for 15 minutes.
Expert Baking/Cooking Tips
For the best results, always work quickly once the marshmallows are melted, as they begin to set as soon as the temperature drops. If you find your treats are too sticky to handle, lightly dampen your hands with water; the moisture acts as a barrier against the sugar. To achieve a perfectly smooth candy coating, add a teaspoon of coconut oil or shortening to your candy melts—this thins the consistency and creates a professional “shell” look. Finally, always store your treats at room temperature; refrigeration can make the cereal soggy and the marshmallows rubbery.
Best Egg-Shaping Techniques
While cookie cutters are the easiest way to get uniform eggs, you can also hand-mold these for a more “rustic” look. If you don’t have a cutter, grease your hands generously and roll about 1/4 cup of the mixture into a ball, then taper one end to create an ovoid shape. Another great tip for clean edges with a cutter is to “wiggle” the cutter slightly before lifting it up. This severs the marshmallow strands cleanly, leaving you with a sharp, defined egg shape that looks like it came from a professional bakery.
Serving Suggestions
These treats are best served on a large white platter to make the turquoise and pastel colors pop. They also make wonderful “place cards” for an Easter brunch table—simply wrap them in clear cellophane bags, tie with a silk ribbon, and attach a name tag. For a fun kids’ activity, set up a “decorating station” where children can dip their own treats into various colors of melted chocolate and different types of toppings like crushed Oreos or mini chocolate chips.
Storage & Make-Ahead Tips
Rice Krispie treats are best enjoyed within 24–48 hours for maximum freshness. Store them in an airtight container at room temperature, using wax paper or parchment paper between layers to prevent them from sticking together. If you need to make them ahead of time, you can freeze the undecorated egg shapes for up to six weeks. Simply thaw at room temperature for an hour before dipping them in the candy melts and adding sprinkles.
FAQs
Can I use marshmallow fluff instead of marshmallows?
While you can use fluff, the treats will be much softer and may not hold the egg shape as well as those made with traditional marshmallows. We recommend sticking to the solid variety for shaped treats.
Why did my Rice Krispie treats turn out hard?
This usually happens for two reasons: the marshmallows were overcooked on high heat, or the mixture was pressed too firmly into the pan. Use low heat and a gentle touch!
How do I keep the treats from sticking to my hands?
Water is your best friend. Lightly dampen your palms before pressing the mixture into the pan or handling the egg shapes.
Can I use different cereal?
Yes! Fruity Pebbles or Honey Nut Cheerios make for delicious and colorful variations of this recipe.
How long does the candy coating take to set?
At room temperature, candy melts usually set in about 15 to 20 minutes. You can speed this up by placing them in the fridge for 5 minutes.
These Easter Egg Rice Krispie Treats are a testament to the fact that you don’t need a lot of time or fancy equipment to create something magical. With their gooey texture, bright colors, and festive crunch, they are the quintessential spring snack. Whether you’re a seasoned baker or a beginner, this recipe offers a foolproof way to bring a little extra joy to your holiday celebrations. Happy snacking!
PrintEaster Egg Rice Krispie Treats
Festive and gooey Easter Egg Rice Krispie Treats dipped in vibrant candy melts and topped with seasonal sprinkles.
Ingredients
3 tablespoons of butter or margarine
10 ounces regular marshmallows OR one 16-ounce package of regular marshmallows (omit 4 cups of mini marshmallows in this case)
4 cups of miniature marshmallows
6 cups of Rice Krispies
½ cup of turquoise candy melts (or any spring color of choice)
candy sprinkles
Instructions
1. In a large saucepan, melt butter over low heat. Add marshmallows and stir until completely melted. Remove from heat.
2. Add cereal. Stir until well coated.
3. Pour the mixture into a 9x13x2 pan that has been coated with cooking spray. Use a slightly wet wooden spoon or spatula (or just CLEAN, wet hands) to roll it out until it is about ½-inch thick.
4. Use an egg-shaped cookie cutter to make egg shapes (periodically dip the cookie cutter in water to keep the marshmallows from sticking to it).
5. Lay the egg shapes on a cooling rack until they’re firm enough to handle.
6. Heat the candy melts in the microwave in a small bowl in short bursts until melted. Dip one end of the eggs into it.
7. Return to the cooling rack momentarily, with a cookie sheet underneath to catch any drips.
8. Dip the treat ends into sprinkles and return to the cooling rack until they’re firm.
Notes
For best results, use a fresh, unopened bag of marshmallows.
Spraying your wooden spoon with cooking spray helps to stir the sticky mixture without it ending up sticking all over the spoon.
To pop the Rice Krispie treats out of the cookie cutter, wet your hands so they are moist, and you will be able to remove the treats easier.
Alternatively, you can microwave butter and marshmallows on HIGH for about 3 minutes, stirring after 2 minutes; stir until smooth.


