
As the holiday season draws near, the air fills with the delightful scent of pine, spices, and, if you’re lucky, the sweet, refreshing aroma of peppermint. For me, Sophie, a passionate home baker and dessert enthusiast, there’s nothing quite like whipping up festive treats that bring joy without the stress. And when it comes to effortless holiday magic, this easy peppermint fudge recipe takes center stage.
Imagine: creamy, melt-in-your-mouth chocolate infused with a cool burst of peppermint, all topped with festive, crunchy candy cane bits. It’s a sensory delight that instantly transports you to a winter wonderland. Best of all? This recipe is entirely no-bake, requiring only 15 minutes of active prep time before a brief chill in the fridge. That’s right – no oven, no candy thermometer, just pure, unadulterated holiday deliciousness accessible to cooks of all skill levels.
Whether you’re looking for a last-minute gift, a stunning addition to your holiday dessert platter, or just a simple sweet indulgence for yourself, this peppermint fudge is your answer. It’s incredibly satisfying to make, yields a generous batch, and guarantees to be a crowd-pleaser. Let’s dive into making this utterly irresistible treat that will make your festive season a little sweeter and a lot easier!
Why You’ll Love This Easy Peppermint Fudge Recipe
This isn’t just another holiday recipe; it’s a game-changer for festive baking. Here’s why this no-bake peppermint fudge will quickly become a cherished part of your holiday tradition:
- No-Bake Bliss: Forget heating up your kitchen or fussing with complex baking techniques. This fudge comes together beautifully with just a microwave and a few stirs, making it perfect for busy schedules or when your oven is already occupied with the main holiday feast.
- Quick & Simple Prep: With only 15 minutes of hands-on time, you can have the fudge cooling in the refrigerator in a flash. It’s ideal for spontaneous craving fixes or when you need a delicious dessert in a hurry.
- Irresistible Flavor Combination: The marriage of rich, creamy milk chocolate with the invigorating zing of peppermint is a classic for a reason. It’s comforting, refreshing, and utterly addictive, especially when complemented by the subtle crunch of candy canes.
- Perfect for Holidays & Gifting: Peppermint fudge embodies the festive spirit. Its vibrant colors and traditional holiday flavors make it an excellent choice for Christmas parties, cookie exchanges, or beautifully packaged homemade gifts for friends, family, and neighbors.
- Crowd-Pleaser Guaranteed: This recipe yields 16 generous squares of fudge, ensuring there’s enough to share (or to keep all to yourself!). Its universal appeal means it disappears quickly from any dessert spread.
- Beginner-Friendly: If you’re new to making candy or fudge, this recipe is a fantastic starting point. It’s virtually foolproof, building confidence in the kitchen while delivering impressive results.
Gather Your Simple Ingredients
One of the beauties of this easy peppermint fudge is its short and sweet ingredient list. Each component plays a crucial role in creating the perfect texture and flavor profile.
- 395g Sweetened Condensed Milk: This is the magic ingredient! Sweetened condensed milk is vital for the fudge’s signature creamy, smooth texture and sweetness. Make sure to grab sweetened condensed milk and not evaporated milk, as they are not interchangeable here.
- 510g Milk Chocolate (Roughly Chopped): High-quality chocolate makes all the difference. While chocolate chips work, I prefer using good quality milk chocolate bars, roughly chopped. This helps it melt more smoothly and creates a richer, more luxurious fudge base. The type of chocolate (milk, semi-sweet, dark) can also be adjusted to your preference.
- 3 Tbsp Unsalted Butter: A touch of butter adds richness and contributes to that desirable melt-in-your-mouth consistency. Unsalted butter allows you to control the overall saltiness of your fudge.
- 1 Tsp Peppermint Extract: This is where the festive flavor comes in! Peppermint extract is potent, so a little goes a long way. Start with 1 teaspoon, but feel free to add a tiny bit more to taste if you prefer a stronger peppermint kick.
- 1 Tsp Vanilla Extract: A good quality vanilla extract enhances the overall flavor profile, rounding out the sweetness and complementing the chocolate and peppermint beautifully. Don’t skip it!
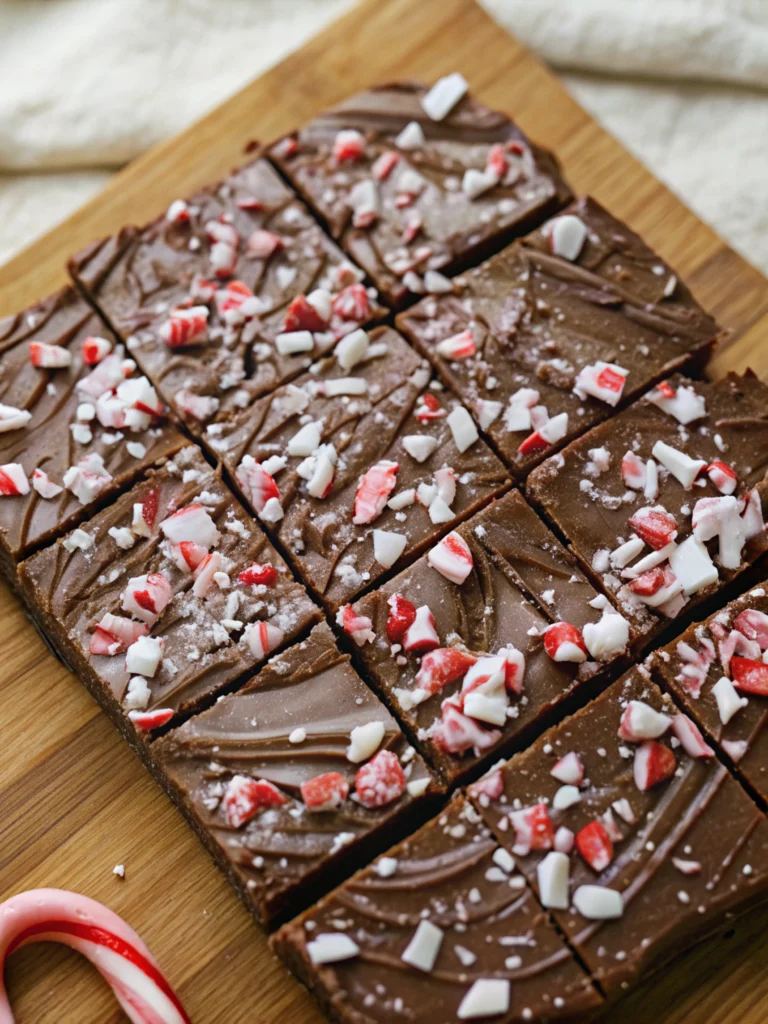
- Crushed Candy Canes (for topping): Not just for decoration, crushed candy canes provide a delightful textural contrast and an extra burst of peppermint flavor. They also add that unmistakable holiday sparkle.
How to Make Peppermint Fudge: Step-by-Step Guide
Making this microwave peppermint fudge is incredibly straightforward. Follow these simple steps for a truly delightful holiday treat:
- Prepare Your Pan: Start by greasing and lining an 8-inch square baking pan with parchment paper. It’s crucial to leave an overhang on all sides – these “handles” will make it incredibly easy to lift the set fudge out of the pan later. Set your prepared pan aside.
- Combine Core Ingredients: In a large, microwave-safe bowl, combine your roughly chopped milk chocolate, the entire can of sweetened condensed milk, and the unsalted butter. Ensure the bowl is large enough to comfortably stir the mixture.
- Microwave to Melt: Place the bowl in the microwave and heat in 30-second bursts. After each burst, remove the bowl and stir the mixture thoroughly with a spatula. This gentle approach prevents the chocolate from burning or seizing. Continue this process (usually 2-3 minutes total) until the chocolate is fully melted and the mixture is smooth, glossy, and well combined. There should be no lumps of chocolate remaining.
- Stir in Extracts: Once the chocolate mixture is perfectly smooth, add the peppermint extract and vanilla extract. Stir vigorously with your spatula until both extracts are fully incorporated into the thick, luscious fudge base. The mixture will be quite dense at this point.
- Pour and Smooth: Working quickly, pour the warm fudge mixture into your prepared 8-inch square pan. Use your spatula to spread and smooth the top evenly, ensuring it reaches all corners of the pan.
- Add Festive Topping: Immediately and generously sprinkle the crushed candy canes evenly over the entire surface of the fudge. Gently press them down with the back of your spatula or your fingers to help them adhere to the warm fudge.
- Chill to Set: Transfer the pan to the refrigerator and allow the fudge to chill for at least 2 hours, or until it is completely firm and set. Patience here is key for perfectly sliceable fudge!
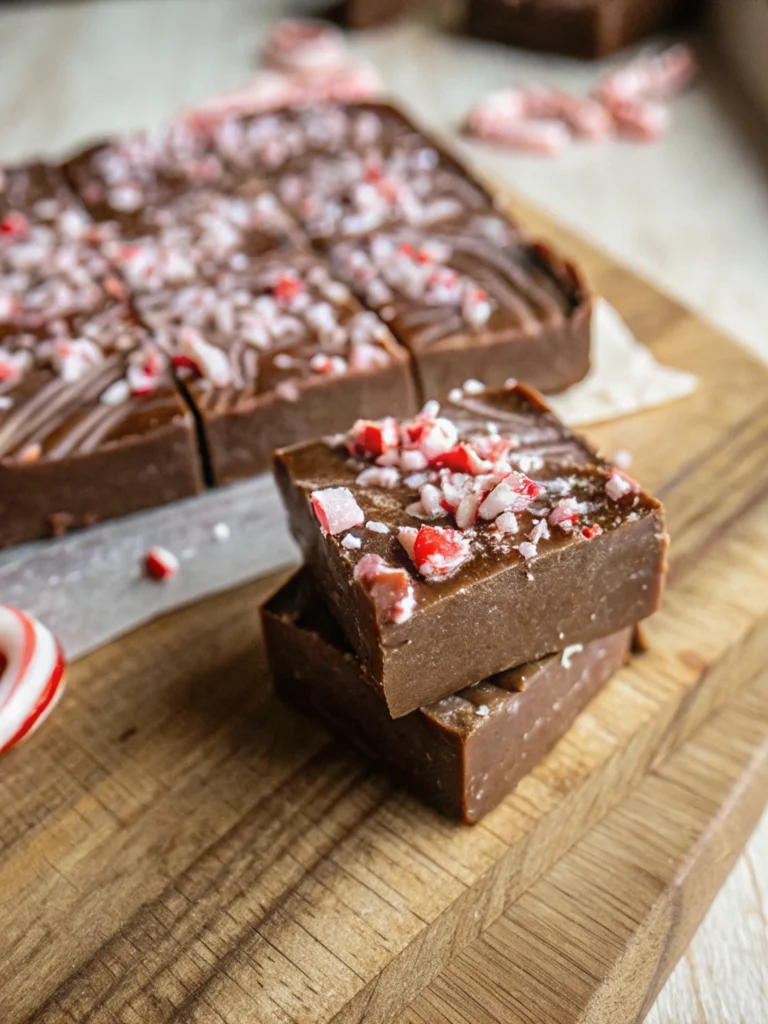
- Slice and Enjoy: Once fully set, use the parchment paper overhangs to carefully lift the entire slab of fudge out of the pan and onto a clean cutting board. Using a sharp knife, slice the fudge into 16 even squares, or your preferred size. Now, gather your loved ones and enjoy your homemade, effortlessly delicious peppermint fudge!
Expert Tips for Flawless Fudge
Even though this easy peppermint fudge recipe is designed to be simple, a few expert tips can elevate your results and ensure a perfect batch every time.
- Parchment Paper is Your Best Friend: Seriously, do not skip lining your pan! The overhangs are crucial for easy removal. Trying to pry fudge from a pan without it can be a frustrating and messy endeavor. If you don’t have parchment, foil works in a pinch, but ensure it’s well-greased.
- Gentle Microwave Technique: The 30-second bursts are non-negotiable. Overheating chocolate, especially with dairy, can cause it to seize, burn, or become grainy. Stirring frequently helps distribute the heat evenly and ensures a smooth, creamy finish. Don’t rush this step!
- Quality of Ingredients Matters: While this recipe is forgiving, using good quality milk chocolate will significantly impact the flavor and texture of your fudge. It melts more smoothly and provides a richer chocolate base compared to lower-quality compound chocolates.
- Don’t Over-Mix After Extracts: Once the extracts are added, stir just until combined. Excessive stirring can start to introduce air, which might slightly alter the texture.
- Chill Thoroughly: Resist the urge to cut the fudge before it’s completely firm. A well-chilled fudge will give you clean, sharp slices. If it’s too soft, your pieces will be crumbly and messy. Pop it back in the fridge if it feels too soft.
- Warm Your Knife for Clean Slices: For extra-clean cuts, especially if your fudge is very cold, run a sharp knife under hot water, wipe it dry, and then slice. Repeat this process occasionally for the neatest squares.
Creative Variations & Customization Ideas
This peppermint fudge recipe is fantastic as is, but it also serves as a wonderful base for creative experimentation. Here are some ideas to make it your own:
- Chocolate Choices:
- Dark Chocolate Peppermint Fudge: For a richer, less sweet treat, use high-quality dark chocolate (60-70% cocoa).
- White Chocolate Peppermint Fudge: This creates a stunning visual contrast with the red candy canes and offers a sweeter, milder flavor. You might reduce the amount of vanilla extract slightly.
- Swirled Fudge: Melt separate batches of milk and white chocolate fudge, then gently swirl them together in the pan before chilling for a marbled effect.
- Alternative Toppings:
- Chocolate Drizzle: Once the fudge is set, melt a little extra chocolate (white or dark) and drizzle it artfully over the top.
- Crushed Cookies: Instead of candy canes, try crushed Oreos or chocolate wafers for a different texture.
- Chopped Nuts: Toasted pecans, walnuts, or almonds can add a delightful crunch.
- Sprinkles: Festive holiday sprinkles can add an extra pop of color, especially if you’re gifting.
- Flavor Twists:
- Mint Chocolate Chip Fudge: Stir in a handful of mini chocolate chips along with the extracts.
- Orange Peppermint: A tiny hint of orange zest or extract can complement chocolate beautifully.
- Espresso Boost: A half teaspoon of instant espresso powder dissolved in a tiny bit of hot water (or mixed directly into the melted chocolate) can deepen the chocolate flavor.
- Liqueur Infusion: For an adults-only version, a tablespoon of peppermint schnapps or crème de menthe stirred in with the extracts can add a sophisticated touch.
Storage, Serving, and Gifting Homemade Peppermint Fudge
You’ve made a beautiful batch of homemade peppermint fudge – now what? Here’s how to best store, serve, and even gift your delectable creation.
Storage:
- Refrigerator: Store the fudge in an airtight container in the refrigerator for up to 2-3 weeks. The cold helps maintain its firm texture and freshness.
- Freezer: For longer storage, you can freeze peppermint fudge for up to 2-3 months. Wrap individual pieces or the entire slab tightly in plastic wrap, then place them in a freezer-safe airtight container or freezer bag. Thaw in the refrigerator overnight or at room temperature for an hour before serving.
Serving:
- Room Temperature or Chilled: Fudge is delicious served either chilled directly from the fridge or allowed to come to room temperature for about 15-20 minutes, which can enhance its creaminess.
- Cutting: Always cut the fudge when it is cold and firm for the cleanest slices. Use a sharp, warm knife (as mentioned in the tips section) for the best results.
Gifting:
Homemade peppermint fudge makes an incredibly thoughtful and appreciated holiday gift.
- Packaging: Arrange fudge squares in festive mini tins, cellophane bags tied with ribbon, or small gift boxes. Add a cute tag with ingredient information for those with allergies.
- Bundles: Pair the fudge with other homemade goodies like cookies, hot cocoa mix, or candied nuts for a lovely holiday gift basket.
- Portion Control: Slice the fudge into smaller, bite-sized pieces for gifting, making it easier for recipients to enjoy without feeling overwhelmed.
Frequently Asked Questions (FAQ)
How do you make easy peppermint fudge?
Making easy peppermint fudge involves just a few simple steps: melt chocolate, sweetened condensed milk, and butter in the microwave. Stir in peppermint and vanilla extracts, pour into a lined pan, top with crushed candy canes, and refrigerate until firm. It’s a no-bake wonder that eliminates the need for complex candy-making techniques. The key is to melt the chocolate mixture slowly in 30-second bursts, stirring well each time, to ensure a smooth, lump-free base.
What are the key ingredients for peppermint fudge?
The core ingredients for this delightful peppermint fudge are sweetened condensed milk (which provides its unique creamy texture and sweetness), milk chocolate (for that rich, classic chocolate taste), unsalted butter (adding a touch of richness and aiding in smoothness), peppermint extract (the star for its refreshing flavor), vanilla extract (to enhance the overall aroma), and crushed candy canes for a festive topping that adds both crunch and visual appeal.
How long does homemade peppermint fudge last?
When stored properly in an airtight container, homemade peppermint fudge can maintain its freshness for a significant period. In the refrigerator, it will last for up to 2-3 weeks. If you want to prepare it further in advance or save some for later, it freezes beautifully. Wrapped tightly in plastic wrap and placed in a freezer-safe container, it can be stored for up to 2-3 months. Just thaw it in the fridge before serving.
Can I use different types of chocolate in this fudge?
Absolutely! While milk chocolate provides a classic creamy flavor profile for this recipe, you are encouraged to experiment. Using high-quality dark chocolate (around 60-70% cocoa) will yield a richer, more intensely chocolatey fudge that’s less sweet. Alternatively, white chocolate can create a vibrant visual contrast with the red candy canes and offers a milder, sweeter flavor. You can even combine different types of chocolate for a custom blend!
Why is my peppermint fudge not setting?
If your peppermint fudge isn’t setting correctly, it could be due to a few common reasons. First, ensure you are using sweetened condensed milk and not evaporated milk, as they have different properties and are not interchangeable in this recipe. Second, make sure the chocolate, condensed milk, and butter mixture was thoroughly melted and smooth before adding the extracts. Any unmelted bits can affect the final set. Finally, patience is crucial: allow the fudge ample time to chill in the refrigerator – a minimum of 2 hours, but sometimes longer if your refrigerator isn’t very cold or your kitchen is particularly warm.
Get Ready to Indulge!
There you have it – a foolproof recipe for easy peppermint fudge that promises to be a highlight of your holiday season. This delightful treat combines the rich comfort of chocolate with the invigorating zest of peppermint, all made incredibly simple with a no-bake method. It’s perfect for gifting, entertaining, or simply enjoying a moment of festive bliss by yourself.
So, gather your ingredients, set aside a few minutes, and prepare to create a batch of fudge that’s as charming as it is delicious. I hope this recipe brings a little extra joy and sweetness to your home. Happy holidays and happy fudgemaking! Don’t forget to share your creations and tell us your favorite ways to enjoy this classic treat!
PrintEasy Peppermint Fudge

Delightful combination of smooth, creamy chocolate and refreshing peppermint, perfect for holiday gatherings or gifting.
- Prep Time: 15
- Total Time: 2h 15m
- Yield: 16 squares
- Category: Dessert, Holiday
- Method: No-Bake, Microwave
- Cuisine: American
Ingredients
395g Sweetened Condensed Milk
510g Milk Chocolate (Roughly Chopped)
3 Tbsp Unsalted Butter
1 Tsp Peppermint Extract
1 Tsp Vanilla Extract
Crushed Candy Canes (for topping)
Instructions
1. Grease and line an 8-inch square pan with parchment paper, leaving an overhang on the sides. Set aside.
2. In a large microwaveable bowl, combine the roughly chopped milk chocolate, sweetened condensed milk, and unsalted butter.
3. Microwave the mixture in 30-second bursts, stirring thoroughly after each burst, until the chocolate is fully melted and the mixture is smooth and combined. This usually takes 2-3 minutes total.
4. Using a spatula, stir in both the peppermint extract and vanilla extract until they are fully incorporated. The fudge mixture will be quite thick at this point.
5. Promptly pour the warm fudge mixture into the prepared pan. Use the spatula to smooth the top evenly.
6. Generously sprinkle the crushed candy canes evenly over the surface of the fudge. Lightly press them down to adhere.
7. Refrigerate the fudge for at least 2 hours, or until it is completely firm and set.
8. Once set, use the parchment paper overhang to carefully lift the fudge out of the pan. Place it on a cutting board, slice into 16 squares (or your desired size), and enjoy this delightful treat!
Notes
Line your pan: Be sure to line your baking pan with parchment paper, making sure to leave some edges hanging over the sides. This helpful technique makes it significantly easier to remove the fudge from the pan when you’re finally ready to slice it up.
Microwave slow: Stick to 30-second microwave bursts when making the fudge or else you could potentially burn the chocolate. Stir well after each burst.
Slice up once refrigerated: Once you remove the fudge from the fridge, it’s best to cut it up immediately while it’s still cold, as it is a lot easier to slice through when it has that firm texture. Taking this step will ensure you achieve clean, even pieces without much hassle.


