
Do you remember the sheer delight of fairy bread? That simple, magical combination of soft white bread, butter, and a generous cascade of rainbow sprinkles? It’s a quintessential Australian party treat, a vibrant symbol of childhood joy and carefree celebrations. What if we told you that nostalgic magic could be transformed into something even more substantial, more elegant, yet just as utterly delightful?
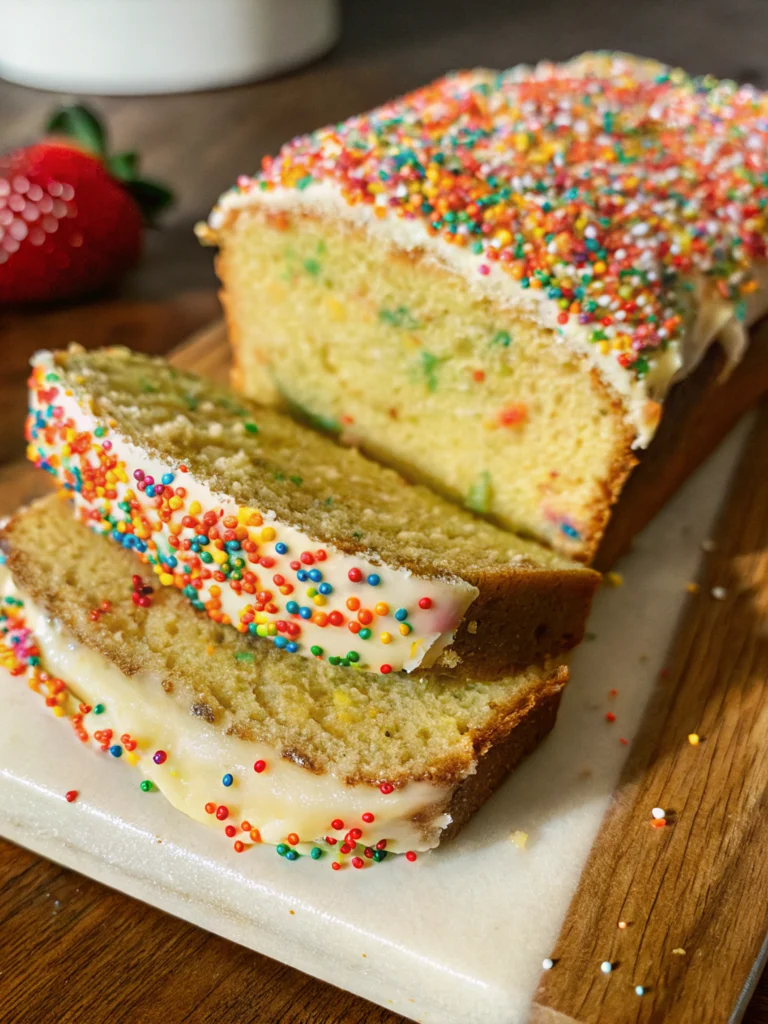
Enter the Fairy Bread Pound Cake: a whimsical, tender, and impossibly moist pound cake bursting with vanilla flavor and, of course, a colorful explosion of rainbow sprinkles. Topped with a silky vanilla buttercream and a final shower of edible confetti, this cake isn’t just a dessert; it’s a celebration in every slice.
This isn’t just a basic recipe; it’s your comprehensive guide to mastering a cake that will steal the show at any birthday, brunch, or afternoon tea. We’ll delve into the science behind a perfect pound cake, share expert tips for vibrant sprinkles, and troubleshoot common baking woes, ensuring your Fairy Bread Pound Cake is always a masterpiece.
What is Fairy Bread Pound Cake? A Sprinkled Slice of History
Before we dive into baking, let’s appreciate the roots of this delightful creation. Fairy bread itself is believed to have originated in Australia in the 1920s, a simple yet effective way to bring color and fun to children’s parties. Its charm lies in its simplicity and the universal appeal of sprinkles.
Our Fairy Bread Pound Cake takes this concept and elevates it. Imagine the dense, buttery crumb of a classic pound cake, infused with rich vanilla and studded throughout with those cheerful rainbow sprinkles. It’s then crowned with a creamy, dreamy vanilla buttercream, mimicking the ‘butter’ of the original fairy bread, before a final flourish of sprinkles. It’s comforting, nostalgic, and undeniably fun – a true fusion of classic baking and playful whimsy.
Why You’ll Fall in Love with This Fairy Bread Pound Cake Recipe
This isn’t just another cake; it’s an experience. Here’s why this recipe will become a treasured favorite:
- Nostalgia in Every Bite: It perfectly captures the fun and spirit of childhood fairy bread in a more grown-up, sophisticated form.
- Visually Stunning: Those rainbow sprinkles baked into the cake and decorating the top make it an instant showstopper, guaranteed to bring smiles.
- Irresistibly Moist & Tender: Thanks to key ingredients like sour cream and precise baking techniques, this pound cake boasts an incredibly soft, buttery crumb that melts in your mouth.
- Easier Than You Think: While it looks impressive, the process is straightforward, making it achievable for bakers of all skill levels.
- Perfect for Any Occasion: From children’s birthdays and baby showers to afternoon tea or a cheerful everyday treat, this cake fits right in.
- Expert Tips for Perfection: We’ve packed this guide with detailed advice to ensure your cake turns out perfectly every single time.
Ready to embark on a journey of sprinkles, vanilla, and pure baking joy? Let’s get started!
Recipe Snapshot
- Yields: 10 generous slices
- Prep time: 20 Minutes
- Cook time: 50-55 Minutes
- Total time: 1 Hour 15 Minutes
- Difficulty: Easy-Medium
Ingredients for Fairy Bread Pound Cake
Quality ingredients, prepared correctly, are the foundation of any great bake. Pay close attention to temperature and measurements for the best results!
Fairy Bread Pound Cake Ingredients
- 4 Eggs (Room Temperature): Crucial for emulsification and a smooth batter.
- 225g Unsalted Butter (Room Temperature): The backbone of a rich pound cake. Unsalted allows you to control the salt content.
- 200g Caster Sugar: Finer than granulated sugar, it dissolves more easily, contributing to a tender crumb.
- 180g Plain Flour: Standard all-purpose flour.
- 120g Sour Cream: The secret to an incredibly moist and tender cake, adding richness and a slight tang.
- 1/4 Tsp Salt: Balances the sweetness and enhances all the flavors.
- 2 Tbsp Vanilla Extract: Use a good quality pure vanilla extract for the best flavor.
- 1/2 Tsp Baking Powder: Provides a little lift to prevent the pound cake from being too dense.
- 60g Rainbow Sprinkles: Choose jimmie-style sprinkles for baking into the batter as they are less prone to bleeding.
Vanilla Buttercream Ingredients
- 85g Unsalted Butter (Softened): Essential for a smooth, creamy buttercream.
- 250g Powdered Sugar (Sifted): Also known as confectioners’ sugar or icing sugar. Sifting is crucial for a lump-free frosting.
- 2 Tbsp Milk: Adjusts the consistency of your buttercream.
- 1 Tsp Vanilla Extract: Pure vanilla extract is best here too.
- Rainbow Sprinkles for Topping: Feel free to use jimmies or nonpareils for the final flourish!
Essential Equipment You’ll Need
Having the right tools makes baking a breeze.
- 9×5 inch Loaf Tin: The perfect size for this pound cake.
- Electric Mixer (Stand or Handheld): For creaming butter and sugar, and making buttercream. It’s a huge time-saver.
- Large Mixing Bowls: Several bowls make prep organized.
- Whisk: For combining dry ingredients.
- Rubber Spatula: For scraping bowls and gentle folding.
- Measuring Cups & Spoons / Digital Kitchen Scale: For accurate ingredient measurements. A scale is highly recommended for baking, especially with flour and sugar.
- Wire Cooling Rack: Essential for cooling the cake evenly and preventing sogginess.
- Wooden Skewer or Toothpick: For testing cake doneness.
Step-by-Step Instructions
Follow these detailed steps to create your magical Fairy Bread Pound Cake. Remember to read through everything once before you start!
Making the Fairy Bread Pound Cake
- Prepare the Oven and Baking Tin:
- Preheat your oven to 175°C (350°F).
- Grease your 9×5 inch loaf tin thoroughly with butter or non-stick spray. Then, line it with parchment paper, leaving an overhang on the long sides to create “slings.” This makes removing the cooled cake much easier. Set aside.
- Combine Dry Ingredients:
- In a medium bowl, whisk together the 180g plain flour, 1/4 tsp salt, and 1/2 tsp baking powder. Whisking ensures they are evenly distributed and aerates the flour. Set aside.
- Cream Butter and Sugar:
- In a separate large bowl, using an electric mixer (with the paddle attachment if using a stand mixer), beat the 225g room temperature unsalted butter for about 2 minutes on medium speed until it’s softened and creamy.
- Add the 200g caster sugar and continue to beat on medium-high speed for another 3-5 minutes. The mixture should become visibly lighter in color, fluffy, and increased in volume. This “creaming” process incorporates air, which is vital for the cake’s texture. Scrape down the sides of the bowl frequently.
- Incorporate Eggs:
- With the mixer on medium-low speed, beat in the 4 room temperature eggs, one at a time. Add the next egg only after the previous one is fully incorporated into the batter. This ensures a stable emulsion and prevents the batter from curdling.
- Add Wet Ingredients:
- Stir in the 120g sour cream and 2 Tbsp vanilla extract. Beat once more on low speed until just combined. Overmixing at this stage can start to develop gluten.
- Fold in Flour Mixture:
- Remove the bowl from the mixer. Add the whisked dry ingredient mixture to the wet batter.
- Using a rubber spatula, gently fold the flour mixture into the batter until just combined. Stop mixing as soon as no streaks of dry flour are visible. Overmixing will lead to a tough, dense cake.
- Fold in Sprinkles:
- Add the 60g rainbow sprinkles to the batter.
- Gently fold them in with your spatula until they are just evenly distributed. Again, do not overmix! Excessive mixing can cause the colors of the sprinkles to bleed into the batter, turning your beautiful rainbow into a murky mess.
- Bake the Pound Cake:
- Pour the pound cake batter into your prepared loaf tin. Use your spatula to gently smooth the top surface.
- Bake for 50-55 minutes. The cake is done when a wooden skewer or toothpick inserted into the very center comes out clean or with a few moist crumbs attached (but no wet batter).
- Cool the Cake:
- Allow the pound cake to cool in the pan for about 10 minutes. This helps the cake firm up and prevents it from breaking when removed.
- Using the parchment paper slings, carefully lift the cake out of the tin and transfer it to a wire rack to cool completely. It’s crucial that the cake is fully cooled before frosting; otherwise, your buttercream will melt!
Crafting the Vanilla Buttercream
- Make Vanilla Buttercream:
- In a large bowl, using your electric mixer, beat together the 85g softened unsalted butter, 250g sifted powdered sugar, and 1 tsp vanilla extract on low speed until combined, then increase to medium-high and beat until light and fluffy.
- Pro Tip: Sifting powdered sugar is key to a smooth, lump-free buttercream!
- Adjust Buttercream Consistency:
- Add 2 tablespoons of milk and beat until combined and smooth. If you prefer your buttercream to be thicker, start with just 1 tablespoon of milk and add more sparingly until you reach your desired spreading consistency.
- Frost and Decorate:
- Once your pound cake is completely cool, use an offset spatula or knife to evenly spread the vanilla buttercream over the top.
- Immediately top with additional rainbow sprinkles for a vibrant, festive finish.
- Serve and Enjoy!
- Cut into as many slices as you like and enjoy your delightful Fairy Bread Pound Cake!
Expert Baking Tips for Pound Cake Perfection
Achieving the perfect pound cake is all about understanding a few fundamental baking principles. These tips will help you bake like a pro and ensure your Fairy Bread Pound Cake is exceptional every time.
Room Temperature is Key to Success
This is non-negotiable for pound cake!
- Butter: Soft, room temperature butter (should indent easily when pressed, but not be greasy or melted) creams better with sugar, incorporating more air and creating a lighter, fluffier texture.
- Eggs: Room temperature eggs emulsify much better with the creamed butter and sugar, preventing the batter from curdling and resulting in a smoother, more uniform cake structure.
- Sour Cream: Ensures the sour cream blends seamlessly into the batter without seizing or creating lumps, contributing to a consistently moist crumb.
- How to get ingredients to room temp quickly: For butter, cut it into small pieces and let it sit for 30 minutes. For eggs, place them in a bowl of warm (not hot) water for 10-15 minutes.
The Creaming Method Demystified
The “cream butter and sugar until light and fluffy” step is crucial. This is where you incorporate air into the butter, creating tiny pockets that expand in the oven, giving your cake its rise and tender texture.
- Don’t rush it: Beat for the full 3-5 minutes. The mixture should visibly lighten in color and nearly double in volume.
- Scrape the bowl: Frequently scrape down the sides and bottom of the bowl to ensure everything is evenly combined.
Do NOT Overmix! (A Crucial Reminder)
This is the most common mistake in cake baking!
- After adding flour: Once you add the flour mixture, mix only until just combined. As soon as you see no more dry streaks of flour, stop. Overmixing develops gluten, which leads to a tough, dense, and rubbery cake. We want a tender crumb!
- After adding sprinkles: This applies even more to the sprinkles! Gentle folding is key. Aggressive mixing will cause the vibrant colors to bleed into the batter, leaving you with a muddy, dull-colored cake rather than a beautiful rainbow effect.
Choosing Your Sprinkles Wisely
Not all sprinkles are created equal when it comes to baking.
- Jimmie Sprinkles (Rod-shaped): These are generally preferred for baking into cake batter as they tend to hold their shape and color better, bleeding less than other types.
- Nonpareils (Tiny balls): While beautiful for topping, these are notorious for bleeding their color when mixed into wet batter and subjected to oven heat.
- Quality matters: Opt for sprinkles from reputable baking brands, as cheaper ones are more likely to bleed.
Achieving the Perfect Buttercream Consistency
Your buttercream should be smooth, creamy, and spreadable.
- Sift your powdered sugar: This is essential to prevent lumps and achieve a silky-smooth frosting.
- Adjust milk slowly: Start with less milk than you think you need, then add tiny amounts (half a tablespoon at a time) until you reach your desired consistency. You want it firm enough to hold its shape but soft enough to spread easily.
Patience in Cooling
Allowing your cake to cool properly is just as important as baking it correctly.
- In the pan: The initial 10 minutes in the pan allows the cake to firm up, making it less fragile when you transfer it.
- On the wire rack: Cooling completely on a wire rack ensures air circulation all around the cake, preventing condensation and a soggy bottom. Attempting to frost a warm cake will result in melted, runny frosting.
Troubleshooting Common Pound Cake Problems
Even experienced bakers face challenges. Here’s how to identify and prevent common issues with your Fairy Bread Pound Cake.
My cake is dry or dense!
- Overmixing: The most likely culprit. Refer to the “Do NOT Overmix!” tip.
- Incorrect measurements: Too much flour or not enough fat/liquid can lead to dryness. Use a kitchen scale for accuracy.
- Overbaking: Even a few extra minutes in the oven can dry out a pound cake. Start checking for doneness at the earliest suggested time.
My cake top cracked!
- This is very common for pound cakes and often desired! It’s a sign of a good, rich cake where the outside sets before the inside is fully baked, causing the top to split as it rises. Don’t worry about it – it adds character!
My cake sank in the middle!
- Underbaked: The center wasn’t fully cooked through and collapsed upon cooling.
- Oven temperature issues: An oven that’s too hot can cause the outside to set too quickly while the inside remains raw, leading to a collapse. Consider using an oven thermometer.
- Opening the oven door too early: Rapid temperature changes can cause delicate cakes to deflate. Avoid opening the oven door before the last 10-15 minutes of baking.
My sprinkles bled their color!
- Overmixing: As discussed, aggressive mixing can damage the sprinkles and release their dye.
- Type of sprinkles: Nonpareils are more prone to bleeding. Use jimmies for baking into the batter.
- Low-quality sprinkles: Invest in better quality sprinkles if this is a recurring issue.
Storage & Make-Ahead Guide
This Fairy Bread Pound Cake is excellent for making ahead, making it perfect for parties and gatherings.
- At Room Temperature (Frosted): Store the frosted pound cake in an airtight container at room temperature for up to 3-4 days. The buttercream will firm up slightly, but the cake will remain moist.
- In the Refrigerator (Frosted): If you live in a very warm climate or prefer to extend its shelf life, you can refrigerate the frosted cake for up to a week. Ensure it’s in an airtight container. Bring it to room temperature for at least an hour before serving for the best texture and flavor.
- Freezing (Unfrosted):
- Whole Cake: Once completely cooled, wrap the unfrosted pound cake tightly in plastic wrap, then again in aluminum foil. Freeze for up to 3 months. Thaw overnight in the refrigerator, then bring to room temperature before frosting and serving.
- Slices: You can also freeze individual slices, wrapped in plastic wrap and then foil. Thaw as needed.
- Freezing (Frosted): It is possible to freeze frosted cake, but the quality of the buttercream can sometimes be affected, and sprinkles might bleed more upon thawing. If doing so, freeze the cake uncovered until the frosting is firm, then wrap tightly in plastic wrap and foil.
Delicious Variations & Customizations
While the classic Fairy Bread Pound Cake is perfect as is, here are some ideas to customize it!
- Citrus Zest: Add the zest of one lemon or orange to the cake batter along with the wet ingredients for a brighter flavor profile.
- Almond Extract: Swap half the vanilla extract for almond extract for a lovely nutty depth.
- Glaze, Not Buttercream: For a lighter option, whisk together 1 cup of powdered sugar with 2-3 tablespoons of milk or lemon juice to create a simple glaze. Pour over the cooled cake.
- Themed Sprinkles: Use specific colored sprinkles for different holidays or events (e.g., red and green for Christmas, pastels for Easter, team colors for a sports party).
- Rainbow Swirl: Instead of folding all sprinkles in, divide a small portion of the batter, tint it with gel food coloring, then swirl it lightly into the sprinkle batter before baking for a marbled effect.
- Cream Cheese Frosting: For an extra tangy and rich topping, consider a cream cheese frosting instead of a vanilla buttercream.
Serving Suggestions
This Fairy Bread Pound Cake is a versatile dessert that can be enjoyed in many ways:
- Afternoon Tea: A gorgeous centerpiece alongside cups of tea or coffee.
- Birthday Parties: A fun, colorful alternative to a traditional layer cake.
- Brunch: Pairs wonderfully with fresh fruit and a mimosa.
- School Fairs or Bake Sales: Its eye-catching appearance makes it a guaranteed seller.
- Just Because: Sometimes, you just need a slice of happy, and this cake delivers!
Fairy Bread Pound Cake FAQ
What exactly is Fairy Bread Pound Cake?
Fairy Bread Pound Cake is a delicious modern take on the classic Australian party food, fairy bread. It combines the tender, rich crumb of a traditional pound cake with the playful joy of rainbow sprinkles, both baked into the cake and generously sprinkled on top of a creamy vanilla buttercream. It’s a nostalgic, whimsical dessert that’s perfect for celebrations or anytime you need a slice of happiness.
Can I make Fairy Bread Pound Cake ahead of time?
Yes, absolutely! The unfrosted pound cake can be baked up to 2-3 days in advance. Store it tightly wrapped at room temperature. The buttercream can also be made a day ahead and stored in the fridge, then brought to room temperature and re-whipped before frosting. For best results, frost the cake closer to serving time to keep the sprinkles vibrant and the buttercream fresh.
What kind of sprinkles should I use for Fairy Bread Pound Cake?
For baking into the cake batter, jimmie sprinkles (the long, rod-shaped ones) are generally recommended as they are less prone to bleeding color than nonpareils (the tiny, ball-shaped sprinkles). However, for topping the buttercream, you can use any rainbow sprinkles you prefer, including nonpareils, as they won’t bleed once on the frosting. Quality sprinkles from a reputable brand tend to hold their color better.
How do I prevent my pound cake from being dry or dense?
Several factors contribute to a moist and tender pound cake. Firstly, ensure all cold ingredients (butter, eggs, sour cream) are at room temperature. Secondly, do not overmix the batter once the flour is added; overmixing develops gluten, leading to a tough cake. Finally, avoid overbaking. Start checking for doneness at the earlier end of the suggested baking time with a skewer test. The sour cream in this recipe also helps keep the cake incredibly moist and tender.
How long does Fairy Bread Pound Cake last?
Stored properly at room temperature in an airtight container, Fairy Bread Pound Cake will stay fresh for 3-4 days. If refrigerated, it can last up to a week, though the texture might become slightly firmer. Bring it to room temperature before serving for the best flavor and texture. It can also be frozen, unfrosted, for up to 3 months when tightly wrapped.
Nutritional Information (Disclaimer)
Please note that the nutritional information provided is an estimate only. It will vary depending on the exact brands and quantities of ingredients used. This recipe focuses on providing a delicious and delightful treat rather than a health-focused one.
Conclusion: Slice Into Joy!
Baking should be a joyful experience, and this Fairy Bread Pound Cake truly embodies that spirit. It’s more than just a recipe; it’s an invitation to rediscover a bit of childhood wonder, to add a splash of color to your day, and to share something truly special with loved ones. With its tender crumb, rich vanilla flavor, and cheerful burst of sprinkles, it’s a cake that promises smiles and a touch of whimsy.
Whether you’re baking for a special occasion or simply to brighten an ordinary afternoon, this guide equips you with all the knowledge to create a show-stopping Fairy Bread Pound Cake. So go ahead, gather your ingredients, put on your apron, and let the magic begin!
Share your creations! We’d love to see your Fairy Bread Pound Cake. Tag us on social media and let us know how your whimsical bake turned out in the comments below!
PrintFairy Bread Pound Cake
A delightful twist on the classic Australian party treat, this Fairy Bread Pound Cake features a tender vanilla pound cake studded with rainbow sprinkles, topped with a luscious vanilla buttercream and more sprinkles. It’s surprisingly easy to make and brings a touch of whimsical nostalgia to any occasion.
- Prep Time: 20
- Cook Time: 55
- Total Time: 75
- Yield: 10 Slices
- Category: Dessert, Cake, Baking
- Method: Baking
- Cuisine: Australian, Modern Australian
Ingredients
**Fairy Bread Pound Cake**
4 Eggs (Room Temperature)
225g Unsalted Butter (Room Temperature)
200g Caster Sugar
180g Plain Flour
120g Sour Cream
1/4 Tsp Salt
2 Tbsp Vanilla Extract
1/2 Tsp Baking Powder
60g Rainbow Sprinkles
**Vanilla Buttercream**
85g Unsalted Butter (Softened)
250g Powdered Sugar (Sifted)
2 Tbsp Milk
1 Tsp Vanilla Extract
Rainbow Sprinkles for Topping
Instructions
1. Preheat the oven to 175°C (350°F). Grease and line a 9×5 inch baking loaf tin. Set aside.
2. In a medium bowl, whisk together the flour, salt and baking powder. Set aside.
3. In a separate large bowl, beat the butter for about 2 minutes then add your sugar and beat again until light and fluffy.
4. Beat the eggs in one at a time until combined.
5. Add the sour cream and vanilla then beat once more until combined.
6. Fold in the flour mixture until just combined.
7. Fold in the rainbow sprinkles until just combined (Don’t overmix as the sprinkles will start to blend with the cake).
8. Pour the pound cake batter into your prepared tin and smooth over the top using a spatula.
9. Bake for 50-55 minutes or until a skewer comes out clean.
10. Allow to cool in the pan for about 10 minutes, then remove from the tin and allow to fully cool on a wire rack before making your vanilla buttercream.
11.
12. **Vanilla Buttercream**
13. In a large bowl, beat together the butter, powdered sugar and vanilla until combined.
14. Add the 2 Tbsp of milk and beat until combined (If you prefer your buttercream to be thicker only add 1 Tbsp).
15. Evenly spread the buttercream onto your cooled pound cake and top with the rainbow sprinkles.
16. Cut into as many pieces as you like and enjoy!
Notes
**Don’t Overmix!:** If you overmix the batter, it will result in a tough and rubbery cake. You will also lose the effect of seeing the sprinkles throughout the cake as their colors can blend into the cake batter, creating a muddy appearance. Mix just until combined for a tender crumb and vibrant sprinkles!


