Remember those simpler times, trading lunchbox goodies and the pure joy of biting into a perfectly gooey Fluffernutter sandwich? Now, imagine all that nostalgic flavor packed into a soft, chewy cookie! These Fluffernutter Cookies are more than just a recipe; they’re a warm hug of peanut butter and marshmallow, a sweet escape back to carefree days. As a seasoned baker with years of experience recreating and perfecting classic comfort foods, I’m thrilled to share my foolproof method for creating these delightful treats. And with peanut butter comfort food on the rise and everyone craving easy, joyful recipes, now is the perfect time to bake a batch and rediscover the magic of Fluffernutter in cookie form! The combination of peanut butter and marshmallow is just delicious, and these cookies are guaranteed to bring a smile to your face.

Growing up, the Fluffernutter sandwich was my ultimate weakness. My grandmother, a baker of legendary status, would always indulge my cravings with her homemade version. This recipe is my tribute to her and that simple, perfect sandwich. Over the years, I’ve tested countless variations, tweaking and refining until I achieved the ideal balance of soft chewiness, intense peanut butter flavor, and sweet marshmallow goo. This recipe is not just about baking; it’s about creating an experience, a memory. I am confident that after reading this, you will have all the knowledge needed to create the best Fluffernutter cookies ever! From how the chemistry of peanut butter affects the cookie’s texture, to mastering that perfect marshmallow swirl. Get ready to impress your friends and family with these truly special cookies!
Ingredients for Fluffernutter Perfection
The key to truly outstanding Fluffernutter Cookies lies in using high-quality ingredients and understanding their roles. Let’s break down each ingredient and explore substitutions.
- All-Purpose Flour: Forms the structure of the cookies. Be sure to measure accurately! Spoon the flour into your measuring cup and level it off with a knife. Too much flour will result in dry, crumbly cookies.
- Baking Soda: Helps the cookies rise and spread, creating a soft, chewy texture. Always check the expiration date to ensure it’s still active.
- Salt: Enhances the flavors of the other ingredients and balances the sweetness.
- Unsalted Butter: Provides richness and tenderness. Using unsalted butter allows you to control the amount of salt in the recipe. Make sure it’s softened to room temperature for easy creaming.
- Granulated Sugar: Adds sweetness and helps create a crisp edge.
- Brown Sugar: Contributes to the cookies’ soft, chewy texture and adds a molasses-like flavor. Pack it firmly when measuring.
- Creamy Peanut Butter: The star of the show! Use a good-quality creamy peanut butter for the best flavor. Natural peanut butter can be used, but it may result in a slightly drier cookie; if using it make sure to stir very well and add a tablespoon of oil if needed.
- Vanilla Extract: Enhances the other flavors and adds a touch of warmth. Use pure vanilla extract for the best results.
- Egg: Binds the ingredients together and adds moisture. Use a large egg at room temperature.
- Marshmallow Fluff: The other star! Provides that signature Fluffernutter flavor and gooey texture. Store-bought works perfectly, but homemade marshmallow fluff is next level!
Expert Tips for Fluffernutter Nirvana
These tips are from my own baking experiences, and will help you create the best possible Fluffernutter cookies, even if you are a beginner.
- Chill the Dough: Don’t skip chilling the dough for at least 30 minutes! This prevents the cookies from spreading too thin and ensures a chewy texture. I sometimes chill it overnight for even better results.
- Don’t Overbake: Overbaking is the enemy of soft cookies! Bake just until the edges are set and the centers are still slightly soft. They’ll continue to bake on the hot baking sheet.
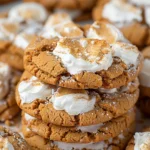
- Marshmallow Swirl Technique: For that beautiful marshmallow swirl, add dollops of Fluff on top of each cookie after baking and then use a toothpick to gently swirl it into the cookie.
- Room Temperature Matters: Ensuring your butter and egg are at room temperature is important for even mixing and a smooth batter, contributing to the perfect cookie texture.
- Peanut Butter Selection: While creamy peanut butter is recommended for consistency, using a high-quality natural peanut butter (ensure it’s well-stirred) can add a more intense peanut flavor profile. Just be mindful of potential texture changes.
- Baking Sheet Prep: Lining your baking sheet with parchment paper isn’t just about easy cleanup; it also helps prevent the cookies from sticking and promotes even baking.
- Size Matters: Use a cookie scoop to ensure uniform cookie sizes for consistent baking.
- Keep an Eye on the Oven: Every oven is different, so watch your cookies closely. Start checking for doneness a minute or two before the recommended baking time.
- Cooling Rack is Key: Allow the cookies to cool on the baking sheet for a few minutes before transferring them to a wire rack to cool completely. This prevents them from breaking.
Storage & Substitutions
Knowing how to properly store your cookies is just as important as baking them! Here are my tips to help.
- Storage: Store cooled cookies in an airtight container at room temperature for up to 3 days. For longer storage, freeze them for up to 2 months.
- Gluten-Free: Substitute the all-purpose flour with a gluten-free blend. Be sure to add 1/4 teaspoon of xanthan gum if your blend doesn’t already contain it.
- Dairy-Free: Replace the butter with a dairy-free butter alternative. Ensure it’s a brand that works well in baking.
- Nut-Free: While this is a peanut butter cookie, you could try substituting the peanut butter with sunflower seed butter for a nut-free option. Be aware that the flavor will be different.
- Extra Gooey: For even gooier cookies, add a few mini marshmallows to the dough before baking!
- Chocolate Chips: Adding chocolate chips can make these cookies even more decadent!
- Flavored Extract: You could try using almond extract instead of vanilla extract for a unique flavor twist.
FAQ: Your Fluffernutter Cookie Questions Answered
Here are some frequently asked questions about Fluffernutter cookies:
Why are my cookies flat?
Flat cookies are usually caused by too much sugar, too little flour, or butter that is too warm. Make sure to measure your ingredients accurately and chill the dough before baking. Using room temperature, not melted, butter is also crucial.
Why are my cookies dry?
Dry cookies can be due to too much flour or overbaking. Measure your flour carefully and avoid overbaking. Also, be sure to use enough butter and egg.
Can I use natural peanut butter?
Yes, you can use natural peanut butter, but it may result in a slightly drier cookie. Be sure to stir it well before using and you may need to add a tablespoon of oil to the dough.
Can I freeze Fluffernutter cookies?
Yes, you can freeze them for up to 2 months. Store them in an airtight container to prevent freezer burn. Thaw them at room temperature before serving.
How do I get the perfect marshmallow swirl?
Add dollops of marshmallow fluff on top of the baked cookies while they’re still warm. Use a toothpick or the tip of a knife to gently swirl the marshmallow into the cookie.
Can I make these cookies ahead of time?
Yes, you can make the dough ahead of time and store it in the refrigerator for up to 2 days. Let it come to room temperature slightly before scooping and baking.
What if I don’t have marshmallow fluff?
While marshmallow fluff is crucial to the recipe, you can substitute it with melted marshmallows. Use about 1 cup of mini marshmallows, melted in the microwave with a tablespoon of water, and swirl it on top of the cookies after baking.
Bake Up Some Fluffernutter Happiness!
These Fluffernutter Cookies are more than just a sweet treat; they’re a trip down memory lane, a perfect blend of childhood nostalgia and homemade goodness. With their soft, chewy texture, intense peanut butter flavor, and gooey marshmallow swirls, they’re guaranteed to be a hit with kids and adults alike. Now that you have all the tips and tricks, it’s time to preheat your oven and get baking! Don’t forget to share your cookie creations on social media and tag me – I can’t wait to see your masterpieces! And for more delicious cookie recipes, check out my Chocolate Chip Cookies , Oatmeal Raisin Cookies and Peanut Butter Cookies recipes! Get ready to spread some Fluffernutter happiness!
PrintFluffernutter Cookies
Easy Fluffernutter cookies recipe Learn simple baking tech tips for delicious soft treats A quick guide to perfect cookies 140 chars
- Prep Time: 15 minutes
- Cook Time: 10 minutes
- Total Time: 25 minutes
- Yield: About 24 cookies
- Category: Cookie
- Cuisine: American
Ingredients
- 2 1/4 cups all-purpose flour
- 1 teaspoon baking soda
- 1/2 teaspoon salt
- 1 cup unsalted butter, softened
- 3/4 cup granulated sugar
- 3/4 cup packed brown sugar
- 1 cup creamy peanut butter
- 2 teaspoons vanilla extract
- 1 large egg
- 1 (7 ounce) jar marshmallow fluff
Instructions
- Preheat oven to 375°F (190°C). Line baking sheets with parchment paper.
- In a medium bowl, whisk together flour, baking soda, and salt.
- In a large bowl, cream together butter, granulated sugar, and brown sugar until light and fluffy.
- Beat in peanut butter, vanilla extract, and egg until well combined.
- Gradually add the dry ingredients to the wet ingredients, mixing until just combined. Do not overmix.
- Chill the dough for at least 30 minutes.
- Scoop rounded tablespoons of dough onto the prepared baking sheets, leaving space between cookies.
- Bake for 8-10 minutes, or until the edges are set and the centers are still slightly soft.
- Remove from oven and immediately add dollops of marshmallow fluff on top of each cookie. Use a toothpick to gently swirl the marshmallow into the cookie.
- Let the cookies cool on the baking sheet for a few minutes before transferring them to a wire rack to cool completely.
