
I’ll never forget the first time I tried to make fruity rice crispy treats. It was supposed to be a simple afternoon project, but I ended up with a sticky mess that resembled concrete more than a fluffy treat. After nine attempts and countless adjustments, I finally cracked the code to creating the perfect balance of chewy, colorful, and absolutely irresistible fruity rice crispy treats.
This rainbow-colored twist on the classic dessert has become my secret weapon for family gatherings. While everyone else brings the same old brownies and cookies, my fruity rice crispy treats disappear within minutes. The best part? They’re surprisingly simple once you understand the technique, and they bring that childhood nostalgia we’re all craving in 2025.
Why Fruity Rice Crispy Treats Are the Perfect Comfort Food Upgrade
Rice crispy treats have been an American staple since 1939, but adding fruity pebbles transforms this simple dessert into something extraordinary. The combination of crispy rice cereal and fruity pebbles creates a multi-textured experience that’s both familiar and exciting.
During my testing phase, I discovered that the 50/50 ratio of rice krispies to fruity pebbles is crucial. Too much fruity cereal makes them overly sweet, while too little leaves you wondering where the flavor went. This balanced approach delivers the perfect nostalgic taste with a modern twist.
The beauty of this recipe lies in its versatility. Whether you’re hosting a birthday party, bringing treats to a potluck, or simply want to satisfy your sweet tooth, these colorful squares check all the boxes. They’re also incredibly forgiving for beginner bakers, which is why I recommend them to anyone just starting their baking journey.
The Secret to Perfect Fruity Rice Crispy Treats Every Time
After making batch after batch, I learned that temperature control is everything. Many people crank up the heat trying to melt marshmallows faster, but this is the biggest mistake you can make. Low and slow is the golden rule.
The marshmallow-to-cereal ratio also matters tremendously. Using 4 heaping cups of jumbo marshmallows creates that perfect gooey texture without making the treats rock-hard once cooled. I also discovered that adding mini marshmallows at the end creates delightful pockets of melted sweetness throughout.
Clear vanilla extract is my secret weapon. While regular vanilla works, clear vanilla keeps the colors vibrant and prevents that brownish tint that can dull the fruity pebbles’ rainbow appeal. It’s a small detail that makes a significant visual difference.
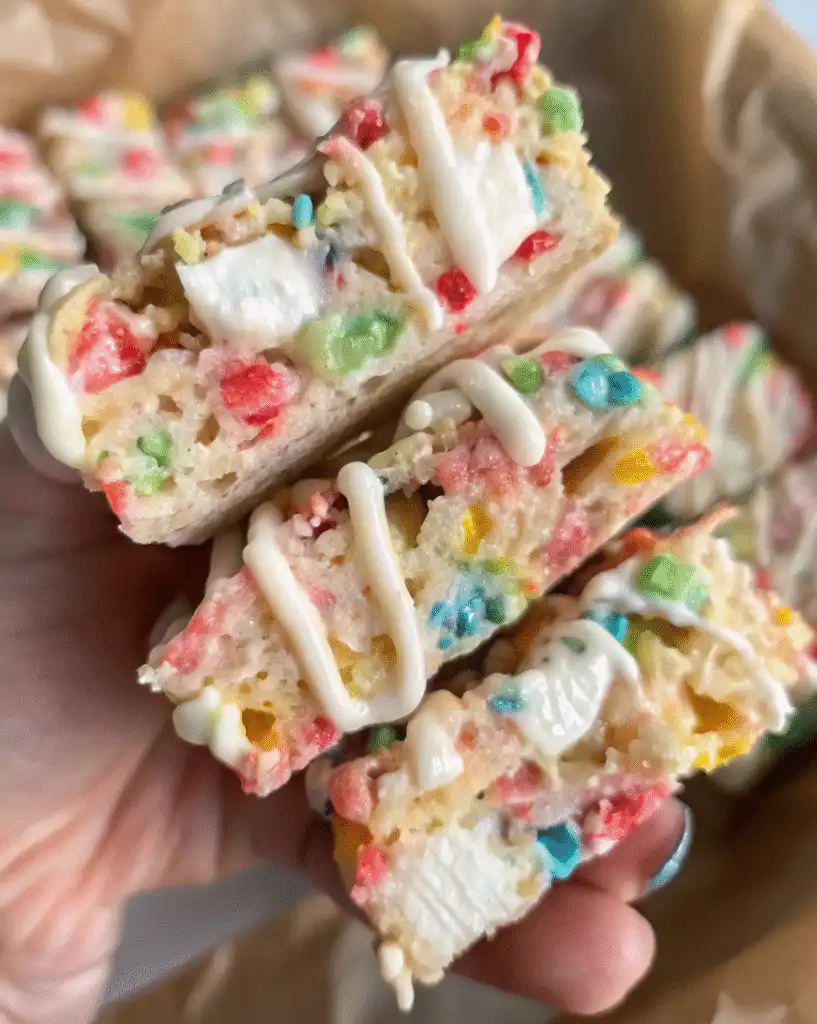
The white chocolate drizzle with crushed fruity pebbles isn’t just decorative—it adds an extra layer of flavor and makes these treats look bakery-worthy. When I bring these to gatherings, people always assume I bought them from a fancy dessert shop.
Essential Ingredients for Fruity Rice Crispy Treats
Cereals: The Foundation
The star combination is 2 cups of rice krispies (54g) paired with 2 cups of fruity pebbles (100g). This dual-cereal approach provides both the classic crispy texture and the fruity flavor punch. Rice krispies alone can be bland, while fruity pebbles add that nostalgic cereal milk taste we all love.
I’ve tested various cereal brands, and while store brands work, name-brand fruity pebbles provide more consistent color and flavor. The cereal should be fresh—stale cereal creates chewy, tough treats instead of light and crispy ones.
Marshmallows: The Binding Magic
You’ll need 4 heaping cups (8oz/226g) of jumbo marshmallows for the base, plus 1 cup (2oz/58g) of mini marshmallows. The jumbo marshmallows melt smoothly and create the binding agent, while the mini marshmallows add texture and visual appeal.
Fresh marshmallows are non-negotiable. Old, dried-out marshmallows won’t melt properly and will leave you with grainy, disappointing treats. I always check the expiration date and give the bag a gentle squeeze—marshmallows should feel soft and pillowy.
Butter and Vanilla: Flavor Enhancers
One stick (8 tablespoons/113g) of unsalted butter creates richness without overwhelming the fruity flavors. I prefer unsalted butter with a pinch of salt added separately because it gives me better control over the final flavor. However, salted butter works perfectly fine if that’s what you have on hand.
Half a teaspoon of clear vanilla extract brightens all the flavors without adding color. This small amount makes a noticeable difference in the overall taste profile, elevating these from good to exceptional.
White Chocolate Drizzle: The Finishing Touch
The decorative drizzle uses 2/3 cup (4oz) of white chocolate mixed with 1 tablespoon of crushed fruity pebbles. This topping transforms simple treats into Instagram-worthy desserts. I’ve found that high-quality white chocolate chips melt more smoothly than baking bars, though both work.
Step-by-Step Guide to Making Fruity Rice Crispy Treats
Preparation Is Key
Before you start cooking, measure everything out. Have your 2 cups each of rice krispies and fruity pebbles mixed in a large bowl. Separate your jumbo marshmallows and mini marshmallows into different bowls. This mise en place approach prevents scrambling once the marshmallows start melting.
Line your 9×9 square pan (8×8 works too) with parchment paper on all sides, leaving overhang for easy removal. I learned this lesson the hard way—trying to line the pan after your mixture is ready means working with a cooling, stiffening mess.
The Melting Process
Place your butter in a heavy-bottomed, nonstick pot over low to medium heat. Heavy-bottomed pots distribute heat evenly and prevent hot spots that can scorch your mixture. Once the butter melts completely, reduce heat to low.
Add your jumbo marshmallows and clear vanilla extract. Using a rubber spatula, stir continuously in a folding motion. The marshmallows will slowly collapse and incorporate into the butter. This process takes 3-5 minutes—patience is crucial here.
If the mixture starts bubbling aggressively or you smell any hint of burning, remove from heat immediately. You can always return to heat, but you can’t undo scorched marshmallows. I keep the heat low enough that I could walk away for 10 seconds without disaster.
Combining Cereal and Marshmallow
Once your marshmallow mixture is smooth and glossy, remove from heat completely. Working quickly but calmly, pour in your cereal mixture. Use your spatula to fold everything together, making sure to scrape the bottom and sides of the pot.
The goal is to coat every piece of cereal evenly without crushing it. I use a folding motion rather than aggressive stirring—this keeps the cereal crispy instead of breaking it into dust. The mixture should look uniformly coated with no dry cereal visible.
Adding Mini Marshmallows
Pour in your mini marshmallows while the mixture is still warm. Fold gently until they’re distributed throughout but not completely melted. You want to see intact mini marshmallows throughout the final product—they create delightful sweet pockets that make each bite interesting.
This step should take no more than 30 seconds. The residual heat will slightly soften the mini marshmallows, but they shouldn’t disappear entirely. If they start melting too much, your base mixture was too hot.
Pressing and Shaping
Transfer your mixture to the prepared pan immediately. Use your spatula to spread it roughly, then press firmly into all corners. I use a buttered measuring cup or a sheet of parchment paper to press down evenly—this prevents sticking and creates smooth, uniform treats.
Press firmly but not aggressively. You want compact treats that hold together, not compressed bricks. The thickness should be even across the entire pan. This took me several attempts to master, but it’s worth the effort for professional-looking results.
Cooling and Setting
Refrigerate your treats for 15 minutes. This quick chill sets them enough for cutting without making them rock-hard. Room temperature cooling works too, but takes 30-45 minutes and sometimes results in softer, stickier treats.
I discovered that slightly under-cooled treats are easier to cut cleanly than fully set ones. They’ll continue firming up after cutting, so don’t worry if they seem slightly soft when you slice them.
Creating the Perfect White Chocolate Drizzle
While your treats cool, prepare the drizzle. Melt 2/3 cup of white chocolate using either the microwave method (10-15 second intervals, stirring between each) or a double boiler. Microwave is faster, but requires attention to prevent seizing.
Crush 1 tablespoon of fruity pebbles in a plastic bag until nearly sandy. I use a rolling pin or the bottom of a measuring cup. Add this fruity powder to your melted white chocolate and stir until combined. The crushed cereal adds color specks and reinforces the fruity flavor.
Transfer your white chocolate mixture to a piping bag or plastic bag. If using plastic, cut a tiny corner—start small because you can always enlarge it. Drizzle over your cut treats in any pattern you like. I prefer zigzag lines, but artistic swirls work beautifully too.
Cutting and Serving Your Fruity Rice Crispy Treats
Use a sharp chef’s knife for clean cuts. I run my knife under hot water, dry it, then make each cut. This prevents sticking and dragging. Cut into 16 squares for standard servings, or adjust based on your needs.
For family gatherings serving up to 10 people, I typically make these 16 squares and watch them disappear. If you’re serving a crowd, consider doubling the recipe and using a 9×13 pan instead.
These treats taste best the day they’re made—the texture is perfect and the colors are brightest. However, they store well in an airtight container at room temperature for 3-4 days. Stack them with parchment paper between layers to prevent sticking.
Expert Tips From My Nine Testing Sessions
Temperature Troubleshooting
If your mixture seems too stiff, you likely overheated the marshmallows or waited too long before adding cereal. Next time, work faster and keep heat lower. If they’re too soft and won’t hold shape, you may have used too much butter or not enough marshmallows.
The ideal consistency when mixing should resemble thick, stretchy taffy. If it’s flowing like lava, it’s too hot. If it’s already setting in the pot, you’ve lost too much heat.
Flavor Variations I’ve Discovered
While the classic version is amazing, I’ve successfully experimented with different cereal combinations. Try cocoa pebbles for a chocolate version, or use all fruity pebbles for maximum color. You could even create ombré treats by layering different colored cereals.
Adding a tablespoon of sprinkles to the mini marshmallows creates a confetti effect. For holidays, use themed colored cereals or drizzle colors. I’ve made red and green Christmas versions and pastel Easter variations.
Common Mistakes to Avoid
Never use the microwave to melt your butter and marshmallows for the main mixture—you’ll get uneven heating and tough results. Stovetop control is essential for perfect texture.
Don’t press too hard when shaping. I initially thought firmer pressing meant better treats, but it actually compresses the air pockets that make them light and enjoyable. Firm but gentle is the sweet spot.
Avoid cutting them while warm. The first time I tried this, the knife dragged marshmallow everywhere and created a sticky disaster. Patience during cooling pays off with clean, beautiful squares.
Nutritional Considerations and Modifications
Each serving (1 of 16 squares) contains approximately 28 grams of carbohydrates. The full recipe totals 447 carbs, with 66 carbs coming from the white chocolate drizzle. These numbers help you make informed choices, especially if you’re managing blood sugar or following specific dietary plans.
For a lighter version, you could reduce the white chocolate drizzle or omit it entirely. The treats are delicious without it, though the drizzle does add that special touch. You might also experiment with sugar-free marshmallows, though I haven’t personally tested this variation.
These aren’t health food, but they’re portion-controlled, peanut-free, and can be enjoyed as an occasional treat. I appreciate knowing exactly what goes into them compared to store-bought options with long ingredient lists.
Why These Work for Every Occasion
I’ve brought these fruity rice crispy treats to children’s birthday parties, adult game nights, office potlucks, and holiday gatherings. They universally appeal to all age groups because they’re familiar yet special.
Kids love the bright colors and sweet flavor. Adults appreciate the nostalgia and the fact that they’re not too heavy after a big meal. Compared to rich stuffed red velvet cookies or decadent pistachio NYC cookies, these offer a lighter but equally satisfying option.
They’re also incredibly cost-effective. The ingredients are inexpensive and widely available, making them perfect for feeding crowds without breaking the budget. A single batch costs less than $10 and serves 10-16 people depending on portion size.
Pairing Suggestions and Serving Ideas
Serve these alongside coffee or milk for a perfect afternoon snack. At family gatherings, I place them on a colorful platter with other nostalgic treats like Creme Egg stuffed cookies for a dessert table that appeals to everyone.
For kids’ parties, set up a DIY decoration station. Provide extra white chocolate, sprinkles, and crushed candies so children can customize their treats. This interactive element makes the dessert memorable and keeps kids entertained.
They also make excellent food gifts. Stack them in a clear cellophane bag tied with a ribbon, and you have an instant hostess gift or thank-you present. I’ve given these to teachers, neighbors, and friends with universally positive responses.
Frequently Asked Questions About Fruity Rice Crispy Treats
Can I use other cereals besides fruity pebbles?
Absolutely! While fruity pebbles create the signature flavor and color, you can experiment with cocoa krispies, cinnamon toast crunch, or even Lucky Charms. Each cereal creates a different flavor profile. I recommend keeping the rice krispies as your base and swapping only the fruity pebbles portion for best texture results.
Why did my treats turn out hard and chewy?
This usually happens from cooking the marshmallow mixture too hot or too long. Overheated marshmallows lose their ability to stay soft and pliable. Next time, use lower heat and remove from stovetop as soon as marshmallows are melted. Using fresh marshmallows also prevents this issue—stale marshmallows never soften properly.
Can I make these ahead of time?
These taste best fresh but can be made 1-2 days ahead. Store in an airtight container at room temperature. They’ll gradually lose some crispness but remain enjoyable. Don’t refrigerate long-term as this makes them tough. For best results, add the white chocolate drizzle the day you plan to serve them.
What if I don’t have clear vanilla extract?
Regular vanilla extract works fine—the treats will just have a slightly more tan color instead of maintaining bright white from the marshmallows. The flavor difference is minimal. You could also omit vanilla entirely, though it does enhance the overall taste significantly.
How do I prevent them from sticking to my hands while pressing?
Lightly butter your hands, use a buttered measuring cup, or place a sheet of parchment paper over the mixture while pressing. I prefer the parchment paper method because it’s less messy and creates a smooth surface. Some people use buttered wax paper, which works equally well.
Can I double this recipe?
Yes! Use a 9×13 pan for a double batch. The melting and mixing process remains the same, though you’ll need a larger pot. Just maintain that low heat and don’t rush the melting process even with more marshmallows.
Are these treats gluten-free?
Rice Krispies and fruity pebbles are typically gluten-free, but always check current packaging as formulations can change. If you need guaranteed gluten-free treats, use certified gluten-free cereals and verify all your ingredients.
Comparing to Other Popular Cookie and Brownie Treats
While treats like peanut butter Nutella cookies and white chocolate stuffed cookies require baking skills and precise measurements, fruity rice crispy treats are forgiving and stove-top simple. There’s no oven required, which makes them perfect for summer or when you need dessert fast.
Brownies take 30-40 minutes to bake plus cooling time. These treats are ready in under an hour including chill time. When you’re short on time but need impressive results, this recipe delivers.
The texture is unique too—not cake-like, not cookie-like, but that distinctive crispy-chewy-gooey combination that only rice crispy treats can achieve. They scratch a different dessert itch than baked goods, making them a valuable addition to any recipe collection.
Final Thoughts on Perfecting Fruity Rice Crispy Treats
After nine rounds of testing and countless batches since, I’m confident this recipe delivers consistently excellent results. The key takeaways are simple: low heat, fresh ingredients, and don’t overthink it. These treats are meant to be fun, colorful, and nostalgic.
I love that this recipe connects me to childhood memories while creating new ones with my family. Every time I make these, I’m reminded that the best recipes don’t need to be complicated—they just need to be made with care and shared with people you love.
Whether you’re a beginner baker looking for confidence-building recipes or an experienced cook wanting a quick crowd-pleaser, fruity rice crispy treats deserve a spot in your repertoire. They’ve certainly earned a permanent place in mine.
Give this recipe a try and watch how quickly they disappear at your next gathering. I’d love to hear about your experience—did you add any fun variations? What occasion did you make them for? Happy baking!
PrintFruity Rice Crispy Treats
These Fruity Rice Crispy Treats are colorful, chewy, and delightfully sweet with a mix of rice krispies, fruity pebbles, marshmallows, and a fun white chocolate fruity drizzle. Perfect for parties or a quick no-bake dessert!
- Prep Time: 15 minutes
- Cook Time: 0 minutes
- Total Time: 1 hour
- Yield: 16 squares
- Category: Dessert, Snack
- Cuisine: American
Ingredients
2 cups rice krispies/puffed rice cereal (54g)
2 cups fruity pebble cereal (100g)
4 heaping cups (8oz) jumbo marshmallows (226g)
1/2 teaspoon clear vanilla extract
1 stick (8 tablespoons) unsalted butter (113g)
Pinch of salt (omit if using salted butter)
1 cup (2oz) mini marshmallows (58g)
2/3 cup (4oz) white chocolate chips
1 tablespoon fruity pebble cereal (for drizzle)
Instructions
1. Prepare ingredients: Mix rice krispies and fruity pebbles in a large bowl. Pre-measure jumbo marshmallows and mini marshmallows in separate bowls.
2. Line pan: Line your square pan with parchment paper on all sides, leaving overhang for easy removal.
3. Melt butter: Place butter in nonstick pot over low to medium heat. Once melted, reduce to low heat.
4. Add marshmallows: Add jumbo marshmallows and vanilla extract. Stir continuously with rubber spatula until mostly melted and well combined (3-5 minutes). Remove from heat if mixture gets too hot.
5. Add cereal: Remove pot from stovetop. Add cereal mixture and fold together until completely coated, scraping edges and bottom of pot.
6. Add mini marshmallows: Pour in mini marshmallows and stir until evenly dispersed but not completely melted.
7. Press into pan: Transfer mixture to lined pan. Use spatula (or buttered measuring cup) to press evenly into corners and across entire pan.
8. Cool: Refrigerate for 15 minutes or let sit at room temperature for 30-45 minutes.
9. Make drizzle: Melt white chocolate in microwave (10-15 second intervals, stirring between) or on stovetop. Crush 1 tablespoon fruity pebbles in plastic bag until sandy. Mix into melted white chocolate.
10. Cut and decorate: Remove treats from pan using parchment overhang. Cut into 16 squares with sharp knife. Transfer white chocolate mixture to piping bag or plastic bag with small corner cut. Drizzle over treats.
11. Set and serve: Let drizzle set at room temperature or in fridge. Store in airtight container at room temperature for up to 3-4 days.
Notes
Use fresh marshmallows for best texture.
Clear vanilla keeps colors bright, but regular vanilla works.
Stack stored treats with parchment between layers.
Treats taste best the day they’re made.


