
There is something inherently celebratory about red velvet. Whether it’s the striking crimson color or that unique, slightly tangy chocolate flavor, it always feels like a special occasion. But let’s be honest: sometimes a giant layer cake is just too much work (and way too much clean-up).
Imagine a fudgy, dense red velvet brownie base swirled with a rich, tangy cream cheese filling, all baked into a perfectly portable, bite-sized treat. They are the ultimate “grab-and-go” dessert for Valentine’s Day, holiday parties, or just because you need a little bit of luxury with your afternoon coffee. Trust me, once you pop one of these, you won’t be able to stop at just one.
Why You’ll Love This Recipe
- Perfectly Portion Controlled: Since they are made in a mini muffin pan, they are pre-portioned and easy to serve.
- The Ultimate Texture: We’re using a high-fat butter (Kerrygold is my go-to!) to ensure these are incredibly fudgy, not cakey.
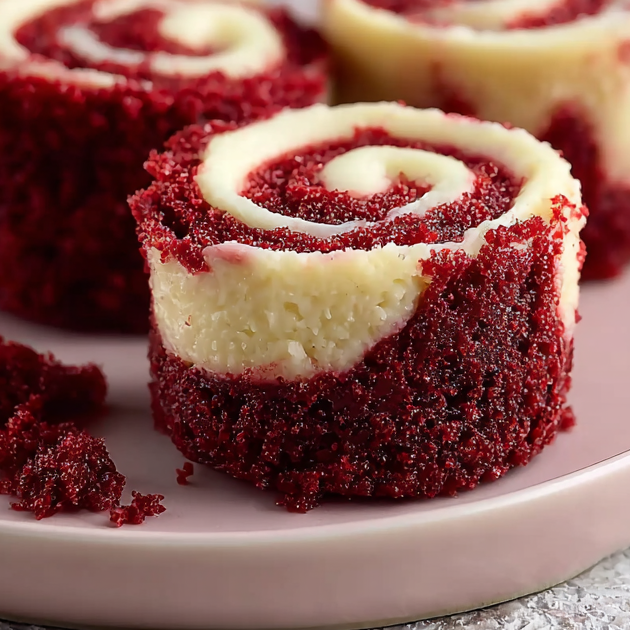
- Eye-Catching Aesthetics: The contrast between the deep red batter and the white cheesecake swirl looks professional but is surprisingly easy to achieve.
- Party Friendly: These stay moist for days, making them the ideal make-ahead dessert for potlucks or office parties.
- No Fancy Equipment: You don’t even need a stand mixer for the brownie base; a simple whisk and bowl will do!
Ingredient Notes
To get that perfect “professional bakery” result at home, the quality of your ingredients matters. Here’s what you need to know:
- Unsalted Butter: I highly recommend Kerrygold unsalted butter. It has a higher fat content and lower water content than standard grocery store butter, which contributes to that signature fudgy brownie texture.
- Cocoa Powder: You only need a small amount for red velvet. Sift it! Cocoa powder is notorious for clumping, and you don’t want a dry lump of cocoa in the middle of your bite.
- Espresso Powder: Don’t worry, these won’t taste like coffee. The espresso powder acts as a flavor booster for the chocolate, making it taste deeper and more complex.
- Vinegar: This is the “secret” to authentic red velvet. The acid reacts with the cocoa and enhances the red color while providing that subtle tang that balances the sugar.
- Cream Cheese: Use the full-fat block variety. Make sure it is at room temperature (around 70°F). If it’s even slightly cold, your cheesecake swirl will be lumpy rather than smooth.
- Flour: I always reach for King Arthur All-Purpose Flour. Its consistent protein content ensures the brownies have the right structure without being tough.
Step-by-Step Instructions
1. Prep the Pan and Ingredients
Preheat your oven to 350°F. This is a crucial step—putting brownies into a cold oven ruins the rise and texture. Generously grease a mini muffin pan with butter or a high-quality cooking spray. Even if it’s non-stick, these bites have a lot of sugar and can be stubborn!
2. Mix the Red Velvet Base
In a medium bowl, melt your butter. Whisk in the sugar, sifted cocoa powder, vanilla, red food coloring, salt, espresso powder, and vinegar. Once it’s a smooth, vibrant red mixture, whisk in the eggs one at a time. Finally, gently fold in the flour. Stop the moment you see no more white streaks. Overmixing is the enemy of a fudgy brownie!
3. Create the Cheesecake Filling
In a separate small bowl, beat the room-temp cream cheese with sugar and vanilla. I like to use a whisk for this to keep it light. Once smooth, fold in the egg yolk. The yolk provides richness and helps the cheesecake set without becoming rubbery.
4. The Layering and Swirling
Spoon about 1 tablespoon of brownie batter into each muffin cup. Top with a teaspoon of the cheesecake mixture, then another teaspoon of brownie batter. Now for the fun part: take a toothpick and gently drag it through the layers in a figure-eight pattern. Pro tip: Less is more. If you swirl too much, the colors blend and you lose that beautiful marble effect.
5. Bake to Perfection
Bake for exactly 12 minutes. The tops should look set, but if you wobble the pan, they should still have a tiny bit of “give.” They will continue to set as they cool.
Expert Tips for Best Results
- The Room Temperature Rule: This applies to the eggs and the cream cheese. Cold eggs can seize up the melted butter in your brownie batter, and cold cream cheese won’t blend smoothly with the sugar.
- Don’t Over-Bake: Brownies go from fudgy to dry in a matter of 60 seconds. Set your timer for 11 minutes and check them.
- Easy Removal: Let the bites cool in the pan for 5 minutes. Then, take a thin knife or a small offset spatula and run it around the edges. They should pop right out!
- Use Gel Coloring: If you want a truly “neon” red, gel food coloring is more concentrated than liquid and won’t throw off the moisture balance of the batter.
Variations and Substitutions
- Gluten-Free: You can easily swap the all-purpose flour for a 1:1 gluten-free baking flour blend (like Cup4Cup or King Arthur Measure for Measure).
- Chocolate Chip Addition: If you’re a chocoholic, fold in 1/4 cup of mini semi-sweet chocolate chips into the brownie batter.
- No Mini Muffin Pan? You can bake these in a standard 9×9 square pan. Increase the bake time to 25–30 minutes and cut them into squares once fully cooled.
Storage and Freezing
To Store: Because of the cream cheese, these should be stored in an airtight container in the refrigerator. They will stay fresh and delicious for up to 5 days.
To Freeze: These freeze beautifully! Wrap them individually in plastic wrap and place them in a freezer-safe bag. They will last for up to 3 months. When you’re ready for a treat, just let one thaw on the counter for 20 minutes (or eat it semi-frozen—it’s like a fudge bar!).
FAQ
Why do I need to add vinegar to red velvet?
Vinegar is a traditional ingredient in red velvet. It reacts with the cocoa powder to reveal its natural reddish tints and provides the iconic “tang” that distinguishes red velvet from plain chocolate.
Can I use low-fat cream cheese?
I don’t recommend it. Low-fat or “whipped” cream cheese has a higher water content, which can cause the cheesecake swirl to weep or become grainy when baked.
My cheesecake swirl sank! What happened?
This usually happens if the brownie batter is too thin or if the cheesecake mixture is too heavy. Make sure you aren’t over-beating the eggs in the brownie batter, which can create a “cakey” structure that can’t support the filling.
Final Thoughts
These Red Velvet Cheesecake Brownie Bites are more than just a dessert; they’re a conversation starter. Whether you’re hosting a Galentine’s brunch or just want to treat your family to something special, this recipe delivers every single time.
The combination of the rich Kerrygold butter and the tangy cream cheese creates a flavor profile that is sophisticated yet comforting. If you make these, please leave a comment below and let me know how they turned out—and don’t forget to pin this to your favorite dessert board!
PrintFudgy Red Velvet Cheesecake Brownie Bites

These Red Velvet Cheesecake Brownie Bites are the ultimate crowd-pleaser. Fudgy brownie base with creamy cheesecake swirl in bite-sized form.
- Prep Time: 20 minutes
- Cook Time: 12 minutes
- Total Time: 32 minutes
- Yield: 24 bites
- Method: Baking
- Cuisine: American
Ingredients
9 tbsp unsalted butter
1 1/4 cups granulated sugar
1/4 cup cocoa powder
1/2 tsp vanilla extract
1 tbsp red food coloring
1/8 tsp salt
1/4 tsp espresso powder
1/2 tsp vinegar
2 eggs
3/4 cup flour
9 oz cream cheese
3 tbsp sugar
1/2 tsp vanilla
1 egg yolk
Instructions
1. Preheat oven to 350°F and grease mini muffin pan.
2. Mix butter, sugar, cocoa, vanilla, color, salt, espresso, vinegar.
3. Add eggs one at a time.
4. Fold in flour.
5. Mix cream cheese, sugar, vanilla, egg yolk.
6. Layer brownie and cheesecake batter in pan.
7. Swirl and bake 12 minutes.
8. Cool before removing.
Notes
Use room temp cream cheese.
Do not overbake.
Remove gently with knife.


