
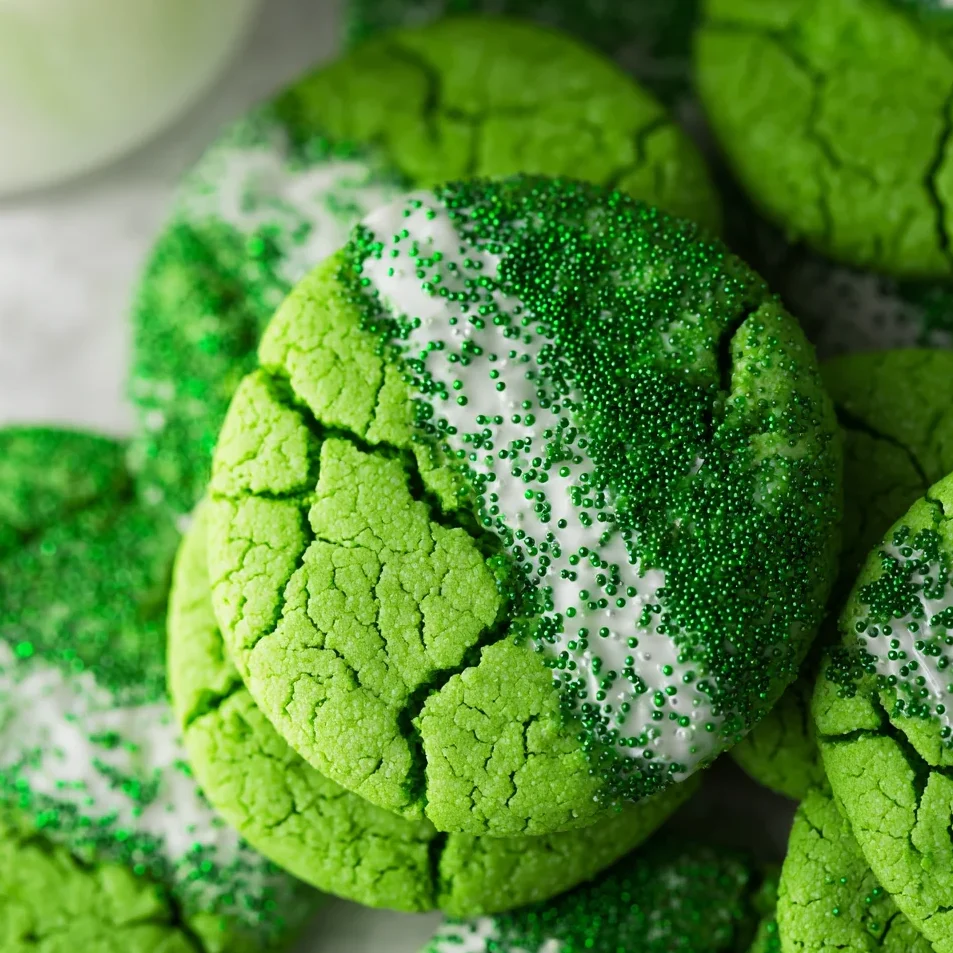
When the craving for something sweet hits, but you don’t have the energy for a full-scale baking project, cake mix cookies are the ultimate kitchen hack. These Green Cake Mix Cookies are the perfect example of how a few pantry staples can transform into a gourmet-looking dessert. Boasting a vibrant emerald hue and a decadent white chocolate dip, these cookies are as visually stunning as they are delicious. Whether you are prepping for a St. Patrick’s Day party, a garden-themed baby shower, or just want to brighten up a rainy afternoon, this recipe delivers a soft, melt-in-your-mouth texture that rivals any from-scratch bakery. The best part? You only need five main ingredients to get started. Let’s dive into how you can create these eye-catching treats in under an hour with minimal cleanup.
Why You’ll Love This Recipe
There are so many reasons to keep this recipe in your back pocket. First, the texture is incomparable—cake mix cookies are famously soft and chewy, almost like a hybrid between a cookie and a brownie. Second, it is incredibly beginner-friendly; you don’t need a stand mixer or advanced pastry skills to achieve professional results. Third, the customization options are endless. While we love the green and gold aesthetic for festive celebrations, the base technique works for any holiday. Finally, the “dip and decorate” step adds a layer of sophistication and extra sweetness that makes these feel much more special than your average Tuesday night cookie.
What Is a Cake Mix Cookie?
If you’ve never made a cookie from a cake mix, you’re in for a treat. Essentially, a cake mix contains all the dry ingredients you need: flour, sugar, leavening agents, and flavorings. By reducing the liquid typically called for on the box (like water or milk) and focusing on fats and proteins (oil and eggs), you transform the batter into a thick, scoopable dough. This results in a “sturdy” cookie that holds its shape while maintaining that characteristic cake-like softness inside. It’s a favorite among busy parents and professional bakers alike for its consistency and time-saving nature.
Ingredients needed
To make these vibrant green cookies, you will need a few key components:
- White Cake Mix (13.25 oz): This serves as your base. A standard white or vanilla mix works best because it allows the green food coloring to pop.
- Vegetable Oil (1/2 cup): The oil provides the necessary fat for a moist, tender crumb. You can also use melted coconut oil or canola oil.
- Eggs (2 large): These act as the binder, giving the cookies structure and chewiness.
- Vanilla Extract (1 teaspoon): Even though the mix is flavored, a splash of high-quality vanilla enhances the “homemade” taste.
- Green Gel Food Coloring: Gel is superior to liquid coloring because it provides a deeper pigment without thinning out the dough.
- Meltable Chocolate (12 oz): Look for white chocolate melting wafers or almond bark. These are designed to melt smoothly and set firmly.
- Sprinkles: Gold stars or green nonpareils add the perfect finishing touch.
Ingredient Substitutions & Tips
If you don’t have a white cake mix on hand, a yellow cake mix works just as well, though it may result in a slightly more “mossy” green. For those looking for a healthier alternative to vegetable oil, unsweetened applesauce can be used in a 1:1 ratio, though the texture will be significantly softer and more cake-like. If you prefer a buttery flavor, substitute the oil with 1/2 cup of melted, slightly cooled butter. For the chocolate coating, if you find white chocolate too sweet, you can use dark chocolate for a “mint-chocolate” look (especially if you add a drop of peppermint extract to the dough!).
Step-by-Step Instructions
- Prep the Baking Sheet: Start by lining a large cookie sheet with parchment paper or a silicone baking mat. This ensures the cookies won’t stick and makes cleanup a breeze.
- Mix the Dough: In a large mixing bowl, combine the box of white cake mix, vegetable oil, eggs, and vanilla extract. Add a few drops of green gel food coloring. Use a hand mixer on medium speed or a sturdy paddle attachment to mix until the ingredients are fully incorporated. If the color isn’t bright enough, add one drop at a time until you reach your desired shade.
- Chill the Dough: This is a crucial step! Cover the bowl with plastic wrap and refrigerate for 30 minutes. Chilled dough is easier to handle and prevents the cookies from spreading too much in the oven.
- Preheat the Oven: Set your oven to 350°F (175°C). Ensure your oven rack is in the center position for even baking.
- Form Cookie Dough Balls: Using a small cookie scoop or a tablespoon, form 1-inch balls. Place them on the baking sheet about 2 inches apart to allow for slight spreading.
- Bake: Bake for 8-10 minutes. The cookies are done when the edges are set and the bottoms are just barely golden brown. The centers may still look a bit soft—that’s okay! They will firm up as they cool.
- Cool the Cookies: Let them rest on the pan for 5 minutes, then transfer to a wire rack to cool completely. They must be cold before dipping.
- Melt the Coating: Melt your white chocolate or almond bark in a microwave-safe bowl in 30-second intervals, stirring in between, until silky smooth.
- Dip and Decorate: Dip half of each cooled cookie into the chocolate. Immediately top with sprinkles before the chocolate sets.
- Set and Serve: Place the cookies back on the parchment paper. Let them sit until the chocolate is hard.
Expert Baking Tips
To achieve the best results, always measure your oil carefully. Too much oil will make the cookies greasy, while too little will make them crumbly. When it comes to the food coloring, “less is more” initially; gel is very concentrated. For the dipping phase, if your chocolate starts to thicken, pop it back in the microwave for 10 seconds. Finally, avoid overbaking at all costs. Since these cookies are green, you won’t see the traditional “browning” on top. Trust the timer—8 to 10 minutes is usually the sweet spot for a perfectly chewy center.
The Secret to Perfect Dipped Cookies
The key to a professional-looking dipped cookie is the temperature of the cookie and the consistency of the chocolate. Never dip a warm cookie; the chocolate will run and the cookie might break. If your melted chocolate is too thick, add a teaspoon of coconut oil or shortening to thin it out—this creates a beautiful, glossy sheen that snaps when you bite into it. For a clean line, dip the cookie straight down halfway, then give it a little shake to let the excess drip off before flipping it upright. This prevents “puddling” on the parchment paper.
Serving Suggestions
These cookies look beautiful arranged on a white platter to make the green color pop. For a St. Patrick’s Day party, serve them alongside a glass of cold milk or a festive green “shamrock” shake. If you’re hosting a brunch, they pair wonderfully with a hot cup of coffee or Earl Grey tea. You can also package them in clear cellophane bags with a gold ribbon to give away as party favors or “pot of gold” gifts.
Storage & Make-Ahead Tips
Store these cookies in an airtight container at room temperature for up to 4 days. If your kitchen is very warm, you might prefer the refrigerator to keep the chocolate coating from softening. These are also great for making ahead; you can bake the cookies, let them cool, and store them in the freezer for up to 3 months. Simply thaw and dip them in fresh chocolate whenever you’re ready to serve!
FAQs
Can I use a different color?
Absolutely! This recipe is a template. Use pink for Valentine’s Day, orange for Halloween, or red for Christmas. The white cake mix is a blank canvas.
My dough is very sticky, what did I do wrong?
Cake mix dough is naturally stickier than traditional dough. If it’s too difficult to roll, chill it for an extra 15-20 minutes or lightly flour your hands.
Do I have to use gel food coloring?
While you can use liquid, it takes a lot more to get a vibrant color, which can add unwanted moisture to the dough. Gel is highly recommended for the best results.
Can I add mix-ins like chocolate chips?
Yes! Folding in 1/2 cup of white chocolate chips or semi-sweet chips before baking adds a great texture.
Why did my cookies come out flat?
This usually happens if the dough wasn’t chilled enough or if the butter/oil was too hot when mixed. Make sure your eggs are at room temperature but your dough is cold.
Green Cake Mix Cookies
These Green Cake Mix Cookies are the ultimate shortcut to a festive dessert. By using a box of white cake mix as the base, you achieve a perfectly soft, pillow-like texture with minimal effort. Dipped in melted white chocolate and finished with shimmering gold or green sprinkles, they are as beautiful as they are delicious.
- Prep Time: 40 minutes
- Cook Time: 10 minutes
- Total Time: 50 minutes
- Yield: 24 cookies
- Cuisine: American
Ingredients
White Cake Mix – 13.25 oz
Vegetable Oil – 1/2 cup
Eggs – 2 large
Vanilla Extract – 1 teaspoon
Green Gel Food Coloring – as needed
White Chocolate Melting Wafers – 12 oz
Sprinkles – 2 tablespoons
Instructions
Line a large cookie sheet with parchment paper or a silicone baking mat.
In a large mixing bowl, combine the cake mix, vegetable oil, eggs, and vanilla. Add food coloring until the desired shade of green is reached.
Mix with a hand mixer or spatula until a thick dough forms. Cover and chill for 30 minutes.
Preheat your oven to 350°F (175°C).
Scoop 1-inch balls of dough and place them 2 inches apart on the prepared sheet.
Bake for 8 to 10 minutes. The cookies should look set but still be soft. Do not overbake.
Allow cookies to cool on the pan for 5 minutes before transferring to a wire rack to cool completely.
Melt the chocolate in 30-second intervals in the microwave, stirring until smooth.
Dip half of each cooled cookie into the chocolate, then immediately top with sprinkles.
Let the cookies sit at room temperature or in the fridge for 5 minutes until the chocolate is firm.
Notes
• Use gel food coloring rather than liquid for a more vibrant color without changing dough consistency.
• Chilling the dough is essential; it prevents the cookies from spreading too thin in the oven.
• For the best dipping results, use high-quality melting wafers like Ghirardelli or almond bark.


