
There is nothing quite like the aroma of fresh bread wafting through the house, but for many, the prospect of dealing with yeast, proofing times, and meticulous kneading is enough to keep the bread bin empty. Enter the humble yet magnificent Irish Soda Bread. This rustic, crusty loaf is the ultimate “emergency” bread—though its flavor is anything but a compromise. Whether you are preparing for a festive St. Patrick’s Day feast or simply want a warm, butter-slathered slice to accompany a bowl of hearty stew, this recipe is your golden ticket. It requires no specialized equipment and no waiting for dough to rise. In just over an hour, you will have a professional-quality loaf that looks like it stepped straight out of a Dublin bakery. Let’s dive into the secrets of the perfect shaggy dough and that iconic golden crust.
Why You’ll Love This Recipe
You are going to fall in love with this recipe because it removes every barrier to home baking. First and foremost, it is incredibly fast; since there is no yeast, you skip hours of waiting. The texture is a delightful hybrid between a dense farmhouse loaf and a tender buttermilk biscuit, offering a satisfying “crunch” from the cast-iron bake. It is also a one-bowl wonder, meaning cleanup is a breeze. Furthermore, this recipe is highly versatile—you can keep it savory or lean into the sweetness of raisins. Most importantly, the use of cold butter and buttermilk creates a tender crumb that stays moist, unlike many drier versions of this traditional bread.
What Is Irish Soda Bread?
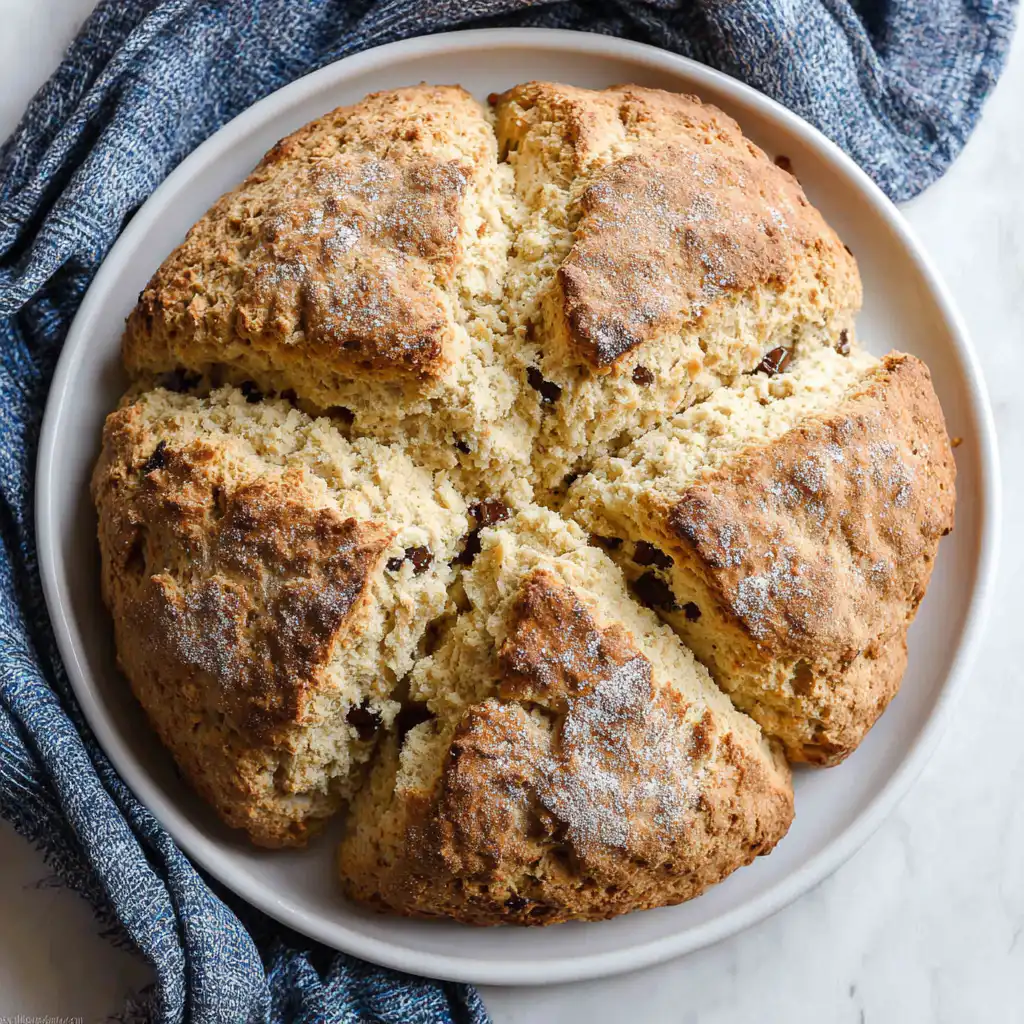
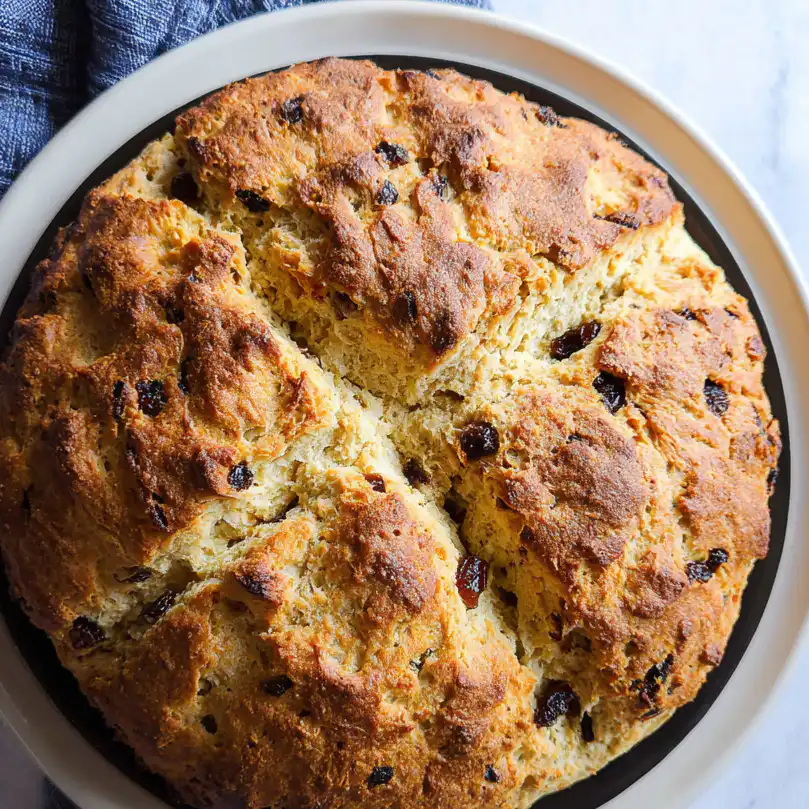
Traditionally, Irish Soda Bread was a product of necessity and ingenuity. In the mid-19th century, Ireland faced economic hardship, and yeast was often too expensive or unavailable. Bakers discovered that “soft” wheat flour reacted beautifully with bicarbonate of soda (baking soda) and the lactic acid in sour milk or buttermilk. This chemical reaction creates carbon dioxide bubbles, causing the bread to rise instantly in the oven. Culturally, the iconic “X” cut into the top wasn’t just for decoration; folk wisdom suggested it “let the devil out,” though practically, it allows the thick dough to expand and the center to cook through evenly. Today, it remains a symbol of Irish hospitality and hearth-cooked comfort.
Ingredients Overview
To achieve the perfect loaf, every ingredient serves a specific structural or flavorful purpose:
- All-Purpose Flour: This provides the base structure. Using all-purpose ensures the bread isn’t too heavy (like bread flour) but has enough strength to hold its shape.
- Baking Soda: The star of the show. This is your leavening agent. Ensure your baking soda is fresh for the best “lift.”
- Granulated Sugar: While traditional brown bread is often savory, this version uses a small amount of sugar to balance the tang of the buttermilk and the salt.
- Cold Unsalted Butter: Cutting cold butter into the flour creates tiny pockets of fat that steam during baking, leading to a tender, flaky crumb rather than a brick-like texture.
- Buttermilk or Kefir: The acid here is vital. It reacts with the soda to create rise. Kefir is a fantastic modern substitute that adds extra probiotics and a similar tang.
- Cold Large Egg: Adding an egg isn’t strictly traditional for every region, but it provides richness, color, and helps the bread hold together when sliced.
- Raisins or Dried Cranberries: These provide bursts of sweetness that contrast beautifully with the salty, buttery crust.
Ingredient Substitutions & Tips
If you find yourself missing an ingredient, don’t worry! For the buttermilk, you can create a DIY version by adding 1 tablespoon of lemon juice or white vinegar to 1 3/4 cups of whole milk; let it sit for 5-10 minutes until it curdles. If you prefer a savory loaf, simply omit the sugar and raisins and replace them with 1/2 cup of sharp cheddar cheese and a teaspoon of dried rosemary. For those needing a gluten-free option, a high-quality 1:1 gluten-free flour blend works surprisingly well here, though you may need to add an extra tablespoon of buttermilk as GF flours tend to be more absorbent.
Step-by-Step Instructions
- Preparation: Preheat your oven to 375˚F (190˚C). The oven must be fully hot before the bread goes in. Generously grease a 10-inch cast-iron skillet with 1/2 tablespoon of butter. The cast iron is preferred for its superior heat retention, which creates that signature thick bottom crust.
- Mix Dry Ingredients: In a large mixing bowl, whisk together the 4 cups of flour, sugar, salt, and baking soda. Sifting isn’t necessary, but ensure there are no large clumps of soda.
- The Butter “Crumble”: Add your cold, cubed butter. Use your fingertips to rub the butter into the flour. You aren’t looking for a smooth paste; you want pea-sized crumbs. This “rubbing in” method is the secret to a biscuit-like interior.
- Add Fruit: Toss in your raisins, breaking up any clumps so they are evenly distributed.
- Wet Ingredients: Whisk the buttermilk and egg together. Make a well in the center of your dry ingredients and pour the liquid in.
- The “Just Enough” Mix: Use a wooden spoon to fold the mixture. Stop the moment the dough starts to come together. It will look shaggy and slightly messy—this is perfect!
- Shape and Score: Transfer to a floured surface. With floured hands, gently pat it into a round loaf. Do not knead it like pizza dough! Place it in the skillet and use a sharp knife to cut a deep “X” (about 1 inch deep) across the top.
- Bake: Bake in the center rack for 50-55 minutes. The top should be a deep golden brown.
Expert Baking Tips
The biggest mistake bakers make with Irish Soda Bread is over-handling the dough. Unlike yeast breads, which thrive on gluten development through kneading, soda bread becomes tough and rubbery if worked too much. You want to handle the dough with a “light touch”—just enough to get it into a round shape. Secondly, check for doneness by “knocking” on the bottom of the loaf (carefully, using a towel). It should sound hollow. If it sounds thuddy, give it another five minutes. Finally, if the top is browning too quickly, loosely tent the skillet with aluminum foil for the last 15 minutes of baking.
The Science of Soda Bread
Why does this recipe work without yeast? It’s all about chemistry. When the alkaline baking soda (sodium bicarbonate) meets the acidic buttermilk (lactic acid), an immediate chemical reaction occurs. This reaction produces carbon dioxide gas. In the heat of the oven, these gas bubbles expand rapidly, trapped by the flour’s structure, causing the bread to rise. Because this reaction starts the moment the wet and dry ingredients touch, it is crucial to get your dough into the oven as quickly as possible. This is why we preheat the oven and grease the pan before we mix the ingredients!
Serving Suggestions
Serve this bread warm, ideally within an hour of baking. It is traditional to tear or slice it into thick wedges. A generous smear of high-quality salted Irish butter (like Kerrygold) is mandatory. It also pairs exceptionally well with a drizzle of honey or a dollop of orange marmalade. For a savory meal, use it to mop up the juices of a Guinness beef stew or a creamy potato leek soup.
Storage & Make-Ahead Tips
Irish Soda Bread is best enjoyed on day one. To store, wrap it tightly in foil or place it in an airtight container at room temperature for up to 2 days. To refresh the crust, pop slices into the toaster. You can also refrigerate leftovers for up to a week, though the texture will firm up. For longer storage, this bread freezes beautifully; slice it before freezing so you can grab and toast individual pieces whenever the craving strikes.
FAQs
1. Why is my Irish Soda Bread so dense?
Usually, this is caused by over-mixing the dough or using expired baking soda. Remember to mix only until the flour is moistened.
2. Can I bake this on a regular baking sheet?
Yes! While a cast-iron skillet provides the best crust, a parchment-lined baking sheet or a round cake pan will also work well.
3. Do I have to use raisins?
Not at all. You can swap them for currants, dried cranberries, or leave them out entirely for a more traditional “blaa” style savory loaf.
4. Why did my bread not rise?
Check your buttermilk. If it wasn’t acidic enough, the soda wouldn’t react. Also, ensure you didn’t let the dough sit on the counter too long before putting it in the oven.
5. Is this bread supposed to be “shaggy”?
Yes! A shaggy, craggy exterior is the hallmark of an authentic soda bread. A perfectly smooth loaf usually means it has been over-kneaded.
Final Thoughts
Baking bread doesn’t have to be a multi-day project. With this Authentic Irish Soda Bread, you can bring a piece of heritage and a lot of flavor to your kitchen in just over an hour. It’s a forgiving, rustic, and deeply satisfying recipe that reminds us that sometimes the simplest ingredients—flour, soda, and buttermilk—yield the most extraordinary results. Happy baking, and enjoy every buttery crumb!
PrintIrish Soda Bread Recipe

A traditional, shaggy-style Irish Soda Bread that requires no yeast and no rising time. This recipe yields a thick, golden crust with a soft, biscuit-like interior, studded with sweet raisins for a classic touch.
- Prep Time: 15 minutes
- Cook Time: 55 minutes
- Total Time: 70 minutes
- Yield: 12 slices
- Cuisine: Irish
Ingredients
All-purpose flour – 4 cups
Granulated sugar – 1/4 cup
Sea salt – 1 tsp
Baking soda – 1 tsp
Cold unsalted butter – 6 Tbsp
Cold lowfat buttermilk or kefir – 1 3/4 cups
Large egg (cold) – 1
Raisins or dried cranberries – 1 cup
Extra butter for greasing – 1/2 Tbsp
Instructions
Preheat your oven to 375˚F. Grease a 10-inch cast-iron skillet with 1/2 Tbsp butter.
In a large bowl, whisk the flour, sugar, salt, and baking soda.
Cut the cold butter into small cubes. Use your fingers or a pastry cutter to work it into the flour until it resembles coarse crumbs.
Stir in the raisins, ensuring they are evenly distributed and not clumped together.
In a separate measuring cup, whisk the buttermilk and egg until combined.
Create a well in the flour and pour in the liquid. Stir with a wooden spoon until just moistened.
Turn dough onto a floured surface. Gently shape into a round loaf. Do not over-knead.
Place in the skillet and score a deep ‘X’ on top with a sharp knife.
Bake for 50-55 minutes until the loaf sounds hollow when tapped.
Cool on a wire rack before slicing.
Notes
• Use very cold butter and liquids for the best texture.
• If you don’t have buttermilk, add 1 Tbsp of lemon juice to regular milk and let sit for 5 minutes.
• Avoid over-mixing the dough to prevent the bread from becoming tough.
• The deep ‘X’ is essential for allowing the center of the bread to cook through.


