
Nothing signals the arrival of spring quite like the pastel hues of Cadbury Mini Eggs. But while snacking on them by the handful is a classic tradition, folding them into a massive, bakery-style NYC cookie takes things to an entirely new level. If you’ve ever found yourself scrolling through Instagram, drooling over those impossibly thick, mountain-like cookies from New York’s famous bakeries, this recipe is for you.
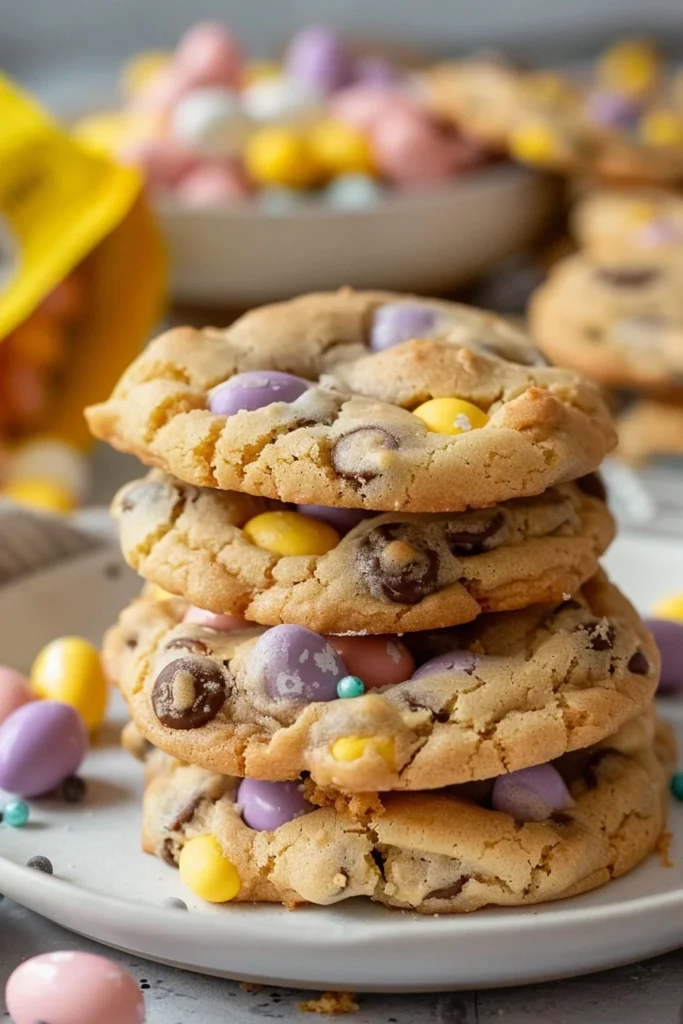
These Mini Egg NYC Cookies are designed for the “more is more” baker. We are talking about 115-gram giants that boast a crisp, golden-brown exterior and a center that remains delightfully doughy and soft. By combining the crunch of sugar-coated chocolate eggs with high-quality milk chocolate chunks, we’ve created a texture profile that is simply unmatched. Whether you are hosting an Easter brunch or just want to treat yourself to the ultimate seasonal snack, these cookies are guaranteed to be the star of the show.
Why You’ll Love This Recipe
You might be wondering what sets these apart from a standard chocolate chip cookie. First and foremost is the texture. Unlike flat, chewy cookies, these are robust and hefty, providing a satisfying “snap” followed by a melt-in-the-mouth center.
Secondly, they are incredibly photogenic. The vibrant colors of the crushed Mini Eggs popping against the golden dough make them a Google Discover favorite and a social media dream. Best of all, they are surprisingly simple to make. Despite their professional appearance, you don’t need fancy equipment—just a bowl, a mixer, and a little bit of patience while they chill. They are the perfect blend of nostalgic flavors and gourmet execution.
What Is an NYC Cookie?
An NYC-style cookie, popularized by legendary spots like Levain Bakery, is defined by its sheer size and unique baking method. Unlike traditional cookies where the butter is softened or melted, NYC cookies often use cold butter and a higher ratio of flour to create a dough that stands tall rather than spreading thin.
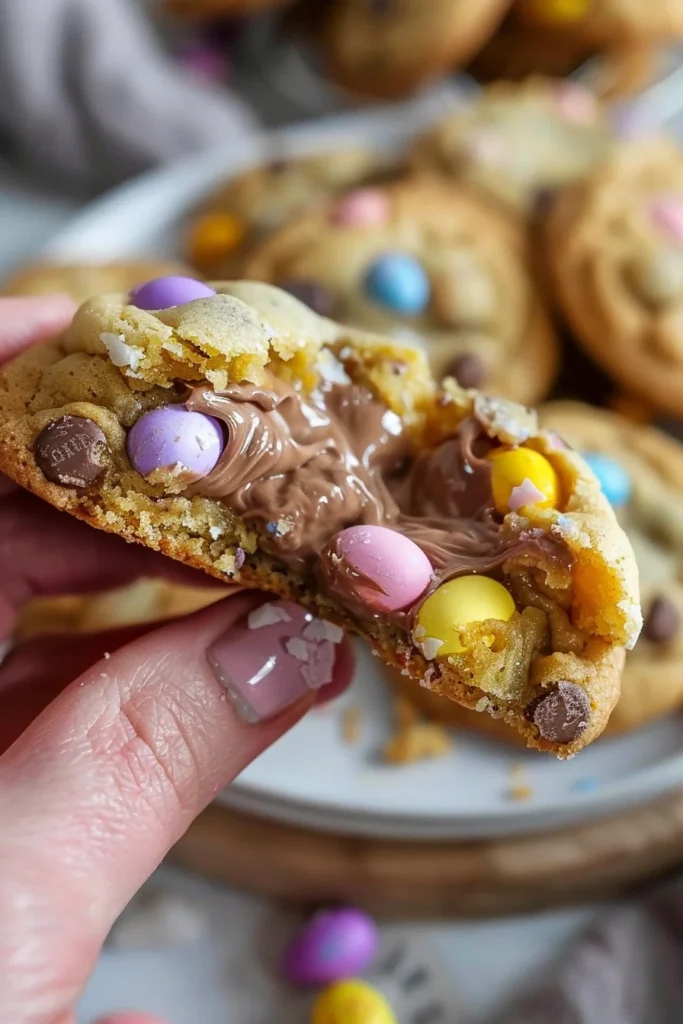
These cookies are typically baked at a higher temperature for a shorter duration. This “shocks” the outside into setting quickly, creating a toasted crust, while the inside remains underbaked and gooey. The result is a hybrid between a cookie and a scone—rich, dense, and utterly indulgent. Adding Mini Eggs into this format provides a seasonal twist that complements the heavy, buttery dough perfectly.
Ingredients needed
To achieve that iconic NYC structure, every ingredient plays a critical role. We start with 125g of unsalted butter. Crucially, this should be cold and cubed, not softened. Cold butter creates small steam pockets during baking, contributing to the lift and height.
For the sugars, we use a blend of 100g light brown soft sugar and 75g white granulated sugar. The brown sugar provides moisture and a deep molasses undertone, while the white sugar ensures those crisp, caramelized edges. 300g of plain flour acts as the structural backbone; it’s a higher amount than usual, which prevents the cookies from collapsing into puddles.
We also incorporate 1.5 teaspoons of baking powder and 0.5 teaspoons of bicarbonate of soda. This dual leavening system ensures the cookies rise and stay light despite their density. Finally, the stars of the show: 200g of chopped Mini Eggs for crunch and 100g of milk chocolate for that classic, gooey pull. A touch of sea salt is essential to balance the sweetness of the candy coating.
Ingredient Substitutions & Tips
While this recipe is optimized for the classic Mini Egg experience, you can easily tweak it to suit your pantry. If you find the cookies too sweet, swap the milk chocolate for 70% dark chocolate chunks; the bitterness provides a lovely contrast to the milk chocolate eggs.
For those who want an even deeper flavor, you can use dark brown sugar instead of light, though it will result in a slightly chewier, darker cookie. If you are looking for a gluten-free version, a high-quality 1:1 gluten-free flour blend with xanthan gum works well, though the cookies may spread slightly more. If you can’t find Mini Eggs, any candy-coated chocolate (like M&Ms) will work, though you’ll miss that specific malted milk flavor that Mini Eggs provide.
Step-by-Step Instructions
- Cream the Base: Begin by beating your cold, cubed butter with both sugars. Use a stand mixer with a paddle attachment if possible. You aren’t looking for a pale, fluffy mix like a cake; rather, you want the sugar and butter to be well combined and creamy but still relatively cool.
- Add Liquid Ingredients: Incorporate the egg and vanilla extract. Mix until just combined. Over-beating at this stage can introduce too much air, which might cause the cookies to deflate later.
- The Dry Mix: Add the flour, baking powder, bicarbonate of soda, and sea salt. Mix on a low speed. Stop the moment you see no more streaks of white flour. The dough will be thick and heavy.
- The Mix-ins: Gently fold in your 100g of chopped milk chocolate and the 200g of chopped Mini Eggs. Doing this by hand ensures you don’t crush the eggs too much, keeping those beautiful pastel shards intact.
- Portioning: Weigh out 8 balls of dough. They should be roughly 115g each. Roll them into rough balls—don’t make them too smooth, as the crags and bumps create a better texture.
- The Topping: Press your remaining 50g of whole Mini Eggs into the top of each ball.
- The Chill Factor: Place the balls on a tray and put them in the freezer for at least 30 minutes. This is the “secret” step that ensures they stay thick in the oven.
- The Bake: Preheat your oven to 180°C Fan. Bake for 12-14 minutes. The tops should be slightly browned, but the cookies will still feel very soft to the touch.
- The Set: This is the hardest part—leave them on the tray for 30 minutes. They will continue to cook internally from the residual heat.
Expert Baking Tips
To take your cookies from “good” to “professional bakery” quality, use a digital scale. Measuring flour by cups is notoriously inaccurate and can lead to dry, crumbly cookies.
Another pro tip is the “Cookie Scoot.” If your cookies come out of the oven looking a bit wonky, immediately place a large circular glass or cookie cutter over the hot cookie and gently swirl it in a circular motion. This pulls the edges in and creates a perfectly round, thick shape. Also, ensure your oven is truly at temperature before sliding the tray in. If the oven is too cool, the butter will melt before the structure sets, leading to flat cookies.
The Secret to the NYC Texture
The real “magic” behind the NYC cookie is the temperature contrast. By putting freezing-cold dough into a very hot oven, you create a race between the outside setting and the inside melting. Because the dough balls are so large (115g), the heat takes longer to reach the center. This creates a gradient of textures: a crunchy, caramelized bottom, a toasted “shell” on top, and a center that is essentially warm, safe-to-eat cookie dough. If you skip the chilling step, the butter will leak out too fast, and you’ll end up with a standard (though still delicious) large cookie rather than a true NYC titan.
Serving Suggestions
These cookies are best served slightly warm. If you’ve let them cool completely to set, you can pop one in the microwave for 15 seconds to regain that “molten” chocolate feel. They pair perfectly with a cold glass of milk or a hot cup of coffee to cut through the richness. For a truly decadent Easter dessert, serve a warm cookie in a bowl topped with a scoop of vanilla bean ice cream and an extra drizzle of melted chocolate.
Storage & Make-Ahead Tips
Store your baked cookies in an airtight container at room temperature for up to 5 days. To refresh them, a quick 2-3 minutes in a 160°C oven works wonders. You can also freeze the raw dough balls for up to 3 months. This is perfect for “emergency” cookie cravings—just bake them straight from the freezer, adding an extra 2 minutes to the total baking time.
FAQs
Why did my cookies come out flat?
This usually happens if the butter was too warm or if you skipped the chilling/freezing step. Ensure your butter is cold from the fridge and your dough is firm before baking.
Can I make these smaller?
Yes! If you prefer 60g cookies, reduce the baking time to about 9-10 minutes. However, the “gooey center” effect is most pronounced with the larger size.
What is the best chocolate to use?
High-quality chocolate bars chopped into chunks are superior to chocolate chips. Chips contain stabilizers that prevent them from melting fully, whereas chopped chocolate creates those beautiful pools of cocoa.
Can I use self-raising flour?
It is better to use plain flour and add your own leavening agents as specified. This gives you better control over the rise and prevents the cookies from becoming too “cakey.”
Do I need a stand mixer?
While a stand mixer makes it easier to handle the cold butter, you can use a hand mixer or even a sturdy wooden spoon and some elbow grease!
Mastering the Mini Egg NYC Cookie is a rite of passage for any home baker looking to impress. These cookies are more than just a dessert; they are an experience. With their massive size, vibrant Easter colors, and incredible contrast of textures, they bring a bit of New York magic right into your kitchen. Happy baking, and enjoy every gooey, chocolatey bite!
PrintMini Egg NYC Cookies

These Mini Egg NYC Cookies are the ultimate Easter indulgence. Inspired by the famous Levain Bakery in New York, they are massive, chunky, and feature a signature gooey center. Packed with crushed Mini Eggs and milk chocolate chunks, they offer a delightful crunch in every bite.
- Prep Time: 20 minutes
- Cook Time: 12 minutes
- Total Time: 60 minutes
- Yield: 8 large cookies
- Cuisine: American
Ingredients
Unsalted butter (cold/cubed) – 125 g
Light brown soft sugar – 100 g
White granulated sugar – 75 g
Large egg – 1
Vanilla extract – 1 tsp
Plain flour – 300 g
Baking powder – 1 1/2 tsp
Bicarbonate of soda – 1/2 tsp
Sea salt – 1/2 tsp
Milk chocolate (chopped) – 100 g
Mini Eggs (chopped) – 200 g
Mini Eggs (whole) – 50 g
Instructions
Beat the unsalted butter and both sugars in a stand mixer until creamy and well combined.
Add the egg and vanilla extract, beating again until the mixture is smooth.
Sift in the plain flour, baking powder, bicarbonate of soda, and salt. Mix on low speed until a thick cookie dough forms.
Fold in the chopped milk chocolate and the 200g of chopped Mini Eggs by hand or on low speed.
Divide the dough into 8 equal portions (roughly 115g each). Roll into tall balls.
Press the remaining 50g of whole Mini Eggs into the tops of the dough balls.
Place the balls on a tray and freeze for 30-60 minutes (or refrigerate for 2 hours). This is crucial for the NYC thickness!
Preheat your oven to 180°C Fan / 200°C regular.
Place 4 cookies per baking tray, leaving plenty of space for slight spreading.
Bake for 12–14 minutes until the edges are golden but the centers still look slightly soft.
Allow the cookies to cool completely on the tray for at least 30 minutes to set.
Notes
• Use cold butter straight from the fridge to prevent the cookies from spreading too thin.
• Do not overbake! They will look underdone in the middle, but they firm up as they cool.
• For a perfectly round look, use a large circular cutter to “scoot” the cookies immediately after they come out of the oven.
• You can substitute milk chocolate for dark chocolate to balance the sweetness of the Mini Eggs.


