
Welcome, fellow chocolate enthusiasts and Nutella lovers! Are you ready to dive into a world of unparalleled indulgence? Today, we’re not just baking brownies; we’re crafting an experience. An experience where rich, intensely chocolatey brownies meet a silky, dreamy Nutella fudge topping, creating a dessert so decadent it’s almost sinful. Get ready to bake the Ultimate Nutella Fudge Brownies – a recipe so good, it might just become your new signature sweet treat.
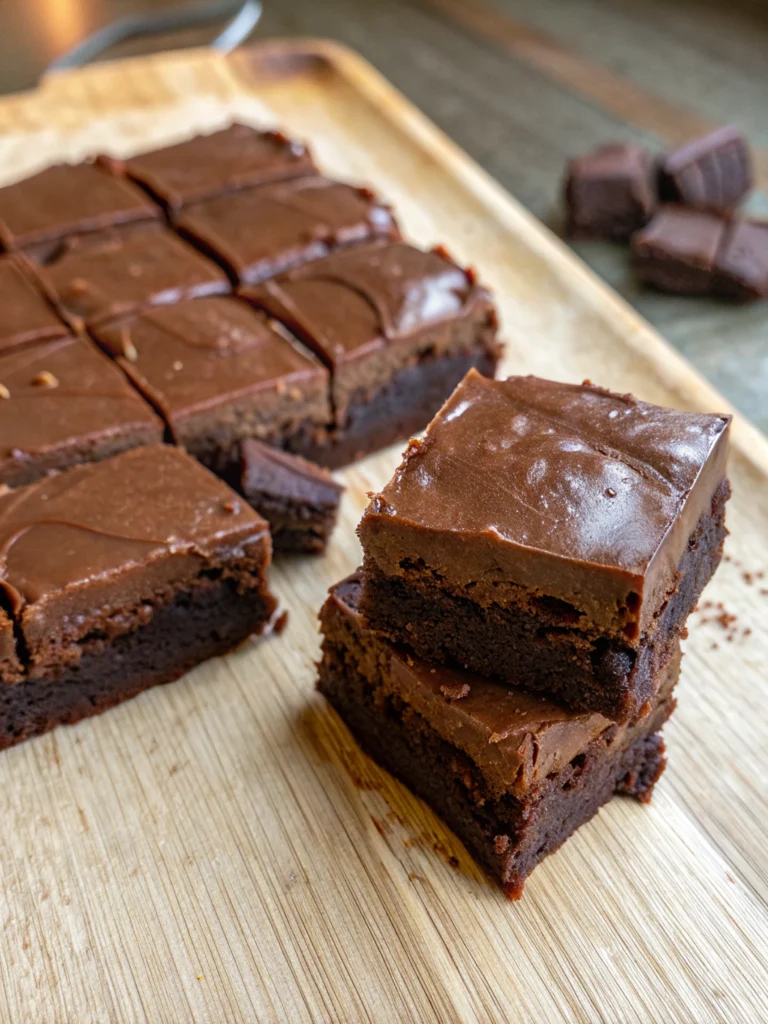
I’ve made countless brownies in my time, always chasing that perfect balance of fudginess, chewiness, and pure chocolate bliss. And then, I discovered the magic of adding a Nutella fudge layer. It’s a game-changer. This recipe isn’t just about throwing ingredients together; it’s about understanding the science and artistry behind truly exceptional brownies. My goal is to equip you with all the knowledge and tips you need to succeed, creating brownies that will impress everyone, from the pickiest eaters to the most seasoned dessert connoisseurs.
This recipe is designed to be accessible for home bakers of all skill levels, offering clear instructions and expert advice to ensure your success. So, tie on your apron, preheat your oven, and let’s embark on this delicious journey together!
Why You’ll Absolutely Fall in Love with These Nutella Fudge Brownies
Before we get our hands dirty, let me tell you exactly why these brownies are about to become your new obsession:
- Unbelievably Fudgy Brownie Base: We’re talking melt-in-your-mouth, intensely chocolatey, and perfectly dense brownies. No cakey imposters here!
- Decadent Nutella Fudge Layer: A smooth, creamy, and gloriously hazelnut-chocolate fudge that sets beautifully and adds another layer of irresistible flavor.
- Simple Ingredients, Big Flavor: Made with pantry staples, yet yielding results that taste like they came from a high-end bakery.
- Perfect for Any Occasion: Whether it’s a casual weeknight craving, a potluck, a birthday, or a holiday gathering, these brownies are always a hit.
- Easy to Follow: My detailed step-by-step instructions, coupled with expert tips, guarantee success even for novice bakers.
- Highly Shareable (or Not!): While they make a generous batch, don’t be surprised if they disappear faster than you can say “Nutella.”
These Nutella Fudge Brownies aren’t just a dessert; they’re a celebration of chocolate and hazelnut, a true comfort food masterpiece that promises to satisfy even the deepest sweet cravings.
Expert Tips for Brownie Perfection: My Secrets to Success
Achieving the perfect brownie is an art, but it’s an art anyone can master with a few key insights. Based on my extensive baking experience, these tips are crucial for transforming good brownies into great brownies.
1. Don’t Overmix the Brownie Batter
This is perhaps the most critical rule for achieving that coveted fudgy texture. Once you add the dry ingredients to the wet, mix just until no streaks of flour remain. Overmixing develops the gluten in the flour, leading to a tough, cakey, and dry brownie rather than a dense, fudgy one. Think of it as gently coaxing the ingredients together, not beating them into submission. A rubber spatula is your best friend here.
2. The Golden Rule of Underbaking (Slightly!)
For truly fudgy and moist brownies, a little underbaking is key. I know it can be tempting to wait for a “clean” skewer, but for brownies, that means overbaked. When you insert a wooden skewer or toothpick into the center, you should see a few moist crumbs clinging to it, not wet batter, but definitely not completely clean. The residual heat will continue to cook the brownies as they cool, a phenomenon known as “carry-over cooking.” This slight underbake ensures an incredibly soft, gooey center.
3. Quality Ingredients Make a Difference
While this recipe uses common ingredients, their quality can significantly impact the final flavor.
- Dark Chocolate: Opt for a good quality dark chocolate (around 60-70% cocoa solids) for that deep, rich chocolate flavor. Chocolate chips work, but a chopped bar melts smoother and often has a better flavor.
- Cocoa Powder: Use unsweetened natural cocoa powder for a classic brownie flavor. Dutch-processed cocoa will give a darker color and a milder, less acidic chocolate taste, but it reacts differently with leavening agents, so stick to natural unless specified.
- Nutella: Choose the authentic Nutella brand for that unmistakable hazelnut-chocolate flavor. Store-brand hazelnut spreads can work, but the flavor profile might vary.
4. Precision in Pan Preparation
Greasing and lining your 8-inch square pan with parchment paper is non-negotiable. The parchment paper creates “handles” that allow you to easily lift the cooled brownies out of the pan, making removal and slicing a breeze. Don’t skip this step – it saves so much frustration!
5. Patience is a Virtue: Cooling and Slicing
This is tough, I know! Waiting for brownies to cool completely before adding the fudge layer and then waiting for the fudge to set before slicing requires immense willpower. However, it’s crucial for the structural integrity and the ultimate enjoyment of your brownies.
- Cooling Brownie: The brownie needs to be fully cool to prevent the warm brownie from melting the fudge layer prematurely.
- Chilling Fudge: The fudge layer needs to set firmly in the refrigerator.
- Slight Softening Before Slicing: As mentioned in the recipe notes, allowing the chilled brownies to sit at room temperature for 15-20 minutes before slicing softens the fudge slightly, making it much easier to cut through cleanly without cracking or smudging. For super neat slices, use a hot, sharp knife, wiping it clean after each cut.
Following these expert tips will elevate your Nutella Fudge Brownies from simply delicious to truly legendary.
Ingredient Deep Dive: Understanding Each Component’s Role
Every ingredient in this recipe plays a vital role in creating the perfect texture and flavor profile. Let’s take a closer look at what each one brings to the table.
For the Brownie Base:
- Unsalted Butter (Melted): Butter provides richness and tenderness. Melting it ensures an even distribution and contributes to the dense, fudgy texture. Unsalted butter gives you control over the overall saltiness of the recipe.
- Brown Sugar: This is a crucial player for fudginess and chewiness. Brown sugar contains molasses, which adds moisture and contributes to that desirable chewy texture that balances the fudgy center. It also imparts a deeper, more caramel-like flavor compared to white sugar.
- Eggs: Eggs act as a binder, providing structure to the brownies while also contributing to their richness and moisture. The protein in eggs helps set the brownie as it bakes.
- Vanilla Extract: A flavor enhancer that complements the chocolate beautifully, adding warmth and depth without overpowering it. Always use good quality pure vanilla extract for the best results.
- Plain Flour: We use a relatively small amount of flour to keep the brownies dense and fudgy rather than cakey. It provides just enough structure to hold everything together without drying it out.
- Cocoa Powder: This is where a significant amount of the chocolate flavor comes from. Using unsweetened cocoa powder allows the richness of the chocolate to shine without excessive sweetness.
- Salt: Essential for balancing the sweetness and enhancing all the other flavors, especially the chocolate. Don’t skip it!
- Dark Chocolate (Roughly Chopped): These chocolate chunks melt into gooey pockets throughout the brownie, adding bursts of intense chocolate flavor and extra fudginess. Chopping a bar often yields better quality chocolate than pre-packaged chips, which sometimes contain stabilizers that prevent them from melting as smoothly.
For the Nutella Fudge Layer:
- Sweetened Condensed Milk: This thick, sweet milk is the base of our no-bake fudge. It provides incredible creaminess, sweetness, and helps the fudge set up perfectly without requiring a candy thermometer.
- Milk Chocolate: Adds a milder, sweeter chocolate flavor to the fudge, complementing the hazelnut of the Nutella. It melts beautifully with the condensed milk to create a smooth, luxurious texture.
- Nutella: The star of the fudge layer! This iconic hazelnut spread brings its distinct nutty, chocolatey, and creamy flavor, creating an irresistible topping that takes these brownies to another level.
By understanding the purpose of each ingredient, you gain a deeper appreciation for the recipe and can even troubleshoot more effectively if needed.
Step-by-Step Guide: Crafting Your Decadent Nutella Fudge Brownies
Let’s get baking! Follow these detailed instructions carefully for the best results.
Part 1: The Gooey Brownie Base
- Preparation is Key: Start by preheating your oven to a moderate 175°C (350°F). Take an 8-inch (20cm) square baking pan and prepare it properly. Grease the pan lightly, then line it with parchment paper, allowing an overhang on two sides to create “handles.” This makes removing the cooled brownies incredibly easy. Set this prepared pan aside.
- Combine Dry Ingredients: In a medium-sized bowl, use a fine-mesh sieve to sift together the 90g of plain flour, 42g of cocoa powder, and 1/4 teaspoon of salt. Sifting helps to break up any lumps and aerates the dry ingredients, ensuring a smooth, lump-free batter. Once sifted, whisk them together briefly to ensure they are well combined. Set this bowl aside.
- Mix Wet Ingredients (The Brown Sugar Magic): In a separate, larger bowl (this will be your main mixing bowl), pour in the 170g of melted unsalted butter. Add the 265g of brown sugar. Whisk these two together vigorously until they are fully combined and the mixture looks smooth. The brown sugar will dissolve slightly into the warm butter, creating a glossy, rich base.
- Incorporate Eggs and Vanilla: To the butter and brown sugar mixture, crack in the 2 eggs and add 2 teaspoons of vanilla extract. Whisk again until everything is fully incorporated and the mixture is light and slightly aerated. You’re building a stable emulsion here that will contribute to the brownie’s texture.
- Gently Combine Wet and Dry: Now, add the sifted dry ingredients to the wet mixture. This is where you need to be gentle! Using a rubber spatula, fold the ingredients together. Mix until just combined. You want to see no more streaks of dry flour. A few small lumps are fine; remember, overmixing leads to cakey brownies!
- Fold in Dark Chocolate: Finally, add the 170g of roughly chopped dark chocolate to the batter. Gently fold these in with your spatula, distributing them evenly throughout the batter. These chocolate chunks will melt into delicious pockets of gooeyness as the brownies bake.
- Pour and Smooth: Pour the brownie batter into your prepared 8-inch square pan. Use your spatula to spread it out evenly, ensuring the top is relatively smooth.
- Bake to Perfection: Place the pan in your preheated oven and bake for 25-30 minutes. Begin checking around the 25-minute mark. To test for doneness, insert a wooden skewer or toothpick into the center of the pan. It should come out with a few moist crumbs clinging to it – not wet batter, but also not completely clean. This indicates that perfect fudgy texture.
- Cool Completely: Once baked, remove the pan from the oven and place it on a wire rack to cool fully. This is absolutely essential before applying the fudge layer. Warm brownies will melt the fudge!
Part 2: The Dreamy Nutella Fudge Layer
- Gather Fudge Ingredients: While your brownies are cooling, get ready to make the irresistible Nutella fudge. In a microwaveable bowl, combine the 395g of sweetened condensed milk, 265g of milk chocolate (chopped or chips), and 280g of Nutella.
- Melt and Mix: Place the bowl in the microwave and heat in short 30-second bursts. After each burst, remove the bowl and stir the mixture thoroughly with a spatula. Continue this process until all the chocolate is fully melted and the mixture is completely smooth, glossy, and well combined. This usually takes a few minutes, depending on your microwave. Be patient and stir well in between to prevent scorching.
- Spread the Fudge: Once the brownie base is completely cool, pour the warm (but not hot) Nutella fudge mixture evenly over the top. Use an offset spatula or the back of a spoon to spread it out all the way to the edges, creating a smooth, beautiful layer.
- Chill to Set: Place the pan with the brownie and fudge into the refrigerator. Allow it to chill for at least 2-3 hours, or preferably until the fudge layer is completely set and firm. This is crucial for easy and clean slicing.
Part 3: Slice, Serve, and Savor!
- Prepare for Slicing: Once the brownies are fully chilled and the fudge is set, carefully lift the entire slab out of the pan using the parchment paper overhangs. Place it on a cutting board.
- Soften for Easier Cutting: For the easiest and cleanest slicing, allow the brownies to sit at room temperature for about 15 minutes. This softens the fudge layer ever so slightly, making it less prone to cracking when cut.
- Slice and Enjoy: Using a large, sharp knife, slice the brownies into 16 even squares (or whatever size you prefer!). For extra clean cuts, wipe your knife with a hot, damp cloth after each slice.
- Indulge! Your ultimate Nutella Fudge Brownies are ready to be devoured.
Serving Suggestions: Elevate Your Brownie Experience
These Nutella Fudge Brownies are absolutely divine on their own, but if you’re looking to elevate the experience, here are a few serving suggestions:
- A La Mode: A scoop of good quality vanilla bean ice cream or hazelnut ice cream is a classic pairing that provides a delightful contrast in temperature and texture.
- Warm Drizzle: Gently warm a small amount of extra Nutella or a simple chocolate ganache and drizzle it over the top just before serving.
- Coffee or Tea: Enjoy with a hot cup of coffee, a creamy latte, or a comforting mug of hot tea. The bitterness of the coffee beautifully complements the sweetness of the brownies.
- Milk: For the ultimate nostalgic treat, serve with a tall, cold glass of milk.
- Sprinkles or Flaky Sea Salt: Add a dash of color with some festive sprinkles (especially for holidays!) or a sprinkle of flaky sea salt to cut through the sweetness and highlight the chocolate.
- Fresh Berries: A few fresh raspberries or strawberries can add a touch of freshness and acidity to balance the richness.
Storage and Make-Ahead Tips
These brownies are so good, they rarely last long, but here’s how to store them if you manage to have leftovers (or want to plan ahead!).
- Refrigeration is Best: Due to the creamy fudge layer, these Nutella Fudge Brownies are best stored in an airtight container in the refrigerator for up to 5-7 days.
- Room Temperature: If you prefer a softer fudge, you can leave them at room temperature for up to 2-3 days in an airtight container, but be aware the fudge layer will be much softer and gooier.
- Freezing for Longer Storage: These brownies freeze beautifully! Once completely set and sliced, wrap individual squares tightly in plastic wrap, then place them in a freezer-safe bag or container. They can be frozen for up to 3 months. Thaw them in the refrigerator overnight or at room temperature for a few hours before serving.
Make-Ahead Tip: You can bake the brownie base a day in advance, cool it completely, cover it, and store it at room temperature. Prepare the fudge layer and assemble on the day you plan to serve. This breaks up the work and makes entertaining a breeze!
Troubleshooting Common Brownie Issues
Even the most experienced bakers run into issues sometimes. Here are some common brownie problems and how to avoid or fix them:
- Dry, Cakey Brownies:
- Culprit: Overmixing the batter, too much flour, or overbaking.
- Solution: Follow the “don’t overmix” rule, measure flour precisely (preferably by weight), and check for doneness at the earliest recommended time (look for moist crumbs, not a clean skewer).
- Oily or Greasy Brownies:
- Culprit: Too much butter or not enough dry ingredients to absorb it.
- Solution: Ensure accurate measurement of butter and flour. If melting butter, avoid scorching it, as this can affect its texture.
- Fudge Layer Not Setting:
- Culprit: Not enough chilling time, or the mixture wasn’t heated enough to melt the chocolate and combine it properly.
- Solution: Ensure the fudge is microwaved until fully smooth and combined. Give it ample time in the refrigerator to set – sometimes overnight is best.
- Brownies Sticking to the Pan:
- Culprit: Inadequate pan preparation.
- Solution: Always grease and line your pan with parchment paper, leaving an overhang to act as handles. This is a game-changer!
Variations and Customizations: Make Them Your Own!
While this recipe is perfect as is, there’s always room for a little personal flair!
- Add Nuts: Fold in 1/2 cup of chopped toasted pecans, walnuts, or hazelnuts into the brownie batter for added crunch and nutty flavor.
- Coffee Kick: Enhance the chocolate flavor by adding 1 teaspoon of espresso powder to the dry ingredients. It won’t make your brownies taste like coffee, but it will deepen the chocolate notes.
- Flaky Sea Salt: A sprinkle of flaky sea salt on top of the still-wet fudge layer adds a sophisticated touch and balances the sweetness beautifully.
- Extra Chocolate Drizzle: Once the fudge has set, melt a little extra dark or milk chocolate and drizzle it decoratively over the top.
- Sprinkle Fun: For a festive touch, add some colorful sprinkles to the top of the fudge layer before it sets.
- White Chocolate Swirl: Instead of milk chocolate in the fudge, use white chocolate for a different flavor profile. Or, melt a small amount of white chocolate separately and swirl it into the Nutella fudge for a marbled effect.
- Spice it Up: A pinch of cayenne pepper in the brownie batter can add a subtle, warming heat that complements the chocolate.
Feel free to get creative and experiment with your favorite additions!
Frequently Asked Questions (FAQ) About Nutella Fudge Brownies
Got more questions? Here are answers to some common queries about making these irresistible brownies.
Q: Can I use a different size baking pan for these Nutella Fudge Brownies?
A: This recipe is optimized for an 8-inch square pan. If you use a larger pan, your brownies will be thinner and may bake faster, potentially becoming dry. A smaller pan will result in thicker brownies requiring a longer baking time. Always adjust baking time and keep an eye on doneness if changing pan sizes. My advice? Stick to the 8-inch square for best results!
Q: How should I store Nutella Fudge Brownies, and do they need to be refrigerated?
A: Due to the Nutella fudge layer, these brownies are best stored in an airtight container in the refrigerator for up to 5-7 days. For optimal texture, allow them to come to room temperature for about 15-30 minutes before serving. You can also freeze them for up to 3 months; simply wrap individual slices tightly in plastic wrap and then foil.
Q: My brownies turned out cakey instead of fudgy. What went wrong?
A: A common culprit for cakey brownies is overmixing the batter or overbaking. Overmixing develops the gluten in the flour, leading to a tougher, more cake-like texture. Overbaking removes too much moisture, making them dry. For ultimate fudginess, mix until just combined and pull them from the oven when a skewer inserted into the center still has a few moist crumbs attached. Trust the moist crumbs!
Q: Can I use other types of chocolate in the Nutella fudge layer?
A: While milk chocolate provides a delightful sweetness and creaminess to complement the Nutella, you can absolutely experiment! Using dark chocolate will result in a richer, less sweet fudge. White chocolate could also be an interesting twist for a different flavor profile, but be mindful of its sweetness and melting consistency. Just ensure it’s good quality chocolate that melts smoothly.
Q: What’s the best way to get clean slices for these brownies?
A: For perfectly clean slices, ensure the brownies are fully chilled and the fudge layer is set. Then, remove them from the fridge and let them sit at room temperature for 15-20 minutes to slightly soften the fudge. Use a large, sharp knife, wiping it clean with a hot, damp cloth after each cut to prevent sticking and achieve those professional-looking edges. This little trick makes a huge difference!
The Sweetest Conclusion
There you have it – the comprehensive guide to baking the most glorious Nutella Fudge Brownies you’ll ever taste. This recipe isn’t just about combining ingredients; it’s about understanding the nuances of baking, embracing patience, and ultimately, creating a truly memorable dessert experience.
From the first gooey bite of the chocolate brownie to the smooth, hazelnut-infused fudge, every element of this treat is designed to delight. Whether you’re a seasoned baker or just starting your culinary journey, I’m confident that with these detailed instructions and my expert tips, you’ll achieve brownie perfection.
So, go ahead, gather your ingredients, follow these steps, and prepare to be hailed as the hero of homemade desserts. These Nutella Fudge Brownies are more than just a recipe; they’re an invitation to indulge, share, and savor the sweet moments in life. Happy baking!
PrintNutella Fudge Brownies
A delightful treat that combines rich, gooey chocolate brownie with the irresistible hazelnut spread.
- Prep Time: 30
- Cook Time: 30
- Total Time: 60
- Yield: 16 Squares
- Category: Dessert
- Method: Baking
- Cuisine: American
Ingredients
170g Unsalted Butter (Melted)
265g Brown Sugar
2 Eggs
2 Tsp Vanilla Extract
90g Plain Flour
42g Cocoa Powder
1/4 Tsp Salt
170g Dark Chocolate (Roughly Chopped)
395g Sweetened Condensed Milk
265g Milk Chocolate
280g Nutella
Instructions
1. Preheat the oven to 175°C. Grease and line an 8-inch square pan with parchment paper. Set aside.
2. In a medium bowl, sift together the flour, cocoa powder and salt. Whisk to combine and set aside.
3. In a separate large bowl, whisk together the butter and brown sugar. Once combined, add the eggs and vanilla then whisk again until fully combined.
4. Add the dry ingredients to the wet ingredients and fold together using a spatula until just combined (Don’t overmix).
5. Fold in the chopped dark chocolate using a spatula until evenly combined.
6. Pour the brownie batter into the prepared pan and smooth over into an even layer using a spatula.
7. Bake for 25-30 minutes or until you can insert a wooden skewer, and a few moist crumbs are on it.
8. Allow to cool fully.
9. Place all the fudge ingredients in a microwaveable bowl, microwave in 30 second bursts (stirring in-between) until fully melted and combined.
10. Evenly spread the fudge all over the brownie.
11. Refrigerate until the fudge layer is set.
12. Carefully remove the brownie from the pan and allow to sit for about 15 minutes, this will soften the fudge slightly to make the slicing process easier.
13. Slice up and enjoy!
Notes
Don’t overmix: Overmixing the brownie batter can lead to a final product that is both dense and dry, ultimately compromising the deliciously fudgy texture that we all love in a good brownie.
Don’t overbake: If you want to achieve fudgy and moist brownies that have a deliciously rich texture, I highly recommend under-baking them just slightly. This little trick can make a significant difference in the final product!
Serving: Since you need to refrigerate the slice to help the fudge layer set properly, it can make the slicing process a little more difficult. To make things easier, I recommend allowing it to sit at room temperature for about 15 minutes before you start slicing it up. This way, the Nutella fudge will soften slightly, making for a much smoother and more enjoyable experience when cutting through the layers.


