
There is something so deeply nostalgic about a perfectly baked frosted sugar cookie. It’s the kind of treat that reminds you of bake sales, holiday parties, and rainy Sunday afternoons in the kitchen. But let’s be honest: not all sugar cookies are created equal. We’ve all had those rock-hard, floury discs that break a tooth, or the ones where the frosting is so sweet it makes your head spin.
Today, we are putting an end to the “boring cookie” era. These Soft and Chewy Frosted Sugar Cookies are the real deal. They have a thick, pillowy texture that stays soft for days, paired with a velvety vanilla buttercream that holds its shape perfectly for piping.
Whether you’re looking for the perfect Pinterest-worthy holiday cookie or just a foolproof recipe to bake with the kids, this is the only one you’ll ever need.
Why You’ll Love This Recipe
- No Fancy Skills Required: You don’t need to be a professional pastry chef. If you can use a hand mixer and a cookie scoop, you’re golden.
- The Texture is Everything: These aren’t thin, crispy cookies. They are thick, soft-baked, and have that melt-in-your-mouth quality.
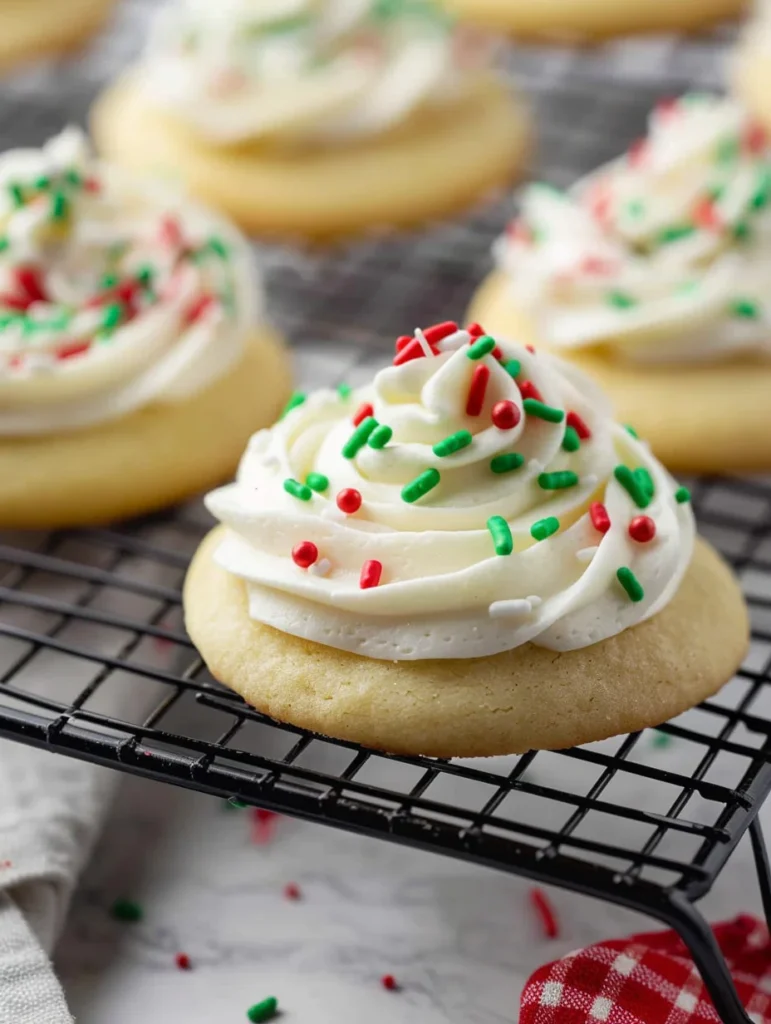
- Customizable for Every Season: Swap the food coloring and sprinkles for Christmas, Valentine’s Day, or a summer birthday party.
- Minimal Chilling: Just 30 minutes in the fridge is all you need to ensure the cookies don’t over-spread and the flavors fully develop.
- The Buttercream: This isn’t a runny glaze. It’s a stable, whipped buttercream that works beautifully for piping rosettes or smooth spreading.
Ingredient Notes for Success
Before you start preheating, let’s talk about the key players in this recipe. Using the right ingredients (and the right temperature) makes all the difference.
- Unsalted Butter: Always use unsalted butter so you can control the salt content. Most importantly, it must be room temperature. If it’s too cold, it won’t cream with the sugar; if it’s melted, your cookies will be greasy and flat.
- The Flour Measurement (Crucial!): This is where most bakers go wrong. If you scoop your measuring cup directly into the flour bag, you’ll pack it down and end up with way too much flour—leading to dry, crumbly cookies. Spoon the flour into the cup and level it off with a knife, or use a kitchen scale for exactly 360 grams.
- Large Eggs: Make sure these are at room temperature as well. Cold eggs can “seize” your creamed butter, causing the dough to look curdled.
- Heavy Cream (for frosting): A little splash makes the buttercream incredibly creamy and light. You can substitute with whole milk if needed, but the cream adds a richness that’s hard to beat.
Step-by-Step Instructions
1. Cream the Butter and Sugar
In a large mixing bowl, beat your softened butter and granulated sugar together. You want to see the color change from yellow to a pale ivory. This usually takes about 1-2 minutes of high-speed mixing. This process incorporates air, which gives the cookies their “lift.”
2. Add the Wet Ingredients
Add in the eggs and vanilla extract. Beat again until the mixture is fluffy and smooth. Don’t be afraid to scrape down the sides of the bowl with a spatula to make sure everything is incorporated.
3. Mix the Dry Ingredients
Sift your flour, baking powder, and salt together. Gradually stir this into the wet mixture. If you’re using a stand mixer, keep it on the lowest speed. Stop mixing the second you stop seeing streaks of white flour. Overmixing develops gluten, which makes cookies tough!
4. The Quick Chill
Cover the dough and pop it in the fridge for 30 minutes. This “marinating” period allows the flour to hydrate, resulting in a deeper flavor and a much easier dough to roll.
5. Scoop and Bake
Preheat your oven to 350°F. Use a medium cookie scoop to form 1.5-inch balls.
- For thick, domed cookies: Leave the balls as they are.
- For flatter decorating surfaces: Gently press the balls down with the palm of your hand or a flat-bottomed glass.
Bake for 10-12 minutes. The secret is to pull them out when the tops look “set” but the edges are barely golden. They will finish cooking on the hot pan.
6. The Buttercream Finale
Whip your frosting ingredients until they look like a fluffy cloud. Once the cookies are completely cool, it’s time to decorate! Use a piping bag for rosettes (I love the Wilton 2D tip) or a simple offset spatula for a rustic look.
Expert Tips for Best Results
- Don’t Overbake: I cannot stress this enough! If you wait until the cookies look “done” in the oven, they will be crunchy once they cool. Pull them out when they still look slightly soft in the center.
- Use Quality Vanilla: Since vanilla is the primary flavor here, use a high-quality pure vanilla extract or even vanilla bean paste for those beautiful little flecks.
- Salt is Your Friend: That “pinch” of salt in the frosting is what cuts through the sugar and makes the flavor complex rather than just cloying.
Variations and Substitutions
- The Almond Twist: Replace 1 teaspoon of vanilla in the cookie dough with 1/2 teaspoon of almond extract. This gives them that classic “wedding cake” flavor.
- Chocolate Chip Sugar Cookies: Fold in 1/2 cup of mini chocolate chips for a hybrid treat.
- Dairy-Free Option: You can use a high-quality vegan butter stick (like Miyoko’s) and almond milk in the frosting, though the texture may vary slightly.
Storage and Freezing
To Store: Keep frosted cookies in a single layer in an airtight container for up to 3 days at room temperature. If you need to stack them, place a piece of parchment paper between the layers, but wait until the buttercream has “crusted” slightly.
To Freeze (Dough): Roll the dough into balls and freeze them on a tray. Once solid, transfer to a freezer bag. Bake directly from frozen, adding 2 minutes to the bake time.
To Freeze (Baked): You can freeze the unfrosted cookies for up to 3 months. Thaw at room temperature and frost fresh!
Frequently Asked Questions
Why are my sugar cookies dry?
Usually, this is caused by over-measuring the flour or over-baking the cookies. Always use the “spoon and level” method!
Can I use this dough for cut-out shapes?
This specific recipe is designed to be a “drop cookie” or a hand-rolled ball. It is a bit too soft for intricate cookie cutters. If you want cut-outs, you would need to add about 1/4 to 1/2 cup more flour.
How do I get my frosting perfectly smooth?
If your buttercream has too many air bubbles, use a spatula to manually stir it back and forth against the side of the bowl for a minute to “smush” out the air.
Happy Baking!
There you have it—the ultimate guide to making the best frosted sugar cookies of your life. These are guaranteed to be the star of your next dessert table. If you make these, don’t forget to snap a photo and tag me on Instagram or pin this recipe to your “Baking” board on Pinterest!
PrintThe Best Soft and Chewy Frosted Sugar Cookies (Better than a Bakery!)

These are the ultimate soft-baked sugar cookies. With a thick, pillowy base and a rich vanilla buttercream, they taste exactly like the ones from a high-end bakery but are so easy to make at home.
Ingredients
FOR THE SUGAR COOKIES:
1 cup (226g) unsalted butter, room temperature
1 cup (198g) granulated sugar
2 large eggs, room temperature
2 teaspoons vanilla extract
3 cups (360g) all-purpose flour, measured properly
1 teaspoon baking powder
¾ teaspoon salt
FOR THE BUTTERCREAM FROSTING:
¾ cup (170g) unsalted butter, room temperature
2 ½ cups (284g) confectioner’s sugar
2 tablespoons heavy cream
2 teaspoons vanilla extract
1 pinch salt
food coloring & sprinkles, optional
Instructions
1. In a large bowl, cream together the room temperature butter and granulated sugar using a hand mixer or stand mixer until light and fluffy (about 1-2 minutes).
2. Add the eggs and vanilla extract. Beat again until the mixture is fully incorporated and looks pale and fluffy.
3. In a separate bowl, whisk together the flour, baking powder, and salt. Gradually add the dry ingredients to the butter mixture, mixing on low speed until just combined. Do not overmix!
4. Cover the bowl and chill the dough in the refrigerator for 30 minutes. This helps the flavors meld and makes the dough easier to handle.
5. Preheat your oven to 350°F (175°C) and line two large baking sheets with parchment paper.
6. Scoop the dough into 1.5-inch balls (about a medium cookie scoop). Place them 2 inches apart on the prepared sheets. For flatter cookies, press down slightly with your palm.
7. Bake for 10-12 minutes, or until the tops are set and the edges just barely begin to turn golden. Do not overbake!
8. Allow cookies to cool on the pan for 5 minutes before transferring to a wire rack to cool completely.
9. Make the frosting: Whip the butter, confectioner’s sugar, heavy cream, vanilla, and salt together until smooth and fluffy. Pipe or spread onto cooled cookies and add sprinkles immediately.
Notes
Measure flour by spooning it into the measuring cup and leveling it off with a knife, or use a kitchen scale (360g).
Ensure butter is truly room temperature—not melted—for the best texture.
If you want a ‘flat’ top for intricate decorating, use the bottom of a glass to flatten the dough balls before baking.


