
Imagine the soft, buttery bite of a classic sugar cookie fused with the nostalgic joy of a fruit-filled pastry. These Strawberry Jam Sugar Cookie Bars are exactly that—a sophisticated, homemade take on a childhood favorite that delivers a perfect balance of textures. With a thick layer of chewy cookie dough on the bottom, a vibrant strawberry preserve center, and a slightly crisp top layer finished with a sweet vanilla glaze, these bars are destined to be the star of your next bake sale or weekend brunch. The secret lies in the specific layering technique and the use of high-quality preserves, creating a dessert that is as beautiful to look at as it is delicious to eat. Whether you are a seasoned baker or a kitchen novice, this recipe offers a foolproof path to bakery-quality results right in your own home.
Why You’ll Love This Recipe
You will fall in love with these bars because they offer the ultimate “comfort food” experience without the hassle of chilling individual cookie dough balls. Unlike traditional sugar cookies that can sometimes turn out dry or crunchy, this bar format ensures a dense, chewy interior that stays moist for days. The addition of the strawberry jam provides a tart contrast to the sweet dough, cutting through the richness of the butter. Furthermore, the recipe is incredibly versatile; while we use strawberry today, it serves as a master template for any fruit preserve you have on hand. It’s a “one-pan wonder” that looks impressively technical thanks to the distinct layers, yet the active prep time is minimal.
What Is A Strawberry Jam Sugar Cookie Bar?
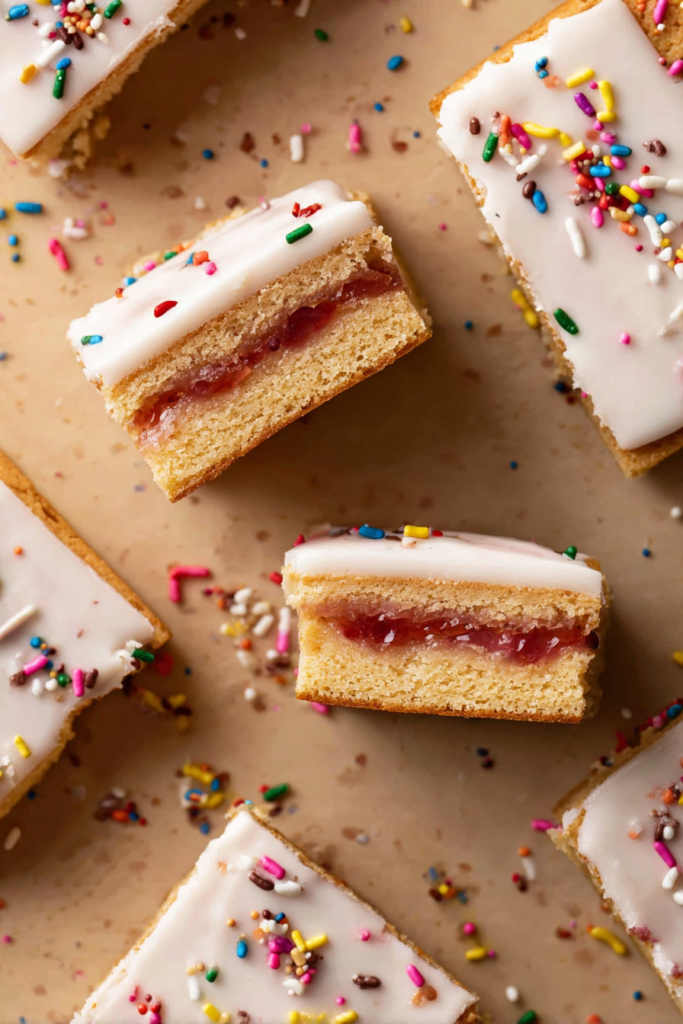
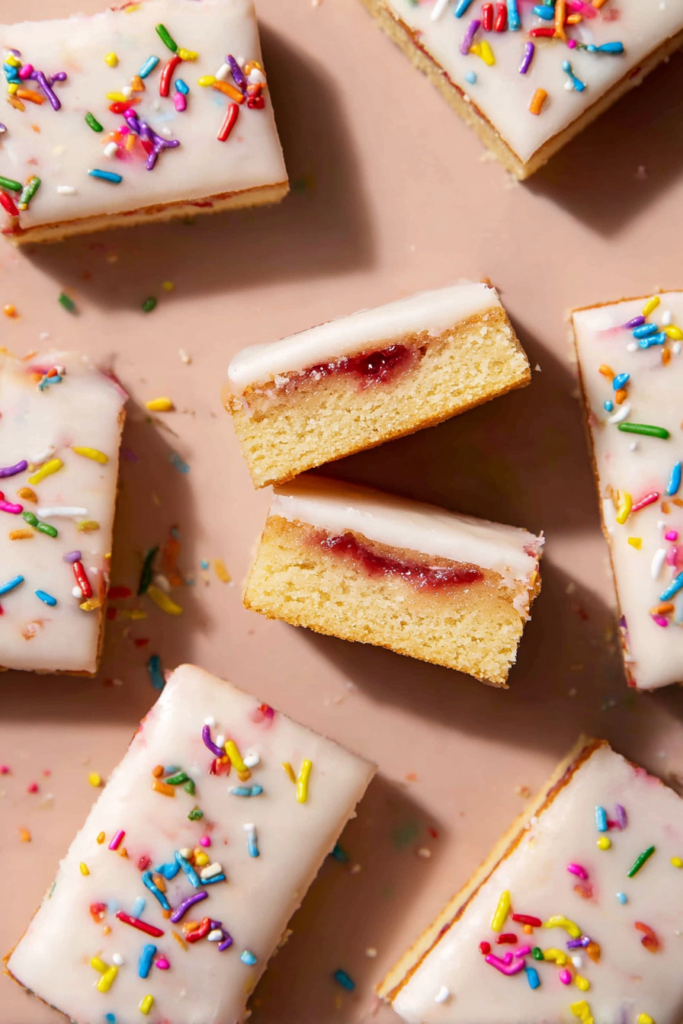
A Strawberry Jam Sugar Cookie Bar is a multi-layered dessert that utilizes a sturdy yet soft sugar cookie dough as both the base and the top crust. Unlike a crumble bar or a “streusel” topped bar, this recipe uses a solid sheet of cookie dough for the top layer, which creates a “stuffed” effect similar to a giant, soft Pop-Tart. The filling is made from strawberry preserves, which are thicker and more fruit-forward than standard jelly, ensuring the filling doesn’t run out when the bars are sliced. Finished with a simple powdered sugar glaze and a handful of rainbow sprinkles, it is a playful, colorful treat that bridges the gap between a breakfast pastry and a classic dessert.
Ingredients Overview
To achieve the perfect bake, every ingredient in this list serves a specific structural or flavor purpose.
- Unsalted Butter: Using room temperature butter is non-negotiable. It allows the sugar to aerate the fat during the creaming process, creating those tiny air pockets that result in a soft crumb.
- Granulated Sugar: Provides sweetness and helps the edges of the bars get that slightly golden, crisp finish.
- Large Eggs: Acts as the binder. Ensure they are at room temperature so they incorporate seamlessly into the emulsified butter and sugar.
- Vanilla Extract or Paste: This is the primary flavor of the dough. Using vanilla bean paste will add beautiful tiny black specks and a deeper aroma.
- All-Purpose Flour: The backbone of the recipe. We use 2 ½ cups plus 2 tablespoons (roughly 296 grams). Accurate measurement here is the difference between a chewy bar and a dry, crumbly one.
- Strawberry Preserves: Choose a high-quality brand with fruit pieces for the best texture and flavor.
- Glaze Components: Powdered sugar and whole milk create a pourable icing that sets firmly, providing that classic “iced cookie” mouthfeel.
Ingredient Substitutions & Tips
If you find yourself missing an ingredient, there are several easy swaps you can make. If you aren’t a fan of strawberry, raspberry or blackberry preserves make for an excellent tart alternative. For a more “grown-up” flavor profile, you can swap the vanilla extract in the glaze for almond extract, which pairs beautifully with stone fruits. If you need to make these dairy-free, a high-quality vegan butter stick and almond milk can be substituted at a 1:1 ratio. For the flour, a 1:1 gluten-free baking blend (the kind that includes xanthan gum) works surprisingly well in this sturdy dough. Always remember to use “fine” sea salt; coarse salt won’t dissolve properly in the dough and will leave salty hot spots.
Step-by-Step Instructions
- Preparation: Start by lining your 8×8-inch metal baking pan with parchment paper. Leave an overhang on the sides to act as a “sling” for easy removal later. Preheat your oven to 375°F (190°C).
- Creaming: In a stand mixer or with a hand mixer, cream the butter and sugar for a full 3 minutes. Do not rush this; the mixture should look significantly lighter in color and very fluffy.
- Emulsifying: Add the eggs one at a time, followed by the vanilla. Scrape down the sides of the bowl to ensure no pockets of butter remain.
- Dry Ingredients: Add the flour, salt, and baking soda. Mix on low speed just until the flour streaks disappear. Overmixing at this stage will develop too much gluten, making the bars tough.
- The Chill Factor: Place the dough in the refrigerator for 20 minutes. This makes the dough less sticky and much easier to handle.
- Layering Technique: Press half of the dough (about 348 grams) into the bottom of the prepared pan. Lift this layer out using the parchment and place it on a baking sheet in the freezer for 5-10 minutes.
- Assembly: Put new parchment in the pan. Press the remaining dough into the bottom. Spread the strawberry preserves evenly across this layer.
- The Topping: Take the chilled top layer from the freezer, peel off its parchment, and place it directly on top of the jam. Press the edges down gently to “seal” the jam inside.
- Baking: Bake for 25–28 minutes. The top should be a light golden brown.
- Cooling & Glazing: Let the bars cool completely in the pan. Once cool, flip them out, whisk your glaze, and pour it over. Add sprinkles immediately before the glaze sets.
Expert Baking Tips
The most critical tip for this recipe is the pan choice. You must use a metal baking pan. Glass and ceramic are insulators; they take longer to heat up and longer to cool down, which often results in the edges of your bars being overcooked while the center remains raw. Additionally, measuring flour by weight is the only way to ensure consistency. If you don’t have a scale, use the “spoon and level” method: fluff the flour with a fork, spoon it into the measuring cup until overflowing, and level it off with the back of a knife. Never scoop the cup directly into the flour bag, as this packs the flour down and can add up to 25% more flour than required.
The Secret to the Perfect Layer
Many jam-filled bars suffer from a “muddy” appearance where the top layer of dough sinks into the jam. To prevent this, we use the freezer method. By pressing out the top layer first and then chilling it in the freezer while you assemble the rest of the bars, you create a solid “lid” of dough. This allows the top layer to sit perfectly on the preserves without mixing. When it hits the hot oven, the bottom of that lid starts to set before it can melt into the jam, resulting in three distinct, beautiful layers that look like they came from a professional patisserie.
Serving Suggestions
These Strawberry Jam Sugar Cookie Bars are incredibly versatile. For a casual afternoon treat, serve them alongside a glass of cold milk or a hot cup of Earl Grey tea. If you want to elevate them for a dessert course, serve a bar slightly warmed with a scoop of premium vanilla bean ice cream or a dollop of fresh whipped cream. They also hold up remarkably well at room temperature, making them the perfect candidate for picnic baskets, lunchbox surprises, or outdoor potlucks where delicate frostings might melt.
Storage & Make-Ahead Tips
To keep these bars fresh, store them in an airtight container at room temperature for up to 3 days. If you prefer a firmer, cold treat, they will last in the refrigerator for up to 6 days. These bars also freeze beautifully! Wrap individual squares in plastic wrap and place them in a freezer-safe bag for up to 3 months. To serve from frozen, simply let them thaw at room temperature for about an hour. You can also make the dough a day in advance and keep it in the fridge until you are ready to assemble and bake.
FAQs
Q: Can I use strawberry jelly instead of preserves?
A: Preserves are highly recommended because they have a thicker consistency and contain real fruit pieces. Jelly tends to be thinner and can become quite runny when heated, which may cause the layers to separate or the bars to become soggy.
Q: Why did my jam leak out the sides?
A: This usually happens if the top layer of dough isn’t pressed firmly enough against the edges of the pan. Ensure you create a “seal” by pressing the top dough layer all the way to the corners.
Q: My bars are very soft in the middle, did I underbake them?
A: These bars are meant to be soft and chewy. However, they must be cooled completely before cutting. The residual heat continues to set the center as they cool on the rack.
Q: Can I skip the glaze?
A: Absolutely! The bars are sweet enough on their own. You could also replace the glaze with a simple dusting of powdered sugar for a less sweet finish.
Q: How do I get perfectly clean slices?
A: For the cleanest edges, chill the glazed bars in the fridge for 30 minutes before cutting. Use a sharp chef’s knife and wipe it clean with a damp cloth between every single cut.
Mastering the Strawberry Jam Sugar Cookie Bar is a rewarding experience that yields a sophisticated yet nostalgic dessert. By following the specific layering and chilling techniques outlined above, you’ll create a treat that boasts a professional appearance and a texture that is second to none. Don’t be afraid to experiment with different fruit fillings once you’ve mastered this base recipe. Happy baking, and enjoy every buttery, jam-filled bite!


