
There is something undeniably nostalgic about the aroma of a Sweet Potato Pie wafting through the house. For many of us, it’s the scent of the holidays—a blend of warm cinnamon, earthy nutmeg, and the caramelized sweetness of roasted yams. While some might reach for a can of pumpkin, those in the know understand that a truly great sweet potato pie is in a league of its own.
This isn’t just any pie. This recipe focuses on two critical elements that elevate it from “good” to “legendary”: a parbaked buttery crust and roasted (never boiled) sweet potatoes. The result is a filling so silky and a crust so crisp that your guests will be asking for the recipe before they’ve even finished their first slice.
Whether you’re prepping for Thanksgiving or just want a cozy Sunday dessert, this guide will walk you through every step to ensure your pie comes out perfectly every single time.
Why You’ll Love This Recipe
- Silky Texture: By pureeing the roasted sweet potatoes in a food processor, we eliminate any fibrous “strings,” resulting in a custard-like consistency.
- Deep Flavor Profile: Roasting the potatoes in their skins caramelizes the natural sugars, offering a depth that boiling simply can’t match.
- No Soggy Bottoms: We parbake the crust to ensure it stays crisp and flaky, even under the heavy custard filling.
- Perfectly Spiced: A blend of cinnamon, nutmeg, and a hint of ginger provides that classic warm holiday feel without overpowering the potato.
Ingredient Notes
The secret to a professional-grade pie lies in the quality and temperature of your ingredients. Here is what you need to know:
- Sweet Potatoes: Choose medium-sized potatoes that are firm and smooth. We roast them whole to concentrate the flavor.
- Cold Butter is Key: For the crust, your butter must be ice-cold. When those cold bits of butter hit the hot oven, they steam and create the air pockets that make the crust flaky.
- Heavy Whipping Cream: Using heavy cream instead of evaporated milk gives the filling a richer, more luxurious mouthfeel.
- Freshly Grated Nutmeg: If you can, grate your nutmeg fresh from the nut. The oils are much more potent and aromatic than the pre-ground variety.
- Ice Water: When making the dough, only add enough water to make it clump. If the dough is too wet, it will be tough; if it’s too dry, it will crumble.
Step-by-Step Instructions
1. Master the Flaky Crust
Start by pulsing your flour, sugar, and salt. When adding the cold butter, stop as soon as the pieces are the size of small peas. Drizzle in your ice water one tablespoon at a time. Pro Tip: The dough should look a bit shaggy and dry in the processor; it will hydrate as it chills in the fridge. Flatten it into a disk and let it rest for at least an hour to relax the gluten.
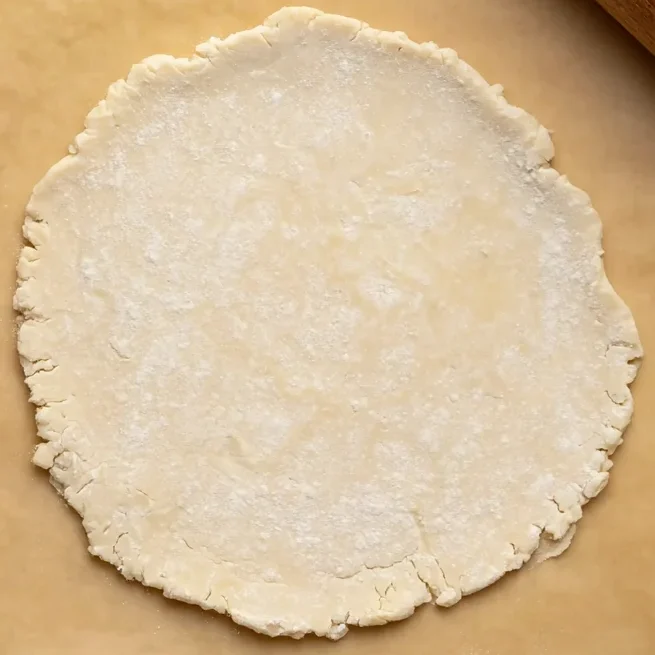
2. The Art of Parbaking
Once your dough is rolled out and fitted into the pie plate, don’t rush it into the oven. Chill the formed crust for 20 minutes to prevent shrinking. Use pie weights (or dried beans) to hold the shape during the initial 12-15 minute bake. This “sets” the crust so it doesn’t get soggy once the wet filling is added.
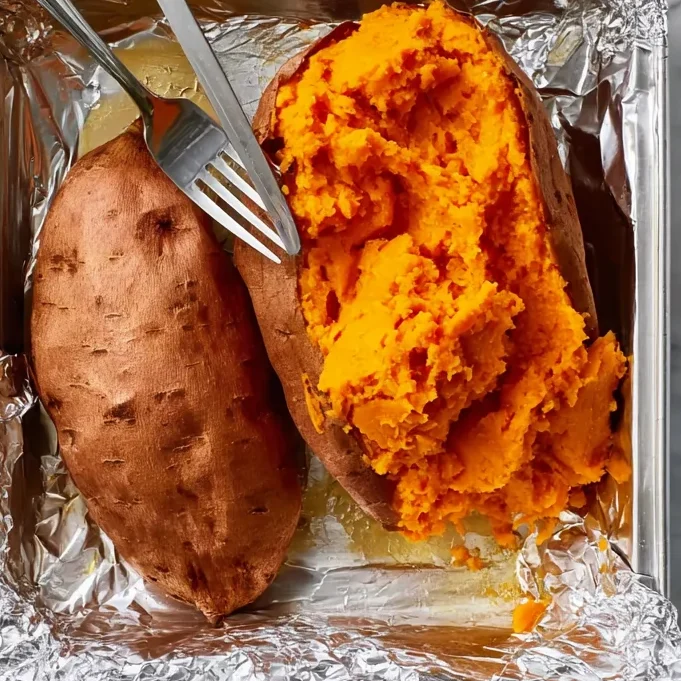
3. Roasting the Star Ingredient
While the crust is doing its thing, roast your sweet potatoes at 425°F. Prick them with a fork to let steam escape. You’ll know they are done when they feel completely soft when squeezed (use a mitt!). The skins should practically slip off once they’ve cooled for a few minutes.
4. Creating the Silky Filling
The food processor is your best friend here. Puree the potato chunks first until they are perfectly smooth. Then, add the butter and sugar, followed by the eggs, cream, and spices. Scrape down the sides to ensure no lumps remain.
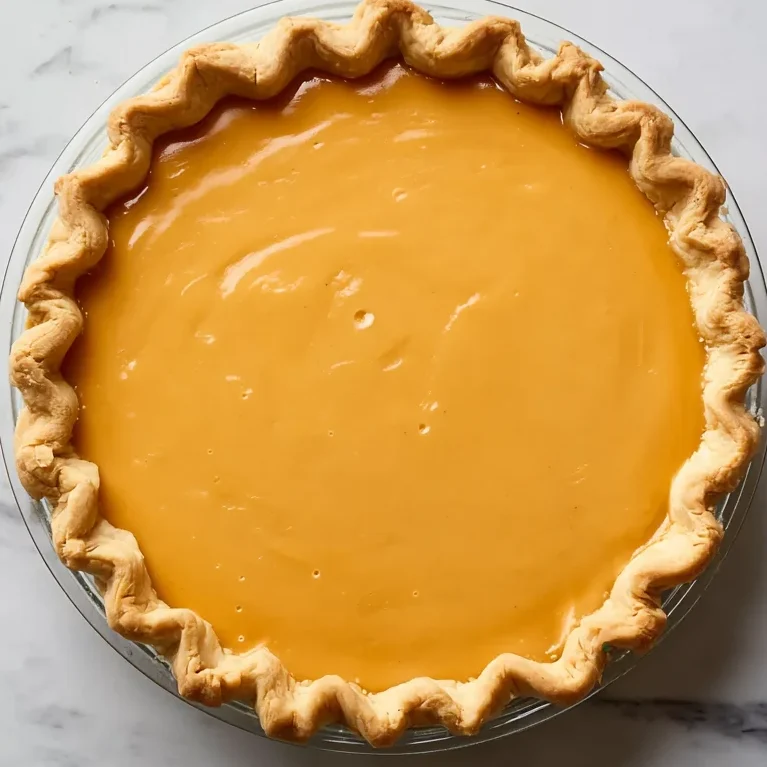
5. The Final Bake
Pour that golden mixture into your cooled crust. Bake at 350°F. The “sweet spot” for removal is when the edges are set but the very center still has a slight, Jell-O-like wobble. It will firm up perfectly as it cools.

Expert Tips for Best Results
- Don’t Overwork the Dough: Handle the crust as little as possible. The warmth from your hands can melt the butter, leading to a leaden crust.
- Sift Your Spices: Sometimes ground ginger can clump. Whisking it into the cream before adding it to the processor ensures even distribution.
- The Cooling Period: I know it’s tempting to dive in, but this pie needs at least 2 hours to set. For the cleanest slices, let it cool completely to room temperature, or even chill it overnight.
- Avoid Cracks: If your pie cracks on top, it usually means it was overbaked. Watch the oven closely during the last 10 minutes!
Variations and Substitutions
- Bourbon Infusion: Add 1 tablespoon of high-quality bourbon to the filling for a sophisticated, smoky depth.
- Maple Sweetener: Replace half of the brown sugar with pure maple syrup for a different type of earthy sweetness.
- Marshmallow Topping: If you love the classic casserole, top the baked (and cooled) pie with mini marshmallows and torch them until golden brown.
- Dairy-Free: You can substitute the heavy cream with full-fat coconut milk and use a vegan butter substitute in the crust, though the texture will be slightly less “custardy.”
Storage and Freezing
To Store: Keep your Sweet Potato Pie covered in the refrigerator for up to 4 days. It’s actually one of those rare desserts that tastes even better on day two!
To Freeze: This pie freezes beautifully. Once completely cooled, wrap the entire pie (or individual slices) tightly in plastic wrap, followed by a layer of aluminum foil. It will stay fresh for up to 3 months. Thaw in the refrigerator overnight before serving.
FAQ
Can I use canned sweet potato puree?
You can, but the flavor won’t be as rich. Canned purees often have a higher water content, which might affect the setting of the custard. If you use it, make sure it is 100% pure sweet potato and not “yams in syrup.”
What is the difference between Sweet Potato Pie and Pumpkin Pie?
Sweet potato pie tends to be lighter, airier, and sweeter. Pumpkin pie is usually denser and relies more heavily on a “spice” profile (clove, allspice, etc.), whereas sweet potato pie lets the flavor of the tuber shine through.
Why did my crust shrink?
Crust shrinkage usually happens if the gluten wasn’t rested enough or if the fat (butter) got too warm before the pie hit the oven. Always chill your dough!
Conclusion
Making a Sweet Potato Pie from scratch is a labor of love, but the results are infinitely better than anything you’ll find at a grocery store. Between the shattered-glass flakiness of the crust and the velvet-smooth filling, this recipe is destined to become a permanent fixture in your holiday rotation. Serve it with a generous dollop of whipped cream and a little extra nutmeg on top. Happy baking!
PrintSweet Potato Pie

This silky-smooth Sweet Potato Pie is the ultimate holiday showstopper. By roasting the sweet potatoes instead of boiling them, we lock in a deep, caramelized flavor that pairs perfectly with our signature buttery, flaky parbaked crust.
Ingredients
1 1/2 cups all-purpose flour
1 tsp granulated sugar
1/2 tsp kosher salt
10 Tbsp cold unsalted butter, cubed
3 to 4 Tbsp ice water
2 large sweet potatoes (14 oz each)
1/2 cup packed light brown sugar
6 Tbsp unsalted butter, softened
2 large eggs
3/4 cup heavy whipping cream
2 tsp vanilla extract
1 tsp ground cinnamon
1/2 tsp ground nutmeg
1/2 tsp kosher salt
1/4 tsp ground ginger
Sweetened whipped cream for serving
Instructions
1. Pulse flour, sugar, and salt in food processor. Pulse in cold butter until pea-sized.
2. Drizzle ice water until dough clumps. Wrap in plastic and chill 1 hour.
3. Roll dough to 12 inches, fit to pie plate, and parbake with weights at 425°F for 15 mins.
4. Roast pricked sweet potatoes at 425°F for 1 hour until soft. Peel and puree.
5. Combine puree with sugar, butter, eggs, cream, and spices. Process until smooth.
6. Pour filling into crust and bake at 350°F for 40-50 minutes until center is slightly wobbly.
7. Cool 2 hours before serving with whipped cream.
Notes
Ensure butter is ice cold for the crust.
Do not skip the parbaking step to avoid a soggy bottom.
Roasting the potatoes provides a better texture than boiling.


