
There is something truly magical about walking into an authentic Italian bakery. The smell of espresso, the sight of rainbow cookies, and—the star of the show the towering stacks of crisp, golden cannoli. For years, I thought making Easy Homemade Cannoli was a feat reserved for nonnas with decades of experience.

I was wrong.
The secret to a bakery-quality cannoli isn’t actually in the frying of the shell (thank goodness for high-quality pre-made shells!), but in the stability and flavor of the filling. By combining traditional ricotta with rich mascarpone, you get a filling that is thick, velvety, and won’t make your shells soggy in five minutes.
Whether you are hosting a Sunday dinner or just want a fancy treat for a weeknight, this recipe will become your new go-to. Let’s dive into why this specific method works every single time.
Why You’ll Love This Recipe
- No-Fail Texture: Using mascarpone adds a fat content that stabilizes the ricotta, preventing that “runny filling” disaster.
- Make-Ahead Friendly: You can prep the filling and the chocolate-dipped shells separately so assembly takes seconds.
- Perfectly Balanced: It’s sweet, but with a hint of cinnamon and vanilla that keeps it sophisticated.
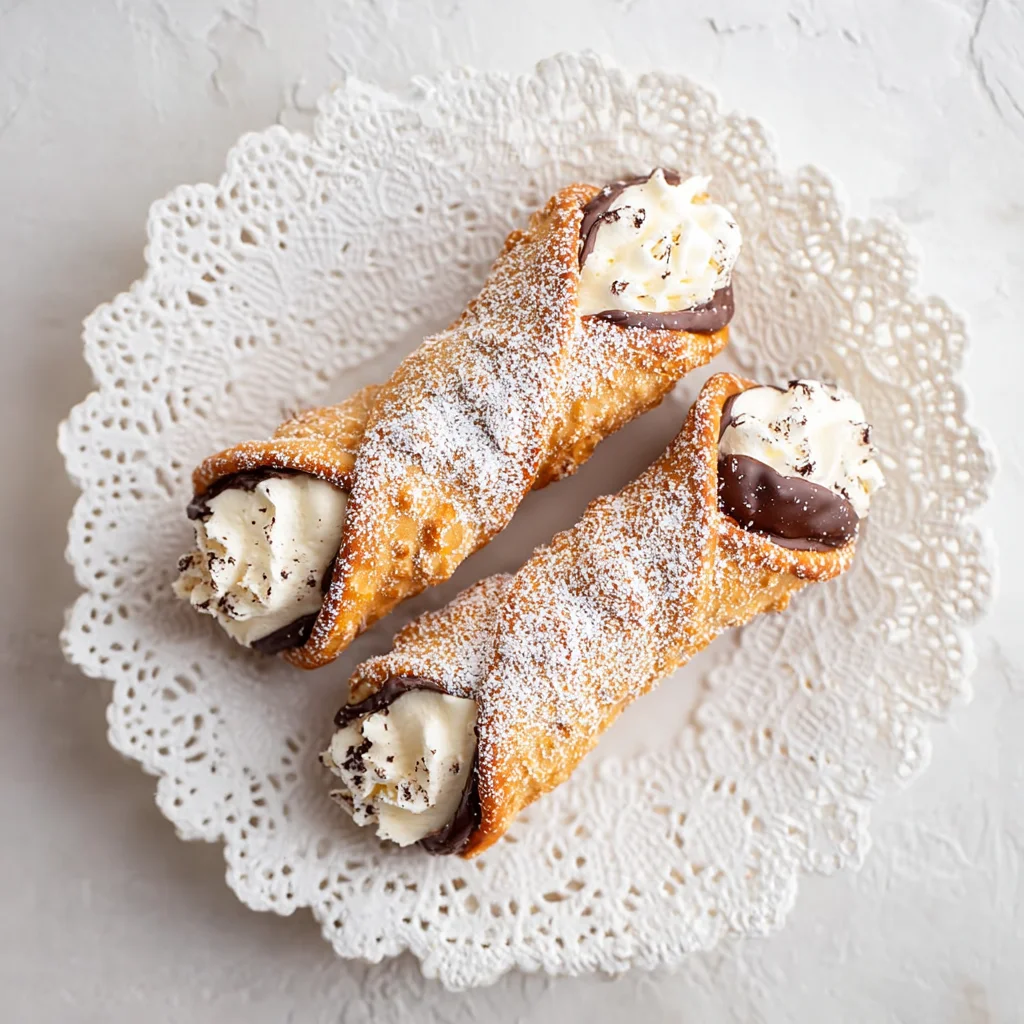
- Stunning Presentation: The chocolate-dipped ends give these a professional look that screams “high-end pastry shop.”
Ingredient Notes
To make the best homemade cannoli filling, quality matters. Here is what you need to know about the ingredients:
- Full-Fat Ricotta: This is non-negotiable. Low-fat ricotta contains too much water. Look for “basket ricotta” if available, but regardless of the brand, you must drain it.
- Mascarpone Cheese: I use BelGioioso because it is consistently thick and creamy. It acts as the “glue” that keeps the filling pipeable.
- Powdered Sugar: Also known as confectioners’ sugar. It dissolves instantly, ensuring your filling isn’t gritty.
- Ground Cinnamon: Just a quarter teaspoon is the “secret ingredient” that provides that authentic Sicilian flavor profile.
- Mini Chocolate Chips: Regular-sized chips can get stuck in your piping tip. Minis ensure every bite has chocolate without the frustration.
- Cannoli Shells: Look for shells that are dark golden brown. You can usually find these in the bakery section or the ethnic food aisle of your local grocery store.
- Shortening/Coconut Oil: Adding a tiny bit to your chocolate melts creates a smoother “dip” and a beautiful sheen once it sets.
Step-by-Step Instructions
1. The Critical Drain
The most important step happens the night before. Line a mesh strainer with cheesecloth and place it over a bowl. Dump your ricotta in, cover it, and let it sit in the fridge overnight. You will be shocked at how much liquid (whey) releases. This is the difference between a firm filling and a mess!
2. Whip the Filling
In a large mixing bowl, combine your drained ricotta and the mascarpone. I prefer using a sturdy spatula rather than an electric mixer. Over-mixing can actually cause mascarpone to “break” or become grainy. Stir until smooth and luscious.
3. Add the Aromatics
Stir in your vanilla extract, powdered sugar, and cinnamon. Once the base is creamy and uniform, gently fold in the mini chocolate chips.
4. Prepare the Shells
Melt your chocolate candy melts with the shortening in the microwave. Dip each end of your cannoli shells into the chocolate. If you want to go the extra mile, this is when you would dip them into crushed pistachios or sprinkles! Let them set on wax paper until the chocolate is firm.
5. Pipe and Serve
Transfer your filling into a piping bag. If you don’t have one, a Ziploc bag with the corner cut off works perfectly. Pipe the filling into one end of the shell until it reaches the middle, then flip and pipe into the other end. This ensures the shell is full all the way through!
Expert Tips for Best Results
- Don’t Over-Sweeten: It’s tempting to add more sugar, but the shells and chocolate ends add sweetness too. Stick to the 1/4 cup for a balanced flavor.
- The “Just-In-Time” Rule: To keep your cannoli shells maximum-crunchy, do not fill them more than an hour or two before serving. The moisture in the cheese will eventually soften the shell.
- Room Temp Mascarpone: Let your mascarpone sit out for about 10 minutes before mixing. It will incorporate much smoother into the ricotta if it isn’t ice-cold.
Variations and Substitutions
- Citrus Twist: Add 1 teaspoon of fresh orange zest to the filling for a bright, fruity note.
- Nutty Crunch: Replace the chocolate chips with finely chopped toasted pistachios.
- Dip-Free: If you’re in a rush, skip the chocolate dipping and simply dust the finished cannoli with extra powdered sugar.
Storage and Freezing
Can you freeze cannoli filling? Yes! You can freeze the filling in an airtight container for up to a month. Thaw it in the fridge overnight. You may need to give it a quick stir to regain its creamy texture.
Storing filled cannoli: Once filled, they are best eaten within 2-4 hours. If you have leftovers, store them in the fridge, but be aware the shell will lose its crunch.
FAQ
Why is my cannoli filling runny?
This usually happens if the ricotta wasn’t drained long enough or if you used a low-fat variety. To fix it, you can stir in an extra tablespoon of powdered sugar or a bit more mascarpone to thicken it back up.
Can I use a hand mixer?
You can, but use the lowest setting. Mascarpone is high in fat and can turn into “butter” if over-whipped, leading to a grainy texture.
What if I can’t find cannoli shells?
Many bakeries will sell you “empty shells” if you ask! Otherwise, look for them online or in the specialty Italian section of stores like Wegmans or Whole Foods.
Final Thoughts
Making Easy Homemade Cannoli is all about the preparation. Once you have that ricotta drained and that mascarpone ready, the process is incredibly fast and rewarding. There is nothing like the sound of that first “crunch” as you bite into a fresh, hand-piped cannoli.
If you make these for your family, be sure to tag me on Instagram or pin this recipe to your “Italian Desserts” board on Pinterest! Happy piping!
PrintEasy Homemade Cannoli

These Easy Homemade Cannoli feature a rich, velvety filling made with a secret weapon: mascarpone cheese. Combined with traditional drained ricotta and a hint of cinnamon, this filling is stable, creamy, and far better than anything from a grocery store bakery.
- Prep Time: 20
- Cook Time: 5
- Total Time: 25
- Yield: 8
- Category: Dessert
- Method: No-Bake
- Cuisine: Italian
Ingredients
3/4 cup full-fat ricotta cheese (drained overnight)
1 cup BelGioioso mascarpone cheese
1 teaspoon vanilla extract
1/4 cup powdered sugar
1/4 teaspoon ground cinnamon
1/2 cup mini chocolate chips
8 cannoli shells
1/4 cup chocolate candy melts
1 teaspoon shortening or refined coconut oil
Instructions
1. Drain the ricotta: Line a fine mesh strainer with cheesecloth, place over a bowl, add ricotta, and drain in the fridge overnight.
2. Combine cheeses: In a mixing bowl, stir the drained ricotta and mascarpone together with a spatula until smooth.
3. Season filling: Add vanilla, powdered sugar, and cinnamon. Stir until well combined.
4. Fold in chips: Gently fold in the mini chocolate chips.
5. Prepare piping bag: Place filling in a piping bag with a large round tip or a storage bag with a corner snipped off.
6. Melt chocolate: Combine chocolate melts and shortening. Microwave in 30-second intervals until smooth.
7. Decorate shells: Dip the ends of the cannoli shells into the chocolate. Let set on wax paper.
8. Fill: Once chocolate is set, pipe the filling into both ends of the shells.
9. Serve: Keep chilled until ready to enjoy.
Notes
Always drain your ricotta for at least 8 hours to avoid a runny filling.
Wait to fill the shells until right before serving to keep them crispy.
You can add crushed pistachios or orange zest for a gourmet twist.


