
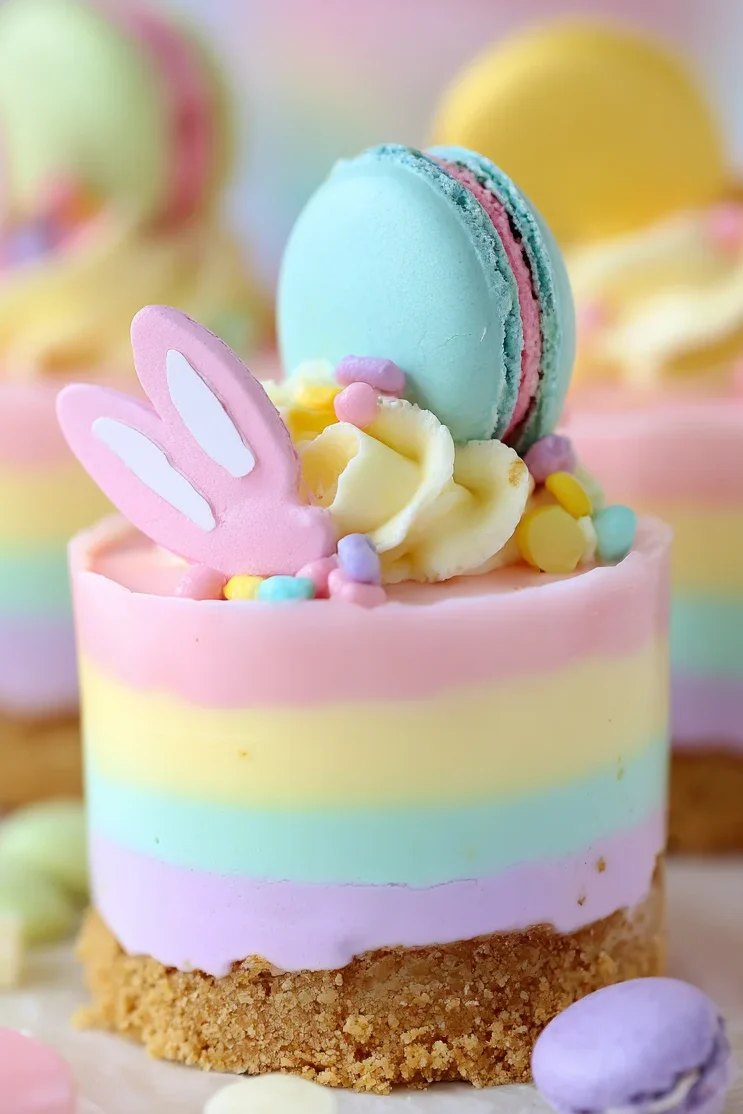
When the flowers start to bloom and the sun lingers a little longer in the evening, my kitchen naturally gravitates toward bright, cheerful desserts. These No-Bake Rainbow Mini Cheesecakes are the quintessential celebration of spring. Featuring a buttery shortbread crust and a silky, vanilla-flecked filling, they are as delicious as they are visually stunning. By using a clever layering technique and high-quality gel colors, you can create a professional-grade dessert that looks like it came from a high-end bakery. The best part? There is absolutely no oven required! Whether you are looking for a centerpiece for your Easter brunch or a whimsical treat for a birthday party, these mini cheesecakes deliver a “wow” factor that guests of all ages will adore.
Why You’ll Love This Recipe
You will fall in love with these rainbow treats because they perfectly balance simplicity with impressive results. Unlike traditional baked cheesecakes, there is no risk of cracks or water baths here. The use of unflavored gelatin provides a stable, mousse-like texture that holds its shape beautifully while remaining incredibly creamy on the tongue. This recipe is also highly customizable; you can swap the colors to match any holiday or theme. Plus, since they are made in jumbo muffin tins, they are perfectly portioned for individual servings. It is a kid-friendly project that allows for creativity with layering and decorating, making it a wonderful family activity during the holiday season.
What Is a No-Bake Rainbow Mini Cheesecake?
A no-bake cheesecake differs from its baked counterpart by omitting eggs and using refrigeration (and often a stabilizer like gelatin) to set the filling. These specific mini cheesecakes are built upon a shortbread cookie base, which offers a more delicate, buttery crunch than standard graham crackers. The “rainbow” aspect comes from dividing the vanilla-bean-infused cheesecake batter into multiple portions and tinting them with vibrant gel food coloring. When layered into silicone molds, these colors create a beautiful gradient effect. The result is a dense yet airy dessert that captures the tanginess of cream cheese and the sweetness of vanilla in every colorful bite.
Ingredients needed
To achieve the best results, quality is key. You will need 6 oz of shortbread cookies; I recommend high-quality brands like Walkers for that signature buttery snap. For the filling, use 1 lb of full-fat brick cream cheese. Low-fat or tub varieties will not set correctly and will lack the richness needed for a stable no-bake treat.
The stabilizer is one packet of unflavored powdered gelatin. This is the “glue” that allows the cheesecakes to be unmolded cleanly. For flavor, vanilla bean paste is superior to extract here, as the tiny black specks add a gourmet look and deep aromatic flavor. You will also need heavy cream and granulated sugar to provide fluffiness and sweetness. Finally, for the colors, I highly recommend Americolor gel food paste. Unlike liquid grocery store dyes, gel colors are highly concentrated, meaning you only need a drop to achieve vivid hues without thinning out your cheesecake batter.
Ingredient Substitutions & Tips
- The Crust: If you cannot find shortbread, graham crackers or even Golden Oreos make an excellent substitute. For a gluten-free version, simply use your favorite gluten-free shortbread brand.
- The Vanilla: If vanilla bean paste isn’t in your pantry, a high-quality Madagascar Bourbon vanilla extract works perfectly fine at a 1:1 ratio.
- The Colors: For a more natural approach, you can use fruit powders (like freeze-dried raspberry or blueberry powder) for coloring, though the shades will be more muted and slightly change the flavor profile.
- The Gelatin: For those avoiding beef or pork gelatin, agar-agar can be used, but note that the setting ratio and texture will differ significantly.
Step-by-Step Instructions
1. Prepare the Base
Start by pulsing your shortbread cookies in a food processor until they resemble fine sand. Mix in one tablespoon of melted unsalted butter. Place a jumbo silicone muffin pan on a flat baking sheet for stability. Divide the crumbs among the six cavities and press them down firmly using the bottom of a small glass to create an even, compact crust.
2. Bloom the Gelatin
In a small heat-proof bowl, combine 2 tablespoons of cold water and sprinkle the gelatin on top. Let it sit for 5 minutes. This “blooming” process ensures the gelatin hydrates properly so you don’t end up with gritty bits in your dessert.
3. Cream the Filling
In a stand mixer, beat the room temperature cream cheese until it is completely smooth and lump-free. This is the most important step for a silky texture! Once smooth, add the sugar, lemon juice, vanilla bean paste, and a pinch of salt. Mix well, then gradually pour in the room temperature heavy cream while the mixer is on low speed.
4. Incorporate the Stabilizer
Microwave your bloomed gelatin for 10-15 seconds until it is liquid. It should be warm to the touch but not boiling. Quickly whisk the liquid gelatin into your cheesecake mixture. Ensure your cream cheese was at room temperature; if it’s too cold, the gelatin will seize and create lumps immediately.
5. Layer and Freeze
Divide the batter into four small bowls. Add a drop of different gel coloring to each bowl and stir. Working quickly, scoop the first color into the muffin tins and smooth the top. Repeat with the remaining colors. Freeze for at least 2 hours. Once solid, peel back the silicone mold to reveal your perfectly layered mini cheesecakes.
Expert Baking/Cooking Tips
- Temperature Control: I cannot stress this enough—your cream cheese and heavy cream MUST be at room temperature. If they are cold, the warm gelatin will solidify the moment it hits the batter, resulting in “gelatin strings” rather than a smooth cream.
- Silicone is Superior: Use a silicone mold rather than a metal tin. Silicone is flexible, allowing you to “pop” the frozen cheesecakes out without ruining the smooth sides or the layered effect.
- Smooth Layers: If you want perfectly flat layers, use a small offset spatula or the back of a measuring spoon to level each color before adding the next. If the batter starts to thicken too much, a few seconds of vigorous stirring will usually loosen it back up.
Special Section: Easter Decorating Ideas
To turn these into the ultimate Easter treat, get creative with your toppings! I love creating a “nest” effect by piping a swirl of whipped cream on top and nesting three pastel-colored candy eggs (like Cadbury Mini Eggs) in the center. For an extra pop of texture, add some “grass” by tossing shredded coconut with a drop of green food coloring. Sprinkles in spring shapes—like bunnies or carrots—add a whimsical touch that children love. If you want a more elegant look, a single edible pansy or a sprig of fresh mint can elevate these for a sophisticated garden party or tea service.
Serving Suggestions
These cheesecakes are best served chilled. After unmolding them from the freezer, let them sit in the refrigerator for about 30 to 60 minutes to reach the perfect creamy consistency. Serve them on a white platter to make the rainbow colors truly pop. They pair beautifully with a crisp glass of Prosecco or a light Earl Grey tea. Because they are individual portions, they are perfect for buffet-style gatherings where guests can easily grab a treat without the mess of slicing a whole cake.
Storage & Make-Ahead Tips
These are the ultimate make-ahead dessert! You can keep them in the freezer (wrapped tightly in plastic wrap once solid) for up to two weeks. This makes party prep a breeze. Once unmolded, they can be stored in an airtight container in the refrigerator for 4 to 5 days. I recommend waiting to add the whipped cream and candy decorations until just before serving, as the moisture from the cheesecake can eventually cause the candy coating on the eggs to bleed or the whipped cream to deflate.
FAQs
Can I make this without gelatin?
Without gelatin, the filling will be more like a soft mousse. It will not be stable enough to unmold from a muffin tin and hold those crisp layers. If you want to skip gelatin, I recommend serving the cheesecake in clear glass jars instead.
Why did my gelatin turn into lumps?
This usually happens if the cheesecake mixture is too cold. When the warm liquid gelatin hits the cold cream cheese, it shocks and solidifies instantly. Always ensure your dairy is at room temperature.
Can I use a regular metal muffin tin?
Yes, but you must line the cavities with plastic wrap or paper liners. You won’t be able to “pop” them out like you can with silicone, so the sides may not be as smooth.
How do I get the colors so bright?
Use gel food coloring (like Americolor or Wilton). Liquid colors from the baking aisle are water-based and can thin out the batter before you reach the desired vibrance.
Is it okay to freeze them overnight?
Absolutely! Freezing them overnight is actually preferred to ensure they are completely solid before you try to remove them from the molds.
These No-Bake Rainbow Mini Cheesecakes are a true celebration of color and flavor. By following the temperature tips and using the right tools, you’ll create a dessert that is as stable as it is delicious. They bring a sense of joy to any table and prove that you don’t need an oven to create a masterpiece. Give this recipe a try this spring—your friends and family will be talking about these vibrant layers long after the last bite is gone!
PrintVibrant No-Bake Rainbow Mini Cheesecakes
These No-Bake Rainbow Mini Cheesecakes are a show-stopping dessert featuring vibrant layers of creamy vanilla bean filling atop a buttery shortbread crust. Using gelatin ensures a stable, silky texture that’s easy to unmold and serve.
Ingredients
6 oz shortbread cookies (approx. 12 cookies)
1 tbsp unsalted butter, melted
2 tbsp cold water
1 packet (0.25 oz) unflavored powdered gelatin
1 lb full-fat cream cheese, room temperature
1/2 cup granulated sugar
1/2 tsp lemon juice
1 tsp vanilla bean paste (or extract)
Pinch of salt
1 cup heavy cream, room temperature
Assorted gel food coloring
Whipped cream, candy eggs, and sprinkles for topping
Instructions
1. Blitz cookies into fine crumbs and mix with melted butter. Press firmly into a 6-cavity jumbo silicone muffin pan.
2. Whisk gelatin into cold water; let sit for 5 minutes to bloom.
3. Beat room temperature cream cheese until perfectly smooth. Mix in sugar, lemon, vanilla, and salt.
4. Gradually pour in heavy cream while mixing on low until smooth.
5. Microwave bloomed gelatin for 10-15 seconds until liquid and warm. Whisk into the cheesecake filling immediately.
6. Divide filling into 4 bowls and tint with food coloring.
7. Layer colors into the muffin cavities, smoothing each layer with a spoon.
8. Freeze for at least 2 hours until solid. Unmold by pressing from the bottom of the silicone mold.
9. Defrost in the fridge, then top with whipped cream and candy eggs before serving.
Notes
Ensure all dairy ingredients are at room temperature to prevent the gelatin from clumping.
Do not use flavored gelatin (Jell-O) as it contains sugar and less structural gelatin.
Silicone molds are essential for easy removal without damaging the layers.


