Last winter, I found myself craving something that combined the cozy warmth of cinnamon oatmeal with the nostalgic sweetness of iced cookies from my childhood. After nine rounds of testing (yes, my family was very happy to be my taste-testers), I finally perfected these iced cinnamon brown sugar oatmeal cookies that strike the perfect balance between wholesome and indulgent. The secret? Using melted butter for ultra-chewy centers, an extra egg yolk for richness, and a vanilla-cinnamon glaze that sets beautifully without being too sweet. These cookies have become my go-to for everything from holiday cookie swaps to simple weeknight treats when comfort food calls.
Why These Are the Best Cinnamon Oatmeal Cookies
What makes these cookies stand out in a sea of oatmeal cookie recipes? It’s all about texture and flavor layering. Traditional oatmeal cookies can be dense and overly chewy, but my version uses melted butter instead of softened butter, which creates pockets of chewiness while keeping the edges crispy.
The brown sugar and cinnamon combination gives these cookies that warm, bakery-style flavor that reminds me of cinnamon rolls meets oatmeal. And here’s what I learned after multiple test batches: the ratio of light brown sugar to granulated sugar matters tremendously. Too much granulated sugar makes them crispy; too much brown sugar makes them cake-like. The 3:1 ratio I’ve settled on creates the perfect soft-chewy texture.
The vanilla brown sugar cinnamon glaze isn’t just decoration—it adds a sweet finish that balances the wholesome oat flavor without overwhelming it. Think of it as the grown-up version of those iced oatmeal cookies from the grocery store, but infinitely better.
Essential Ingredients for Perfect Oatmeal Cookies
The Cookie Base
Unsalted Butter (9 tablespoons): I always use unsalted butter so I can control the salt level. Melting the butter is crucial—it creates a denser, chewier texture compared to creamed butter. Let it cool slightly before mixing to avoid cooking the eggs.
Brown Sugar & Granulated Sugar: The combination of 3/4 cup light brown sugar and 1/4 cup granulated sugar provides moisture, chewiness, and that signature caramel-like flavor. Brown sugar contains molasses, which keeps cookies soft for days.
Eggs (1 whole + 1 yolk): This was my game-changer discovery. The extra egg yolk adds richness and creates that bakery-style tender center. Always bring eggs to room temperature—I take mine out 30 minutes before baking. Cold eggs can cause the melted butter to solidify into lumps.
Old Fashioned Rolled Oats (1 1/2 cups): Don’t substitute quick oats or instant oats here. Old-fashioned rolled oats provide the perfect texture and hold their shape during baking. They’re also nutritionally superior, offering more fiber and keeping you fuller longer.
Cinnamon (1 1/4 teaspoon): This is more cinnamon than most oatmeal cookie recipes call for, and it’s intentional. The warm spice needs to stand up to the sweetness and complement the brown sugar. I prefer Ceylon cinnamon for its delicate, sweet flavor, but any quality ground cinnamon works beautifully.
The Glaze Components
The vanilla brown sugar cinnamon glaze transforms these from simple oatmeal cookies into something special. Sifting the powdered sugar eliminates lumps, and the pinch of salt balances the sweetness. The consistency should be thick but pourable—similar to honey. If you’re looking for more creative cookie glazing techniques, my stuffed red velvet cookies use a similar method.
Step-by-Step Instructions for Bakery-Quality Cookies
Preparing the Cookie Dough
Start by melting your butter in a microwave-safe bowl—about 30-45 seconds should do it. While it cools slightly, grab your large mixing bowl and prepare your workspace. One mistake I made early on was trying to rush this process. Taking your time with each step ensures even mixing and better texture.
Combine the melted butter, light brown sugar, and granulated sugar in your large bowl. Here’s where your arm workout begins—mix vigorously with a spatula or large spoon for at least 1-2 minutes. You’ll notice the mixture becomes glossy and the sugar begins to dissolve. This creaming process, even with melted butter, helps create air pockets for a lighter texture.
Add your room temperature egg, egg yolk, and vanilla extract. Mix with speed and purpose until the mixture thickens slightly and there are absolutely no streaks of egg visible. This usually takes another minute or two of consistent mixing. The mixture should look smooth, glossy, and slightly paler than before.
Incorporating Dry Ingredients
In a separate bowl, whisk together your flour, old-fashioned rolled oats, cinnamon, baking soda, baking powder, and salt. This pre-mixing ensures even distribution of leavening agents and prevents pockets of baking soda that can create bitter spots in your cookies.
Add the dry mixture to your wet ingredients and fold gently with your spatula. Don’t overmix—you want to stop as soon as no dry flour is visible. Overmixing develops gluten, which creates tough, dense cookies instead of tender ones. The dough will be thick and slightly sticky.
The Critical Chilling Step
This is the step many home bakers skip, and it’s where most oatmeal cookies go wrong. Using a 3-tablespoon cookie scoop (about 57g each), portion out 13 cookies onto a parchment-lined baking sheet. Place the entire sheet uncovered in the refrigerator for 2-3 hours.
Why is chilling so important? During my testing, I baked one batch immediately and one after chilling. The difference was dramatic. Chilled cookie dough spreads less, creating thicker cookies with chewier centers. The cold butter takes longer to melt in the oven, giving the cookies time to set before spreading too thin. Plus, the resting time allows the flour to fully hydrate, creating more complex flavors.
If you need to chill longer (overnight, for example), I recommend leaving the dough in one mass, covering it tightly with plastic wrap, and scooping just before baking.
Baking to Perfection
Preheat your oven to 350°F (175°C). Space your chilled cookie dough portions onto larger parchment-lined cookie sheets, leaving at least 3 inches between each cookie. They will spread slightly during baking.
Bake for 11-13 minutes. The exact timing depends on your oven and desired texture. At 11 minutes, you’ll get ultra-soft, barely-set centers. At 13 minutes, you’ll have more structure with still-chewy centers. I prefer 12 minutes for the perfect balance.
The cookies are done when the edges are set and lightly golden, but the centers still look slightly underbaked. They’ll continue cooking on the hot pan after you remove them from the oven. Let them cool on the baking sheet for 5 minutes before transferring to a wire rack. If you’re interested in exploring other chewy cookie techniques, check out my white chocolate stuffed cookies that use a similar baking method.
Creating the Perfect Vanilla Brown Sugar Glaze
While your cookies cool completely (this takes at least 30 minutes—resist the urge to rush!), prepare your glaze. Sift your powdered sugar if you notice clumps. In a medium bowl, whisk together the powdered sugar, light brown sugar, cinnamon, milk, vanilla extract, and a pinch of salt.
The consistency is crucial. Your glaze should be thick enough to coat the back of a spoon but thin enough to pour. If it’s too thick, add milk by the half teaspoon until you reach the right consistency. If it’s too thin, add more sifted powdered sugar a tablespoon at a time.
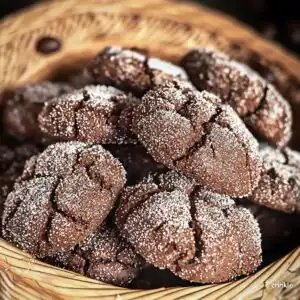
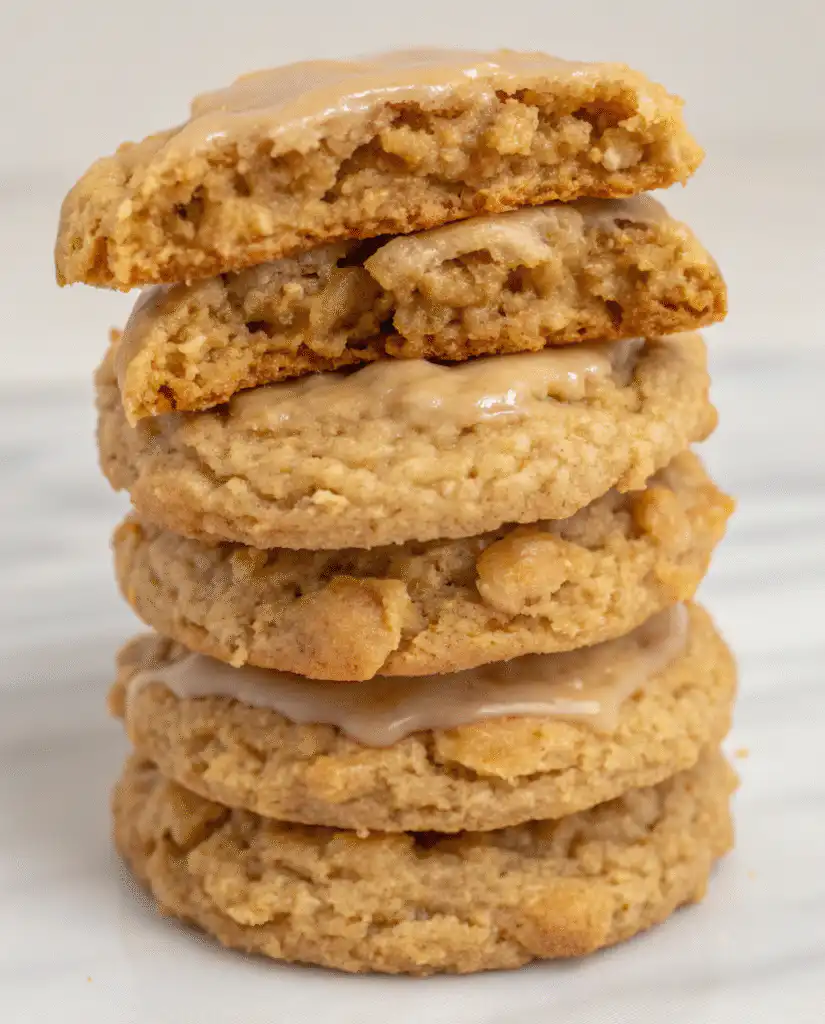
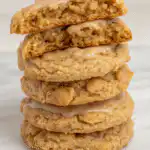
Once cookies are completely cool, carefully dip the top of each cookie into the glaze, allowing excess to drip off. Place on a wire rack or parchment paper and let the glaze set for 15-20 minutes. The glaze will form a beautiful, slightly crackled surface that stays soft enough to bite through without shattering.
Expert Tips for Oatmeal Cookie Success
After baking these cookies more than nine times, I’ve learned some valuable lessons:
Temperature Matters: Room temperature eggs incorporate smoothly into melted butter. Cold eggs can cause the butter to seize up into lumps, creating an uneven texture.
Don’t Skip the Chill: I know 2-3 hours seems long, but this step is non-negotiable for thick, chewy cookies. If you’re in a rush, freeze the scooped dough for 30 minutes instead of refrigerating for 2 hours.
Oven Variations: Every oven is different. If your cookies are spreading too much, try chilling them longer or reducing your oven temperature to 340°F. If they’re too thick and cakey, increase to 360°F.
Brown Sugar Measurement: Pack your brown sugar firmly into the measuring cup. Loose brown sugar measurements can throw off the texture significantly.
Oat Selection: Only use old-fashioned rolled oats. Quick oats create a mushy texture, and steel-cut oats don’t soften enough during baking.
For more tips on perfecting chewy cookie textures, my peanut butter Nutella cookies share similar techniques.
Storage, Freezing, and Make-Ahead Tips
These cookies stay remarkably fresh thanks to the moisture from brown sugar and the extra egg yolk. Store baked and iced cookies in an airtight container for 3-5 days. I actually prefer storing them in the refrigerator—it maintains their chewy texture even better than room temperature storage. They’ll be at their absolute best within the first day or two, but unlike crunchier cookies, these maintain their soft texture for nearly a week.
Freezing Cookie Dough
This is where meal prep magic happens. After scooping your cookie dough onto the baking sheet, instead of refrigerating, place the sheet in the freezer for 12-24 hours. Once completely frozen, transfer the dough balls into a freezer-safe plastic bag or airtight container. They’ll keep for up to 3 months.
To bake from frozen, preheat your oven to 325°F (reduced temperature) and bake for 13-14 minutes. No thawing required! This makes these cookies perfect for unexpected guests or when you need a quick homemade treat.
Make-Ahead Strategy
You can prepare the cookie dough up to 3 days in advance. Store it covered in the refrigerator and scoop just before baking. The extended chill time actually enhances the flavor as the ingredients have more time to meld together.
Variations and Customization Ideas
While I love this recipe exactly as written, here are modifications I’ve successfully tested:
Add-Ins: Fold in 1/2 cup chocolate chips, dried cranberries, or chopped walnuts for extra texture. Add these after incorporating the dry ingredients.
Spice Variations: Add 1/4 teaspoon nutmeg or 1/2 teaspoon cardamom alongside the cinnamon for a chai-spiced version.
Glaze Flavors: Replace the cinnamon in the glaze with maple extract for a maple-glazed oatmeal cookie, or add a tablespoon of smooth peanut butter for a peanut butter glaze. Speaking of peanut butter, my pistachio NYC cookies offer another fun flavor combination.
Healthier Swaps: Replace half the all-purpose flour with whole wheat flour for added fiber. The texture will be slightly denser but still delicious.
Nutritional Information and Dietary Considerations
Each cookie contains approximately 38g of carbohydrates (based on the specific ingredients I use for managing my own dietary needs). The total recipe yields 500g of carbohydrates across 13 cookies.
These cookies contain gluten (flour), dairy (butter, milk), and eggs. They are not suitable for vegan or gluten-free diets without modifications, though gluten-free all-purpose flour blends can be substituted 1:1 with good results.
The oats provide about 2g of fiber per cookie, and using old-fashioned rolled oats rather than processed instant oats keeps the glycemic index slightly lower. The cinnamon also has the added benefit of helping to regulate blood sugar levels—a bonus for anyone watching their glucose response.
Frequently Asked Questions
Can I use quick oats instead of old-fashioned rolled oats? I strongly recommend sticking with old-fashioned rolled oats. Quick oats are cut smaller and more processed, which creates a mushy texture in cookies rather than the hearty, chewy texture you want. Old-fashioned oats hold their shape and provide better texture contrast. If you absolutely must substitute, the cookies will still taste good but won’t have that signature chewy oat texture.
Why do my cookies spread too much? Excessive spreading usually comes from one of three issues: the dough wasn’t chilled long enough, your butter was too warm when mixing, or your oven temperature is too low. Always chill the scooped dough for at least 2 hours, ensure your melted butter has cooled to lukewarm, and verify your oven temperature with an oven thermometer. Also check that you’re using the correct amount of flour—measuring by weight (200g) is more accurate than cups.
Can I make these cookies without the glaze? Absolutely! The cookies are delicious on their own. The glaze adds sweetness and visual appeal, but if you prefer a less sweet cookie or want to save time, skip it entirely. You could also try a simple cinnamon-sugar topping before baking instead—press the scooped dough lightly into a cinnamon-sugar mixture before chilling.
How do I prevent my glaze from being too runny? The key is the powdered sugar-to-liquid ratio. Start with the recipe measurements, then adjust gradually. If your glaze is too thin, add more sifted powdered sugar one tablespoon at a time. If it’s too thick, add milk by the half teaspoon. The glaze should be thick enough to coat the back of a spoon without immediately running off, but thin enough to self-level after dipping.
Can I substitute the brown sugar? Brown sugar is crucial for the chewy texture and caramel-like flavor in these cookies. If you absolutely must substitute, you can use coconut sugar or even add a tablespoon of molasses to regular white sugar, but the texture and flavor will change slightly. Dark brown sugar will give a stronger molasses flavor, which some people prefer. Don’t use artificial sweeteners—they won’t provide the same moisture and structure.
Why add an extra egg yolk? The extra egg yolk is my secret weapon for ultra-rich, tender cookies. Egg yolks contain fat and emulsifiers that create a softer, more tender crumb. The egg whites contain mostly water and protein, which can make cookies cakey or dry. By using one whole egg plus an extra yolk, you get the binding power of the whole egg plus extra richness from the yolk. This is a professional baker’s trick that makes a noticeable difference.
How long should I really wait before glazing? At least 30 minutes, and I mean it. I tried glazing warm cookies once (impatience got the better of me), and the glaze melted and soaked into the cookie instead of setting on top. Completely cooled cookies allow the glaze to set properly with that beautiful, slightly crackled finish. If you’re in a rush, you can speed cooling by transferring cookies to a wire rack in a cool room or even briefly in the refrigerator.
Why These Cookies Are Perfect for Any Occasion
These iced cinnamon brown sugar oatmeal cookies have become my signature recipe for a reason. They’re impressive enough for holiday cookie exchanges yet simple enough for a Tuesday afternoon baking session with kids. The combination of wholesome oats with indulgent glaze makes them feel both comforting and special.
For family gatherings, I often double the batch—they disappear fast. The fact that they store well and can be frozen means you can always have homemade cookies ready to serve. Whether you’re bringing them to a potluck, packaging them as gifts, or simply enjoying them with afternoon coffee, they never disappoint.
The cinnamon and brown sugar combination evokes that cozy, comforting feeling we all crave, especially during cooler months. But honestly, I’ve made these year-round and they’re always a hit. There’s something universally appealing about a soft, chewy cookie with just the right amount of sweetness.
If you’re looking for more show-stopping cookie recipes, my Creme Egg stuffed cookies are another family favorite that combines nostalgic flavors with elevated technique.
Final Thoughts
After nine rounds of testing and countless hours in my kitchen, I can confidently say these are the best iced cinnamon brown sugar oatmeal cookies you’ll ever make. The melted butter method creates that perfect chewy texture, the extra egg yolk adds richness, and the vanilla-cinnamon glaze provides just the right finishing touch.
The beauty of this recipe is that it’s both forgiving and reliable. Follow the steps, don’t skip the chilling time, and you’ll have bakery-quality cookies every single time. Whether you’re an experienced baker or just starting out, this recipe will become a staple in your collection.
I hope these cookies bring as much joy to your kitchen as they have to mine. There’s something magical about the smell of cinnamon and brown sugar filling your home, and the satisfaction of pulling a perfect batch from the oven never gets old.
Ready to bake? Gather your ingredients, set aside time for that crucial chilling step, and prepare for the most comforting, delicious oatmeal cookies of your life. Don’t forget to share photos of your finished cookies—I love seeing how they turn out in your kitchen!
Happy baking!
— Sofie
ICED CINNAMON BROWN SUGAR OATMEAL COOKIES
Soft and chewy brown sugar oatmeal cookies with warm cinnamon spice, topped with a sweet vanilla-cinnamon glaze. These bakery-style cookies stay fresh for days and are the ultimate cozy dessert for fall or winter.
- Prep Time: 30 minutes
- Cook Time: 11-13 minutes
- Total Time: 3 hours 45 minutes
- Yield: 13 cookies
- Category: Dessert, Cookies
- Cuisine: American
Ingredients
For the Cookies:
– 9 tablespoons (127g) unsalted butter, melted
– 3/4 cup (144g) light brown sugar, packed
– 1/4 cup (48g) granulated sugar
– 1 large egg, room temperature
– 1 large egg yolk, room temperature
– 1 teaspoon vanilla extract
– 1 2/3 cups (200g) all-purpose flour
– 1 1/2 cups (120g) old-fashioned rolled oats
– 1 1/4 teaspoons ground cinnamon
– 1/2 teaspoon baking soda
– 1/4 teaspoon baking powder
– 1/4 teaspoon salt
For the Vanilla Brown Sugar Cinnamon Glaze:
– 1/2 cup (60g) powdered sugar, sifted
– 1 teaspoon light brown sugar
– 1/4 teaspoon ground cinnamon
– 1 tablespoon whole milk
– 1/4 teaspoon vanilla extract
– Pinch of salt
Equipment:
– Large mixing bowl
– Medium mixing bowl
– Spatula or large spoon
– 3-tablespoon cookie scoop
– Parchment paper
– 2-3 cookie sheets
– Wire cooling rack
Instructions
1. Melt butter in a microwave-safe bowl (30–45 seconds). Let cool slightly while preparing other ingredients.
2. In a large bowl, combine melted butter, brown sugar, and granulated sugar. Mix vigorously for 1–2 minutes until glossy.
3. Add egg, egg yolk, and vanilla. Mix for 1–2 minutes until thickened and smooth.
4. In a medium bowl, whisk together flour, oats, cinnamon, baking soda, baking powder, and salt.
5. Fold dry ingredients into wet mixture with a spatula until no dry flour remains. Do not overmix.
6. Using a 3-tablespoon scoop, portion dough into 13 equal portions (~57g each) on parchment-lined baking sheet.
7. Refrigerate uncovered for 2–3 hours.
8. Preheat oven to 350°F (175°C). Place chilled dough 3 inches apart on baking sheets.
9. Bake 11–13 minutes, until edges are set and centers appear slightly underbaked.
10. Cool cookies on the sheet for 5 minutes, then transfer to wire rack and cool fully.
11. While cooling, whisk together powdered sugar, brown sugar, cinnamon, milk, vanilla, and salt for glaze.
12. Dip tops of cookies into glaze, shake off excess, and place on rack to set 15–20 minutes before serving.
Notes
Storage: Store cookies in an airtight container for 3–5 days or refrigerate for best texture retention.
Freezing Dough: Scoop dough, freeze 12–24 hours, then bake from frozen at 325°F for 13–14 minutes.
Room Temperature Eggs: Remove eggs from fridge 30 minutes before baking for best consistency.
Measuring Flour: Weigh flour (200g) or spoon and level for accuracy.