I’ll never forget the first time I attempted turtle brownies. The caramel seized, the chocolate refused to drizzle properly, and I ended up with what looked like a chocolate crime scene. But after nine attempts—yes, nine—I finally cracked the code to creating the most luxurious, foolproof chocolate turtle brownies that have become my signature dessert at every family gathering.
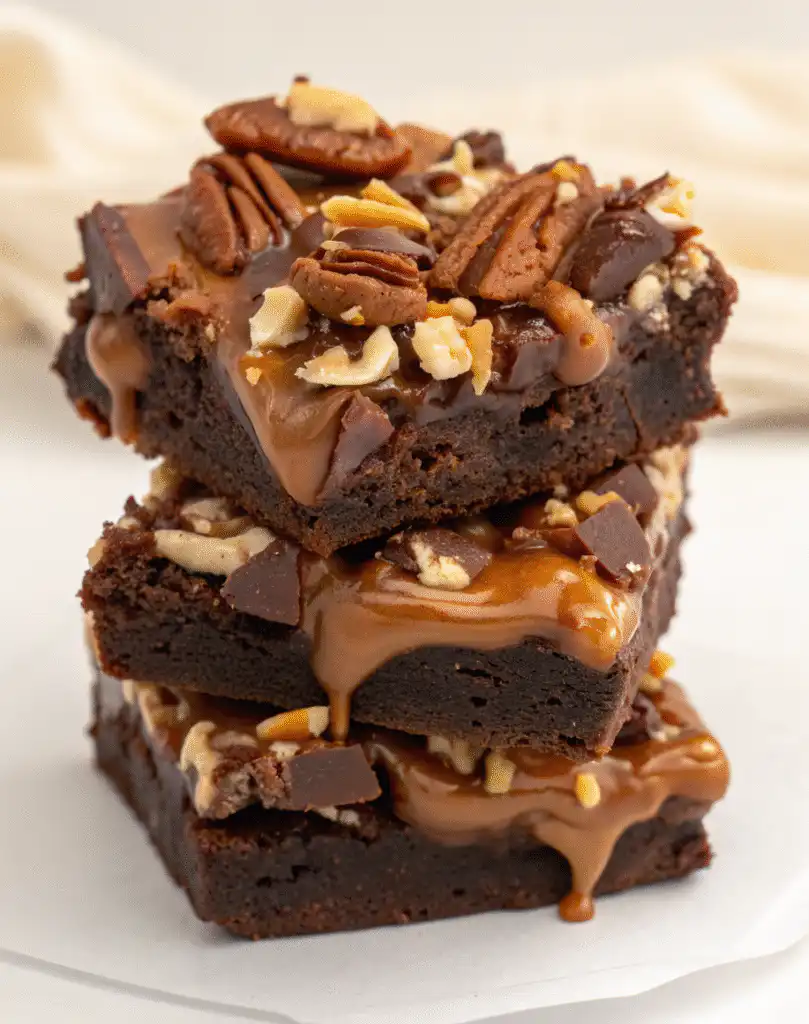
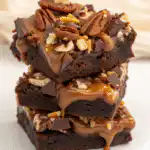
As someone who’s spent countless hours perfecting brownie recipes, I can tell you that chocolate turtle brownies represent the holy trinity of dessert perfection: fudgy brownies, silky homemade caramel, and crunchy pecans all crowned with a glossy chocolate drizzle. This isn’t just another brownie recipe—it’s a showstopper that looks bakery-quality but is surprisingly achievable at home.
What Makes Chocolate Turtle Brownies So Special?
Chocolate turtle brownies combine three beloved elements into one irresistible treat. The name “turtle” comes from the classic turtle candy—those delightful clusters of pecans and caramel coated in chocolate that have been an American favorite since the early 1900s.
What sets this recipe apart is the layered approach. Instead of mixing everything together, we build flavors and textures: ultra-fudgy brownies on the bottom, a thick layer of homemade salted caramel in the middle, crunchy pecans for texture, and a final chocolate drizzle that makes each square look like it came from a fancy bakery.
The magic happens when you bite through all three layers at once. The rich, dense brownie provides the foundation, the salted caramel adds buttery sweetness with a hint of salt that cuts through the richness, and the pecans give you that satisfying crunch that makes every bite interesting.
The Science Behind Perfect Fudgy Brownies
After testing this recipe nine times, I learned that the secret to ultra-fudgy brownies lies in three key factors: fat ratio, sugar balance, and mixing technique.
First, we’re using both butter and oil in the brownie base. The butter provides flavor and helps create that signature crackly top, while the oil keeps the brownies incredibly moist and fudgy even days later. This combination is what professional bakers use when they want guaranteed fudginess.
Second, we’re using a blend of powdered sugar and granulated sugar. The powdered sugar dissolves quickly and creates a denser texture, while the granulated sugar contributes to structure and that shiny crust on top. This isn’t a common technique in most brownie recipes, but it’s a game-changer I discovered through trial and error.
Third—and this is crucial—we’re not overmixing the flour. Once you add that flour and salt, fold gently just until no white streaks remain. Overmixing develops gluten, which turns fudgy brownies into cakey ones. Nobody wants cakey brownies when they’re craving that dense, truffle-like texture.
The melted chocolate method we’re using also contributes to fudginess. By melting chocolate with butter rather than using cocoa powder alone, we’re adding more fat and creating a richer chocolate flavor that tastes more sophisticated than standard brownies.
Why Homemade Caramel is Worth the Effort
I know what you’re thinking: “Can’t I just use store-bought caramel?” Technically yes, but here’s why you shouldn’t. Homemade caramel has a depth of flavor that jarred caramel simply cannot match. Plus, you control the salt level, which is crucial for balancing all that chocolate.
The caramel-making process intimidated me at first. I’d heard horror stories about burned sugar and crystallization. But here’s the truth: if you follow the temperature guidelines and stir consistently, making caramel is actually quite forgiving.
We’re using the dry method here, which means we’re melting sugar without any water. This creates a deeper caramel flavor with more complex notes. Yes, the sugar will clump as it melts—this is completely normal and not a sign you’ve done something wrong. Just keep the heat low and be patient. Those clumps will eventually melt into liquid gold.
The key moment is adding the butter. This is when your caramel transforms from plain melted sugar into something luxurious. Add it one tablespoon at a time, stirring constantly. The mixture will bubble and steam dramatically—this is normal chemistry, not a disaster. Just keep stirring and everything will come together beautifully.
Choosing Your Chocolate: A Guide for Best Results
The chocolate you choose dramatically impacts the final flavor. For the brownie layer, I recommend a quality semisweet chocolate with 60-70% cacao content. Brands like Ghirardelli, Guittard, or even Trader Joe’s Belgian chocolate work beautifully. Avoid using chocolate chips here—they contain stabilizers that prevent smooth melting.
For the topping drizzle, milk chocolate is traditional and provides a sweeter contrast to the dark brownie and slightly bitter caramel. However, if you prefer less sweetness, you can absolutely use semisweet or even dark chocolate for the drizzle. I’ve tried all three variations, and each has its merits.
The oil added to the melted chocolate topping serves a specific purpose: it thins the chocolate slightly, making it easier to drizzle and preventing it from becoming too hard when chilled. This creates that professional bakery look where the chocolate sets but remains slightly soft and glossy.
The Pecan Situation: Raw vs. Toasted
One question I get constantly is whether to toast the pecans first. After testing both ways multiple times, here’s my honest answer: it’s baker’s choice, but I prefer raw pecans in this recipe.
Toasted pecans have a deeper, nuttier flavor and extra crunch. However, the caramel layer already provides intense flavor, and the pecans spend time in the fridge where they’ll firm up naturally. Raw pecans offer a slightly softer texture that contrasts beautifully with the fudgy brownie and sets caramel.
That said, if you love that extra-toasted flavor, toast your pecans at 350°F for 5-7 minutes before chopping and adding them. Just watch them carefully—pecans can go from perfectly toasted to burned in under a minute.
Chopping size matters too. I recommend rough chopping them into halves or thirds. Pieces that are too small get lost in the caramel, while whole pecans can make cutting clean slices difficult. Those medium-sized pieces provide texture in every bite without overwhelming the chocolate and caramel.
Step-by-Step: Making the Perfect Brownie Base
Let’s walk through the brownie-making process with the insights I’ve gained from my nine testing rounds.
Temperature Control Matters Preheat your oven to exactly 350°F. Use an oven thermometer if possible—many home ovens run hot or cold, and temperature accuracy is crucial for achieving that fudgy texture with a shiny crust.
The Melting Process When melting your butter and chocolate together, low and slow is the mantra. If you’re using the stovetop method, keep the heat on low and stir constantly. The mixture should feel warm but not hot to the touch when you remove it from heat. If it’s too hot, it can scramble your eggs in the next step.
The microwave method works perfectly fine too. Use 30-second intervals, stirring between each one. This prevents hot spots that can burn the chocolate. Once melted, stir in your oil thoroughly—it should incorporate seamlessly into the chocolate-butter mixture.
Achieving That Foamy Egg Mixture This step separates okay brownies from exceptional ones. When you whisk the eggs with both sugars for 1-2 minutes, you’re incorporating air and partially dissolving the sugar. The mixture should become noticeably lighter in color and slightly thick—almost like a thin mousse. This creates that papery, crackly top that’s the hallmark of high-quality brownies.
Don’t skip the whisking time. Set a timer if you need to. Those two minutes of arm workout create structure and contribute to the fudgy texture we’re after.
The Folding Technique Once you add the cocoa powder and flour, switch from a whisk to a spatula immediately. Fold in a figure-eight motion, scraping the bottom and sides of the bowl. Stop the moment you see no more dry flour—even if the batter looks slightly streaky. It will come together as you transfer it to the pan.
Baking Signs to Watch For The brownies are done when the top looks shiny and slightly crackled, and the center barely jiggles when you gently shake the pan. They’ll continue cooking slightly from residual heat, so slightly underbaking is better than overbaking. We’re targeting that ultra-fudgy texture, not cake-like brownies.
Caramel Mastery: Lessons from My Failures
My first three attempts at the caramel layer were disasters. Batch one crystallized into gritty sugar rocks. Batch two burned before fully melting. Batch three seized when I added cold butter. Here’s what I learned so you don’t have to suffer through the same failures.
The Setup is Everything Have all your ingredients measured and ready before you start. Room temperature butter is non-negotiable—cold butter will cause the caramel to seize or form lumps that won’t dissolve. Your heavy cream should also be at room temperature for the same reason.
Sugar Melting Stages First, your white sugar will start to look wet around the edges. Then it clumps into chunks that look concerning—don’t panic! Keep stirring occasionally and those chunks will slowly melt. The color will start appearing gradually, first as pale tan, then golden, then amber.
Watch carefully during the final stages. Caramel can go from perfect to burned in less than 30 seconds. Remove it from heat when it’s a rich amber color, like an old penny. It will continue darkening slightly off the heat.
The Butter Addition This is where magic happens, but it’s also where things can go wrong. Add one tablespoon of room-temperature butter at a time, stirring vigorously. The mixture will bubble intensely and release steam. This is the sugar’s moisture evaporating—it’s supposed to happen.
If you add all the butter at once or use cold butter, you’ll get lumps that are difficult to incorporate. One tablespoon at a time ensures smooth integration.
The Cream Finale Pour the cream slowly while stirring constantly. It will bubble up dramatically, which is why we use a pot with high sides. Stir until completely smooth, making sure to scrape the corners where unmixed caramel likes to hide.
The salt goes in at the end. Start with 3/4 teaspoon for a subtle salted caramel, or add the full teaspoon for a more pronounced salted flavor that really cuts through the sweetness. I prefer the full teaspoon—it creates better balance with all that chocolate.
Assembly Tips for Bakery-Perfect Results
The assembly process is where your turtle brownies go from homemade to professional-looking. Here’s how to nail it every time.
Cooling is Critical Your brownies must be completely cool before adding the caramel—and I mean cool to the touch, not just no longer hot. If there’s any warmth remaining, the caramel will melt the brownie and you’ll get a muddy mess instead of distinct layers. I typically let my brownies cool for an hour at room temperature, then refrigerate them for 30 minutes before adding the caramel.
Spreading the Caramel The caramel should still be warm and pourable when you add it to the brownies. If it’s cooled too much and become thick, gently rewarm it in 10-second microwave bursts until it’s spreadable again. Pour it all at once in the center, then use an offset spatula to spread it evenly to the edges. Work quickly but carefully—warm caramel is forgiving and will level itself somewhat.
Pecan Distribution Don’t just dump the pecans on top. Sprinkle them evenly across the entire surface so every square gets some nutty crunch. Press them very gently into the caramel—just enough so they stick but not so hard that they sink completely. You want them sitting on top, visible and proud.
The Chocolate Drizzle Technique For that professional drizzle pattern, I use a piping bag with a small round tip, but a plastic zip-top bag with a tiny corner snipped off works perfectly. Hold the bag 6-8 inches above the brownies and move in quick back-and-forth motions. Don’t overthink it—random drizzles look more artisanal than perfect lines.
For a full chocolate layer instead of a drizzle, use 6 ounces of milk chocolate with one tablespoon of oil. Pour it on and spread gently with an offset spatula. This method is better if you’re transporting the brownies since the chocolate layer protects the caramel.
Setting Time Refrigerate for at least an hour, preferably two. This sets all the layers and makes cutting clean squares possible. Try to cut them cold using a sharp knife wiped clean between each cut. For the cleanest cuts, warm your knife under hot water, dry it completely, then cut. Repeat for each cut.
Storage Solutions and Make-Ahead Magic
One of the best things about these chocolate turtle brownies is how well they keep, which makes them perfect for meal prep or making ahead for gatherings.
Short-Term Storage These brownies stay freshest in the refrigerator, stored in an airtight container with parchment paper between layers if you’re stacking them. The caramel will soften at room temperature, especially in warm weather, so refrigeration is essential. They’ll keep in the fridge for up to 5 days, though in my experience, they never last that long.
Freezing for Later You can absolutely freeze these brownies! Cut them into squares, wrap each individually in plastic wrap, then store in a freezer-safe container or bag. They’ll keep frozen for up to 3 months. Thaw overnight in the refrigerator or at room temperature for 2-3 hours before serving.
Pro tip: Freeze a batch and keep them on hand for emergency dessert situations. You’ll thank yourself when unexpected guests arrive or you need a last-minute contribution to a potluck.
Make-Ahead Strategy You can make these in stages to spread out the work. Bake the brownie layer up to two days ahead and store it covered in the refrigerator. Make the caramel topping the day you plan to serve, as fresh caramel has the best texture and flavor. Add the pecans and chocolate drizzle, then refrigerate for an hour before cutting.
Serving Suggestions and Pairing Ideas
While chocolate turtle brownies are spectacular on their own, here are some ways to elevate them even further for special occasions.
Temperature Matters I actually prefer eating these straight from the fridge. The cold temperature firms up the caramel to a chewy consistency and makes the brownie extra dense and fudgy. However, if you prefer softer textures, let them sit at room temperature for 15-20 minutes before serving.
Ice Cream Pairings These brownies are incredible with vanilla ice cream—the simple flavor lets the turtle elements shine. Coffee ice cream is another favorite that enhances the chocolate notes. For something adventurous, try butter pecan or salted caramel ice cream to double down on those flavors.
Beverage Pairings With coffee, these brownies find their soulmate. The bitterness of coffee cuts through the sweetness perfectly. For non-coffee drinkers, try cold milk (classic for a reason), hot cocoa, or even a robust black tea. For adults-only gatherings, a small pour of bourbon or Irish cream liqueur alongside these brownies is divine.
Presentation Ideas For serving at parties, cut them into smaller pieces—these are rich enough that 1-inch squares are plenty. Arrange them on a platter with the chocolate drizzle facing up, maybe dust with a tiny bit of flaky sea salt right before serving for extra visual appeal.
Troubleshooting Common Turtle Brownie Problems
After making these nine times plus countless questions from recipe testers, here are solutions to the most common issues.
Problem: Caramel Crystallized This happens when sugar crystals form on the side of the pot and fall back into the melting sugar. Prevention: Use a pastry brush dipped in water to wipe down the sides of your pot periodically while the sugar melts. If crystallization starts, you can sometimes save it by adding a tablespoon of water and stirring over low heat, but prevention is easier.
Problem: Brownies are Cakey, Not Fudgy You likely overmixed the flour or overbaked them. Remember, fold just until no white streaks remain, and pull them from the oven when the center barely jiggles. They’ll firm up as they cool.
Problem: Chocolate Drizzle Hardened Too Much Next time, add an extra 1/2 teaspoon of oil to your melted chocolate. If your chocolate is already too hard, gently warm the whole pan in a 200°F oven for 2-3 minutes to soften it slightly.
Problem: Caramel Layer is Too Thin Make sure you’re measuring your sugar correctly—it should be a full, level cup, not packed. Also, the caramel thickens significantly as it cools, so what seems thin when hot will be perfect when cold.
Problem: Can’t Cut Clean Squares Make sure your brownies are fully chilled. Use a large, sharp chef’s knife and wipe it clean between every single cut. Warming the knife under hot water and drying it completely before each cut also helps dramatically.
Variations to Try Once You’ve Mastered the Classic
Once you’re comfortable with the original recipe, here are some fun variations I’ve tested.
White Chocolate Turtle Brownies Use white chocolate for the drizzle instead of milk chocolate. The sweet, creamy flavor contrasts beautifully with the salty caramel. You could even try white chocolate stuffed cookies for a similar flavor profile in cookie form.
Nutella Swirl Before adding the caramel, warm 1/2 cup of Nutella until pourable and swirl it into the brownie batter before baking. This creates a turtle-meets-Nutella situation that’s incredibly indulgent. If you love Nutella in desserts, check out this peanut butter Nutella cookie recipe too.
Salted Pretzel Turtle Brownies Add 1/2 cup of crushed pretzels to the caramel layer along with the pecans. The salty crunch adds another dimension of flavor and texture. This sweet-salty combination is trending right now and always gets rave reviews.
Espresso Turtle Brownies Add 1 tablespoon of instant espresso powder to the brownie batter. This doesn’t make them taste like coffee—it amplifies the chocolate flavor significantly. The depth it adds is remarkable.
Mixed Nut Version Can’t find pecans or prefer other nuts? Try walnuts, almonds, or even hazelnuts. Each brings its own flavor profile. Hazelnuts with milk chocolate create a flavor reminiscent of Nutella and are absolutely worth trying.
Why This Recipe Works for Beginners and Experts Alike
What I love about this chocolate turtle brownie recipe is its flexibility for different skill levels. If you’re a beginner, follow the recipe exactly as written—it’s forgiving and produces consistent results. The steps are straightforward, and even if your caramel or chocolate drizzle isn’t picture-perfect, the taste will still be incredible.
For experienced bakers, there’s room to play. Adjust the salt level in the caramel. Experiment with different chocolates. Try the variations above. The foundation is solid enough that you can make it your own.
The recipe also scales beautifully. Double it for a 9×13 inch pan if you’re feeding a crowd. The baking time will increase by about 5-8 minutes—watch for that shiny, barely jiggly center as your guide.
The Nutritional Reality (and Why That’s Okay)
Let’s be honest: these are not health food. With chocolate, butter, sugar, and caramel, they’re pure indulgence. One square (1/16 of the recipe) contains approximately 42 grams of carbs and a significant amount of fat and calories.
But here’s why I’m including this information: if you’re someone who tracks macros for medical reasons (like diabetes management, which is why I track carbs), having accurate information is valuable. It allows you to enjoy treats mindfully while managing your health needs.
These brownies are for special occasions, celebrations, and moments when you want to impress. They’re not everyday snacks, and that’s perfectly fine. Food is about joy and connection as much as it is about nutrition.
Creating Your Signature Dessert
After nine rounds of testing, countless adjustments, and more caramel failures than I’d like to admit, I can confidently say these chocolate turtle brownies are my signature dessert. They’re what I bring to every potluck, what I make for birthday celebrations, and what people specifically request when they know I’m baking.
The beauty of this recipe is that once you make it a few times, it becomes intuitive. You’ll develop your own rhythm for stirring the caramel, your preferred chocolate drizzle pattern, and your ideal level of saltiness. That’s when a recipe truly becomes yours.
If you’re looking for more indulgent dessert ideas, you might also enjoy these stuffed red velvet cookies or these trendy pistachio NYC cookies that are taking social media by storm. And for Easter or spring celebrations, these crème egg stuffed cookies are absolute showstoppers.
Frequently Asked Questions About Chocolate Turtle Brownies
Can I use a different pan size? Yes! An 8×8 inch pan will create thicker brownies—increase the baking time by 5-7 minutes. A 9×13 inch pan creates thinner brownies—reduce baking time by 3-5 minutes and you’ll get about 24 smaller squares instead of 16.
Do I have to make homemade caramel? While homemade is best, you can use about 1 1/2 cups of store-bought caramel sauce in a pinch. Heat it slightly to make it spreadable, and add extra salt to taste since most jarred caramels aren’t salty enough for this application.
Why did my brownies turn out cakey instead of fudgy? The most common culprits are overmixing the flour (develops gluten) or overbaking. Brownies continue to cook slightly as they cool, so remove them when they still look slightly underdone in the center.
Can I make these nut-free? Absolutely. Simply omit the pecans for a chocolate-caramel brownie that’s still delicious. You could add toffee bits or chopped chocolate instead for texture.
How far ahead can I make these? The brownies can be made 2-3 days ahead and stored covered in the refrigerator. Add the caramel, pecans, and chocolate topping the day you plan to serve for the best texture and freshest flavor.
Why is my caramel grainy? This is crystallization, which happens when sugar crystals form during melting. Use a wet pastry brush to wipe down the sides of your pot while the sugar melts to prevent crystals from falling back in. Also ensure you’re not stirring too vigorously at the beginning—gentle, occasional stirring is better.
Can I freeze these brownies? Yes! Wrap individual squares in plastic wrap, then store in a freezer bag for up to 3 months. Thaw in the refrigerator overnight or at room temperature for 2-3 hours.
Final Thoughts: Why These Brownies are Worth the Effort
Making chocolate turtle brownies from scratch requires more time and effort than boxed brownies, no question. But the payoff is extraordinary. The depth of flavor from homemade caramel, the perfect fudgy texture of the brownies, and the impressive layered presentation make these worth every minute.
These brownies have become my go-to whenever I need to bring something special to a gathering. They work for holidays, birthdays, potlucks, or Tuesday evening just because you deserve something wonderful. They’re fancy enough for special occasions but approachable enough for a weekend baking project.
Most importantly, they’re the kind of dessert that makes people ask for the recipe—and then text you a week later saying they made them and everyone loved them. That’s the best compliment any recipe can receive.
So grab your ingredients, set aside a couple of hours, and create something truly special. And remember: if I could perfect these after nine attempts, you can absolutely nail them on your first try with all the tips and tricks I’ve shared. Happy baking!
PrintChocolate Turtle Brownies
Ultra-fudgy chocolate brownies layered with homemade salted caramel, crunchy pecans, and a glossy milk chocolate drizzle. The ultimate decadent dessert that looks bakery-quality but is surprisingly achievable at home!
- Prep Time: 45 minutes
- Cook Time: 20-22 minutes
- Total Time: 3 hours
- Yield: 16 squares
- Category: Dessert
- Cuisine: American
Ingredients
For the Brownies:
8 tablespoons (113g) unsalted butter
1 cup (6oz) semisweet chocolate, chopped
2 tablespoons oil (canola, vegetable, or olive oil)
1/3 cup (40g) powdered sugar
3/4 cup + 2 tablespoons (168g) granulated sugar
2 large eggs
2 teaspoons vanilla extract
1/3 cup (35g) Dutch process cocoa powder
1/2 cup (60g) all-purpose flour
1/2 teaspoon salt
For the Chocolate Turtle Topping:
1 cup (192g) granulated sugar
8 tablespoons (113g) unsalted butter, room temperature
1/4 cup heavy cream, room temperature
3/4 to 1 teaspoon salt
1 cup (120g) whole pecans, roughly chopped
4oz (2/3 cup) milk chocolate
1 1/2 teaspoons oil (canola, vegetable, or olive oil)
Instructions
1. Preheat oven to 350°F (175°C). Line a 9×9 inch square pan with parchment paper.
2. Melt butter and semisweet chocolate together over low heat. Remove from heat and stir in oil. Set aside to cool slightly.
3. Whisk eggs, powdered sugar, and granulated sugar for 1–2 minutes until slightly foamy. Add vanilla extract.
4. Pour in melted chocolate mixture and whisk until smooth.
5. Fold in cocoa powder, flour, and salt until just combined. Do not overmix.
6. Pour batter into pan and bake 20–22 minutes until top is shiny and center barely jiggles.
7. Cool completely for 1 hour at room temperature, then refrigerate.
8. In a pot, melt sugar over medium-low heat until amber and smooth. Add butter one tablespoon at a time, stirring constantly.
9. Slowly add heavy cream while stirring; remove from heat and stir in salt. Strain for smoothness.
10. Pour caramel over cooled brownies and spread evenly. Add chopped pecans.
11. Melt milk chocolate with oil until glossy; drizzle or spread over caramel-pecan layer.
12. Refrigerate for 1–2 hours until set. Cut into 16 squares and serve.
Notes
Store brownies in an airtight container in the refrigerator for up to 5 days.
Freeze individually wrapped squares up to 3 months.
Ensure caramel ingredients (butter and cream) are room temperature to prevent seizing.
Do not overmix batter once flour is added—this keeps brownies fudgy.
Cool brownies completely before layering to maintain clean layers.
Oil in melted chocolate helps retain shine and soft texture when chilled.