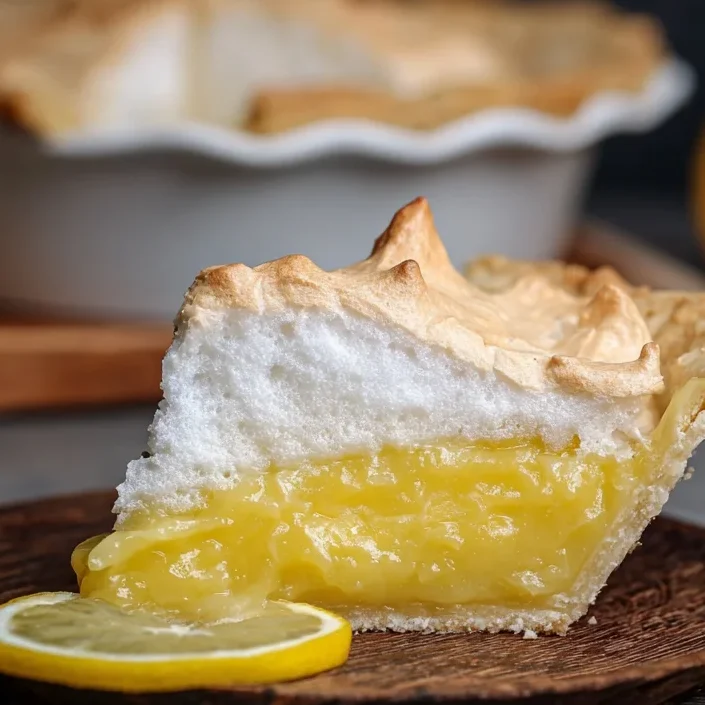
There is something undeniably nostalgic about a homemade fruit pie cooling on a wire rack by a sunlit window. While most modern lemon desserts lean toward the creamy curd of a tart or the fluffy billows of a meringue, the Old-Fashioned Lemon Pie stands in a league of its own. This isn’t your average citrus dessert; it is a vintage masterpiece that utilizes a unique double-crust method rarely seen in contemporary lemon recipes. With its translucent, zesty filling and a crust that boasts a specialized finish of shortening, milk, and a dusting of flour, this pie is a testament to the ingenuity of traditional home bakers. Whether you are looking to recreate a childhood memory or simply want to master a citrus classic that balances tartness with a buttery, flaky crunch, this guide will walk you through every step of the process.
Why You’ll Love This Recipe
You will fall in love with this Old-Fashioned Lemon Pie because it offers a texture profile that is completely different from a standard lemon meringue. The filling is thickened with cornstarch until it is crystal clear, resulting in a bright, jewel-toned center that highlights the natural beauty of the lemon. Furthermore, the double-crust design provides a satisfying structural contrast to the silky filling. The specialized “triple-coat” topping technique—using shortening, milk, and flour—creates a rustic, golden finish that is incredibly flaky and visually stunning. It is the perfect balance of sweet, sour, and salty, making it a sophisticated choice for any holiday table or Sunday dinner.
What Is Old-Fashioned Lemon Pie?
Historically, lemon pies evolved through various regional traditions, but this specific version is often associated with “Shaker” or “Clear-Filled” lemon pies. Unlike lemon custard pies that rely heavily on milk or cream, this version uses a water and cornstarch base, enriched at the final moment with eggs and fresh lemon juice. This technique ensures the lemon flavor remains sharp and clean rather than being mellowed out by dairy. The inclusion of a top crust is the defining feature; while most lemon pies are open-faced or topped with egg whites, this vintage variation treats the lemon filling like a fruit compote, encasing it in pastry for a richer, more substantial dessert experience.
Ingredients Overview
To achieve the perfect balance of flavor and structure, each ingredient in this pie plays a critical role.
- Cornstarch & Water: These form the slurry that creates the “clear” filling. Using boiling water is essential for activating the starch properly.
- Granulated Sugar: 1-1/2 cups may seem generous, but it is necessary to counteract the high acidity of the lemon juice and zest.
- Fresh Lemon Zest & Juice: Do not use bottled juice here. The oils in the grated rind provide the aromatic “high notes,” while the fresh juice provides the necessary tang.
- Eggs: These provide richness and help the filling set so that it doesn’t run when sliced.
- Butter: A single tablespoon adds a velvety mouthfeel and a hint of dairy richness to the citrus base.
- Double Pastry Crust: You’ll need enough dough for both a bottom and a top layer. A standard 9-inch pie plate works best.
- The “Topper” (Shortening, Milk, Flour): This trio is the secret to the pie’s unique appearance, providing a matte, rustic, and extra-crispy top.
Ingredient Substitutions & Tips
If you find yourself missing an ingredient, there are a few ways to pivot. For the citrus, you can swap traditional Lisbon or Eureka lemons for Meyer Lemons if you prefer a sweeter, more floral flavor profile; just reduce the sugar by two tablespoons. If you don’t have shortening for the top crust, melted butter can be substituted, though the texture will be slightly less “sandy” and more “browned.” For the pastry, while homemade is always superior for E-E-A-T (Experience, Expertise, Authoritativeness, and Trustworthiness) standards, a high-quality store-bought refrigerated double crust will work in a pinch. Always ensure your eggs are at room temperature before adding them to the warm cornstarch mixture to prevent curdling.
Step-by-Step Instructions
- Prep the Environment: Preheat your oven to 425°F (218°C). This high initial heat is crucial for setting the pastry and preventing a “soggy bottom.”
- Thicken the Base: In a medium saucepan, whisk the cornstarch with 1/4 cup of room-temperature water until smooth. Pour in the 1-1/2 cups of boiling water. Cook over medium heat, stirring constantly with a wooden spoon or whisk. You will notice it turn from cloudy to translucent and thick.
- Flavor Integration: Once clear, remove from heat. Stir in the sugar, lemon zest, and butter. The heat from the mixture will melt the butter and dissolve the sugar instantly.
- Tempering the Eggs: Allow the mixture to cool for about 10-15 minutes. Lightly beat your eggs in a small bowl. Slowly whisk the eggs and the lemon juice into the cooled cornstarch base. (Wait until it’s cool so you don’t scramble the eggs!)
- Assemble the Pie: Line your 9-inch pie plate with the bottom pastry. Pour the lemon mixture into the shell. Drape the second pastry over the top. Trim, fold, and crimp the edges to create a tight seal.
- The Signature Topping: Brush the top crust with the melted shortening, followed by the milk. Lightly dust a thin layer of flour over the damp surface.
- Vent and Bake: Cut 4-5 vents into the top. Bake at 425°F for 10 minutes, then turn the oven down to 375°F. Bake for an additional 30 minutes until the crust is a pale, sandy gold.
- The Cooling Phase: This is the hardest part! Let the pie sit on a wire rack for at least 2 hours. The filling continues to set as it cools.
Expert Baking Tips
The biggest challenge with starch-thickened pies is ensuring the filling doesn’t become watery. To avoid this, make sure the cornstarch and water mixture actually reaches a “boil” and becomes completely clear before you take it off the heat. If it stays cloudy, it hasn’t fully gelatinized and won’t hold the weight of the sugar and eggs. Another tip is the “tempering” of the lemon juice. Add the lemon juice after the cooking process; boiling lemon juice for too long can actually break down the thickening power of the cornstarch, leading to a runny pie. Finally, always use a glass pie plate if possible so you can check the bottom crust for a golden hue.
The Secret to the Perfect Golden Crust
What sets this specific Old-Fashioned Lemon Pie apart from others is the rustic crust treatment. Most pies use an egg wash for a shiny, lacquered look. However, the combination of shortening, milk, and flour creates a “shattery” texture that is reminiscent of 19th-century farmhouse baking. The shortening provides the fat, the milk provides the sugars for browning, and the flour creates a delicate, micro-thin layer of extra crunch. This technique mimics the effect of a professional deck oven, giving the home baker a crust that looks like it came from a high-end heritage bakery.
Serving Suggestions
This pie is best served at room temperature or slightly chilled. Because it is quite tart and rich, a dollop of unsweetened or lightly sweetened homemade whipped cream is the ideal accompaniment. For a more decadent “a la mode” experience, serve a slice alongside a scoop of high-quality vanilla bean ice cream. The cold creaminess of the ice cream beautifully cuts through the sharp acidity of the lemon filling. A few fresh raspberries on the side can also add a lovely color contrast and a secondary berry note.
Storage & Make-Ahead Tips
Old-Fashioned Lemon Pie can be kept at room temperature for up to 24 hours if your kitchen is cool, but for the best food safety, store it in the refrigerator. Cover it loosely with foil or plastic wrap; it will stay fresh for 3 to 4 days. If you want to make it ahead of time, you can prepare the crust dough and the lemon filling base (before adding eggs) a day in advance. However, once the pie is baked, we do not recommend freezing it, as the cornstarch filling can become “weepy” or spongy upon thawing.
FAQs
Q: Why is my lemon pie filling runny?
A: This usually happens if the cornstarch wasn’t cooked long enough to become “clear” and thick, or if the pie wasn’t allowed to cool completely (at least 2 hours) before slicing.
Q: Can I use this filling for a single-crust pie?
A: Yes! You can put this filling into a blind-baked shell and top it with meringue, though you would omit the top-crust baking steps.
Q: How many lemons do I need for 1/4 cup of juice?
A: Generally, two medium-sized lemons will yield approximately 1/4 cup of juice, plus more than enough zest for the 2 tablespoons required.
Q: Is the flour on top of the crust necessary?
A: It is a traditional stylistic choice that provides a unique texture. You can omit it if you prefer a shiny crust, but you will lose that vintage “farmhouse” aesthetic.
Mastering the Old-Fashioned Lemon Pie is a rite of passage for any serious home baker. It challenges the status quo of modern lemon desserts by bringing back the sturdy, satisfying double crust and the clean, translucent filling of yesteryear. By following the starch-thickening process carefully and embracing the unique shortening-and-flour crust technique, you’ll produce a dessert that is as beautiful as it is delicious. Happy baking!
PrintOld Fashioned Lemon Pie
A nostalgic, zesty lemon pie featuring a unique double-crust design and a bright, translucent citrus filling that balances sweet and tart perfectly.
Ingredients
1/4 cup cornstarch
1–1/2 cups boiling water
1–1/2 cups sugar
2 tablespoons grated lemon rind
1 tablespoon butter
2 eggs, slightly beaten
1/4 cup lemon juice (about 2 lemons)
Pastry for a double crust 9-inch pie
1–1/2 to 2 tablespoons shortening, melted
1–1/2 to 2 tablespoons milk
Sprinkling of flour
Instructions
1. Preheat oven to 425°F.
2. In a saucepan, blend cornstarch and 1/4 cup of the water. Add boiling water and cook over medium heat, stirring constantly, until thick and clear.
3. Add sugar, lemon zest, and butter. Set aside to cool. Once cooled to room temperature, stir in eggs and lemon juice.
4. Pour filling into an unbaked pie shell. Cover with the top crust and seal the edges tightly.
5. Brush the top crust with melted shortening and then milk. Lightly sprinkle flour over the entire top crust.
6. Using a sharp knife, cut several vents into the top crust to allow steam to escape.
7. Bake for 10 minutes at 425°F, then reduce heat to 375°F and bake for 30 minutes more.
8. Transfer to a cooling rack for at least 2 hours before serving to allow the filling to set.
Notes
Ensure the cornstarch mixture is completely clear before adding the other ingredients to avoid a cloudy filling.
Letting the pie cool for the full 2 hours is essential for clean slices.