There is something undeniably magical about a Red Velvet Crinkle Cookie. The striking contrast between the deep, vibrant crimson dough and the stark white, “snow-capped” powdered sugar crackle makes them an absolute showstopper on any dessert table.
Whether you are looking for the perfect Christmas cookie to leave out for Santa, a romantic treat for Valentine’s Day, or just a cozy weekend baking project, these cookies hit every mark. They are fudgy like a brownie, soft like a classic sugar cookie, and have that hint of cocoa and vanilla that defines a true red velvet flavor.
In this post, I’m sharing my “secret weapon” trick to ensure that your powdered sugar stays bright white and doesn’t disappear into the cookie while baking!
Why You’ll Love This Recipe
- The Texture: These are incredibly soft and chewy with a slightly crisp edge.
- No Chill Time: Unlike many crinkle cookie recipes, this dough is ready to bake immediately (though you can chill it if you prefer a thicker cookie!).
- The Secret Trick: We use a double-rolling method and a touch of cornstarch to ensure the crinkle pattern is high-contrast and beautiful.
- Festive & Photogenic: These are the ultimate Pinterest-worthy cookies that look like they came from a high-end bakery.
Ingredient Notes
To get that perfect Red Velvet Crinkle Cookie, a few specific ingredients make all the difference:
- Dutch-Processed Cocoa Powder: This provides a smoother, mellower chocolate flavor and a darker base which makes the red color pop. Natural cocoa works, but Dutch-processed is superior for red velvet.
- Red Gel Food Coloring: I highly recommend using gel rather than liquid. Liquid food coloring adds too much moisture to the dough and often results in a “pink” rather than a deep red.
- Brown Sugar & Granulated Sugar: The combination of both gives us the perfect chewiness from the molasses in the brown sugar and the crisp edges from the granulated sugar.
- Cornstarch: This is my “pro-tip.” Mixing a little cornstarch into your powdered sugar helps absorb any surface moisture, keeping that white coating from melting away in the oven.
Step-by-Step Instructions
1. Cream the Butter and Sugars
Start by creaming your softened butter with the granulated and brown sugar. You want to beat this for about 2-3 minutes until it’s pale and fluffy. This creates the air pockets needed for a light cookie.
2. Add the Wet Ingredients
Incorporate the egg and a generous 3 teaspoons of vanilla extract. Vanilla is crucial in red velvet to balance the cocoa notes. Mix until the batter is creamy.
3. Incorporate Dry Ingredients
Gently mix in your flour, cocoa powder, baking soda, and salt. Be careful not to overmix at this stage; stop as soon as the last streaks of white flour disappear.
4. Color the Dough
Add your red gel food coloring. Start with a small amount and work your way up until you have a rich, deep red color. The dough will look slightly darker than the final baked cookie.
5. The Double-Sugar Roll
Scoop about 1.5 tablespoons of dough and roll it into a ball. First, roll it in a small bowl of granulated sugar. Second, roll it in the powdered sugar/cornstarch mixture. The granulated sugar creates a barrier that prevents the powdered sugar from dissolving!
6. Bake to Perfection
Bake at 375°F for 7-10 minutes. You’re looking for the cookies to spread, flatten, and show those beautiful cracks. Don’t overbake, or you’ll lose that fudgy center!
Expert Tips for Best Results
- Use a Cookie Scoop: For even baking and a professional look, use a #40 cookie scoop (about 1.5 tablespoons).
- Room Temperature Ingredients: Make sure your butter and egg are at room temperature. This ensures the emulsion is perfect and the cookies rise correctly.
- Don’t Skimp on the Sugar: When rolling in the powdered sugar, make sure the ball is heavily coated. It should look like a snowball!
- The “Spoon and Level” Method: When measuring flour, don’t scoop directly with the measuring cup. Spoon the flour into the cup and level it off with a knife to avoid dry, crumbly cookies.
Variations and Substitutions
- Chocolate Chip Red Velvet: Fold in 1/2 cup of white chocolate chips or mini semi-sweet chips for extra decadence.
- Gluten-Free: You can substitute the all-purpose flour for a high-quality 1:1 gluten-free baking flour.
- Dairy-Free: Use a high-quality vegan butter stick (ensure it is chilled and firm).
- Natural Coloring: If you prefer not to use dyes, you can use beet powder, though the color will be more of a “muted burgundy” than a bright red.
Storage and Freezing
To Store: Keep cookies in an airtight container at room temperature for up to 5 days. To keep them extra soft, place a slice of white bread in the container to absorb excess air.
To Freeze: You can freeze the baked cookies for up to 3 months. Alternatively, freeze the dough balls (before rolling in sugar). When ready to bake, thaw for 15 minutes, roll in sugar, and bake as directed, adding 1-2 minutes to the cook time.
FAQ
Why did my powdered sugar melt?
This usually happens if the dough is too warm or if you didn’t use the “granulated sugar first” trick. Rolling in granulated sugar first creates a dry surface that protects the powdered sugar.
Can I make the dough ahead of time?
Yes! You can make the dough and keep it in the fridge for up to 48 hours. Let it sit on the counter for 15 minutes before rolling so it’s pliable.
Do I have to use Dutch-processed cocoa?
You can use regular unsweetened cocoa powder, but the flavor will be slightly more acidic and the color won’t be as deep.
Conclusion
These Red Velvet Crinkle Cookies are truly the queen of the cookie tray. With their fudgy texture and striking appearance, they are guaranteed to be a hit. The best part is that they look incredibly impressive but are actually quite simple to make. Give that cornstarch and double-rolling trick a try—it’s a total game-changer for the perfect crinkle!
Happy baking!
PrintSoft & Chewy Red Velvet Crinkle Cookies (The Best Recipe!)
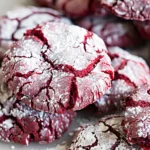
These Red Velvet Crinkle Cookies are the ultimate showstopper for holiday cookie trays or Valentine’s Day. They feature a rich, fudgy cocoa center with a striking “snow-covered” crackle finish.
Ingredients
3/4 cup butter, softened
1/4 cup granulated sugar + extra for rolling
3/4 cup brown sugar
1 egg
3 tsp vanilla extract
2 cups all purpose flour
1/4 cup dutch processed cocoa powder
1 tsp baking soda
1/2 tsp salt
red gel food coloring, as needed
1/2 cup powdered sugar + 1 tbsp cornstarch, mixed
Instructions
1. Preheat oven to 375° F. Line a cookie sheet with parchment paper or a silicone mat.
2. Cream together the softened butter, 1/4 cup granulated sugar, and brown sugar until light and fluffy.
3. Add the egg and vanilla. Mix until light in color and creamy.
4. Add in the dry ingredients (flour, cocoa, baking soda, and salt). Mix until completely combined. The dough will be soft.
5. Mix in the red food coloring until you’ve achieved a vibrant red color.
6. Scoop the cookie dough out into 1 1/2 tbsp portions (#40 scoop).
7. Roll each ball first in granulated sugar, then generously in the powdered sugar/cornstarch mixture.
8. Arrange on the prepared cookie sheet.
9. Bake at 375° F for 7-10 minutes, until the cookies flatten and begin to crackle.
10. Allow the cookies to cool on the pan for 5 minutes before transferring to a wire cooling rack.
Notes
Use Dutch-processed cocoa for the best deep flavor and color.
The cornstarch in the powdered sugar helps prevent the sugar from melting into the dough during baking.
Gel food coloring is highly recommended over liquid for a brighter red without altering dough consistency.