There is a long-standing debate in the baking world: do you go for the buttery, crisp-edged satisfaction of a sugar cookie, or the gooey, comforting nostalgia of a chocolate chip cookie?
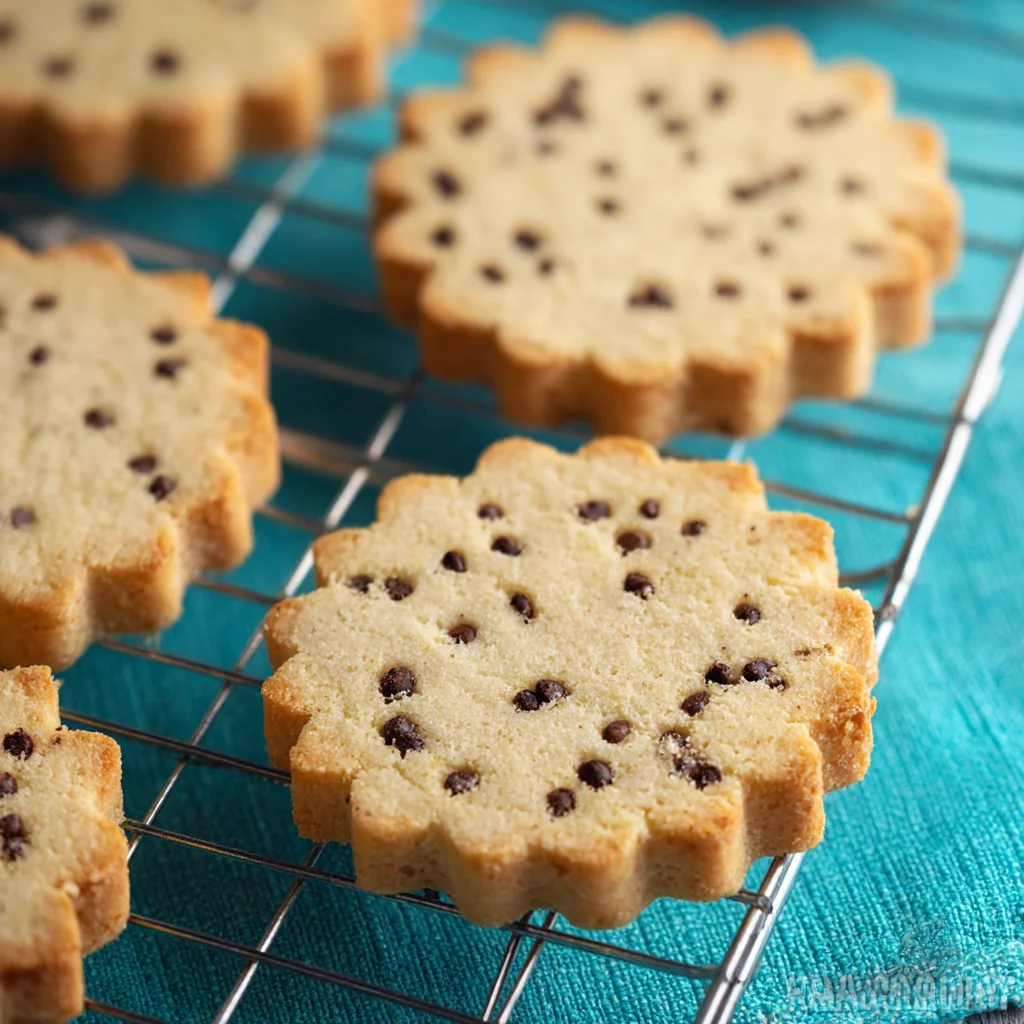
Today, we are putting that debate to rest. These Chocolate Chip Sugar Cookies are the ultimate hybrid. They have the structural integrity of a classic cutout sugar cookie—meaning they won’t spread into unidentifiable blobs in the oven—but they are packed with the brown-sugar-depth and chocolatey goodness of your favorite chipper.
Whether you’re looking for a unique holiday cookie, a fun weekend project with the kids, or a “just because” treat that pairs perfectly with a cold glass of milk, this recipe is about to become your new gold standard.
Why You’ll Love This Recipe
- No-Spread Magic: Thanks to a specific ratio of flour to fats and a double-chill method, these cookies hold their shape perfectly. If you cut out a star, it stays a star!
- The Texture: Soft, slightly chewy, and dense enough to stand up to royal icing, yet delicious enough to eat plain.
- The “Mini” Secret: We use mini chocolate chips instead of standard ones. This ensures that your cookie cutters can glide through the dough without hitting a “boulder” of chocolate, giving you clean, professional edges.
- Pantry Staples: No fancy ingredients here—just high-quality basics you likely already have in your kitchen.
Ingredient Notes
To get the best results with these Chocolate Chip Sugar Cookies, let’s talk about the why behind the ingredients.
- Unsalted Butter: Make sure it is softened to room temperature, but not melty. If your butter is too soft, the dough will be greasy and harder to handle.
- Brown Sugar vs. Granulated Sugar: We use a higher ratio of brown sugar here. Why? Because the molasses in the brown sugar provides that “chocolate chip cookie” flavor and keeps the centers soft.
- All-Purpose Flour: This provides the structure. I recommend the “spoon and level” method for measuring. If you scoop directly with the measuring cup, you’ll likely pack too much flour, leading to dry cookies.
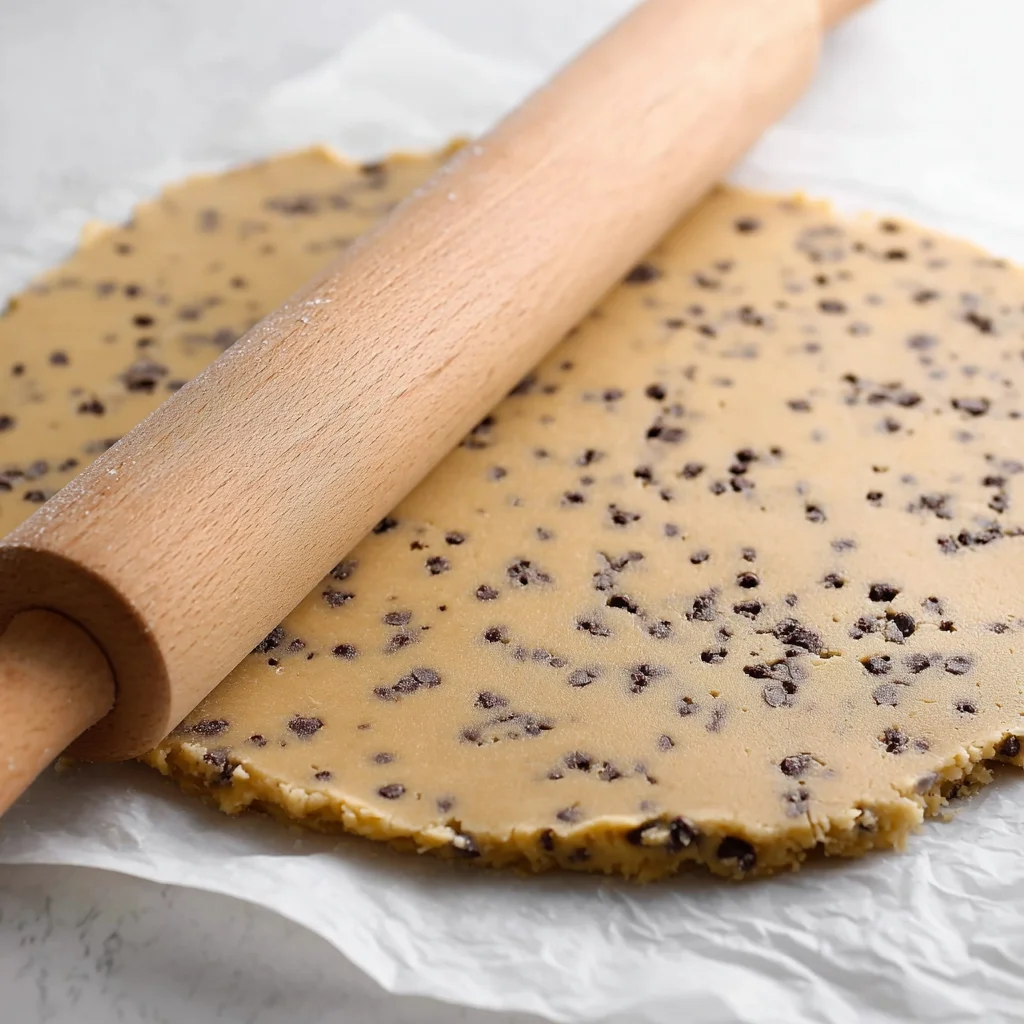
- Mini Semi-Sweet Chocolate Chips: Don’t swap these for regular-sized chips if you plan on using cookie cutters. The mini size allows for a more even distribution and easier cutting.
- Vanilla Extract: Use the good stuff! A tablespoon seems like a lot, but it’s what gives these cookies that bakery-style aroma.
Step-by-Step Instructions
1. The Creaming Process
Start by preheating your oven to 375°F (190°C). In a stand mixer or with a hand mixer, cream together your softened butter, brown sugar, and granulated sugar. You aren’t just mixing them; you are aerating them. Mix until the mixture looks pale and fluffy.
2. The Wet Ingredients
Add in your eggs, salt, vanilla extract, and baking powder. Beat these until well incorporated. It’s important to add the baking powder now to ensure it’s evenly distributed throughout the dough.
3. Adding the Flour
Add your flour one cup at a time. This is where you need to pay attention to the texture. After adding 3 ½ cups, touch the dough. It should feel soft but non-greasy. If it leaves a heavy oily residue on your fingers or feels very sticky, add an extra ¼ cup of flour.
4. Folding in the Chips
Using a hand spatula, gently fold in the mini chocolate chips. Do this by hand to avoid overworking the dough, which can lead to tough cookies.
5. The Roll and Chill
Place your dough between two sheets of parchment paper. Roll it out to a consistent ¼ inch thickness. Pro Tip: I swear by my Joseph Joseph rolling pin with the adjustable rings. It takes all the guesswork out of getting an even bake! Once rolled, slide the whole sheet onto a tray and chill in the fridge for at least 30 minutes.
6. Cutouts and The Second Chill
Once the dough is cold and firm, use your favorite cutters to create shapes. Place them on a light-colored baking sheet lined with parchment. Crucial Step: Chill the cutouts again for 10-15 minutes before they hit the oven. This “shocks” the butter and prevents spreading.
7. The Perfect Bake
Bake for 7-9 minutes. You want to pull them out before you see any browning on the edges. They will look slightly underbaked and soft—that’s exactly what you want! Let them rest on the hot baking sheet for 10 minutes to finish setting.

Expert Tips for Best Results
- Use Light-Colored Pans: Dark baking sheets absorb more heat and can cause the bottoms of your cookies to burn before the centers are set.
- Temperature Matters: If your kitchen is hot, your dough will soften quickly. If the dough starts getting floppy while you are cutting shapes, pop it back in the freezer for 5 minutes.
- Don’t Overmix: Once the flour goes in, mix only until just combined. Over-mixing develops gluten, which makes for a bready, tough cookie rather than a tender one.
Variations and Substitutions
- The Salty Sweet: Sprinkle a tiny bit of flaky sea salt on top immediately after taking them out of the oven.
- Holiday Flare: Use peppermint extract instead of vanilla and add some crushed candy canes into the dough.
- Icing: These are sturdy enough for Royal Icing or a simple vanilla glaze. If you use icing, wait until the cookies are completely cool.
Storage and Freezing
To Store: Keep cookies in an airtight container at room temperature for up to 5 days. Placing a slice of white bread in the container will help keep them soft!
To Freeze (Baked): These freeze beautifully. Place them in a freezer-safe bag with parchment paper between layers. They will stay fresh for up to 3 months.
To Freeze (Dough): You can freeze the rolled-out sheets of dough. Wrap them tightly in plastic wrap. When ready to bake, just cut your shapes and add 1-2 minutes to the bake time.
FAQ
Can I use regular chocolate chips?
You can, but I don’t recommend it if you are using intricate cookie cutters. Large chips will break your shapes and make the edges look jagged. If you are just doing “drop” cookies, regular chips are fine!
Why did my cookies spread?
Usually, this happens if the butter was too warm or if the dough wasn’t chilled long enough. Make sure you don’t skip the “second chill” after cutting the shapes.
Can I use this recipe for standard drop cookies?
Absolutely! If you don’t want to roll them out, just scoop tablespoon-sized balls, flatten them slightly, and bake.
The Verdict
These Chocolate Chip Sugar Cookies offer the best of both worlds. They are sophisticated enough for a cookie exchange but simple enough for a Tuesday afternoon snack. Give them a try, and don’t forget to pin this to your “Baking” board on Pinterest!
PrintChocolate Chip Sugar Cookies
The ultimate hybrid cookie: the buttery, structural integrity of a sugar cookie meets the nostalgic sweetness of chocolate chips. Perfect for cutouts!
- Prep Time: 45
- Cook Time: 8
- Total Time: 53
- Yield: 36 cookies
- Category: Dessert
- Method: Baking
- Cuisine: American
Ingredients
1 cup (two sticks) unsalted butter, softened
1 cup packed brown sugar (light or dark)
1/2 cup granulated sugar
2 eggs
1 tbsp vanilla extract
1 tsp salt
1 tsp baking powder
3 1/2 cups all-purpose flour
1 cup mini semi-sweet chocolate chips
Instructions
1. Preheat oven to 375 degrees F.
2. In a mixer, cream together butter and the two sugars until fluffy.
3. Add eggs, salt, vanilla extract, and baking powder and beat until well mixed.
4. Add flour a cupful at a time. The dough should be non-greasy; add up to 1/4 cup extra if needed.
5. Fold in the mini chocolate chips.
6. Roll to 1/4 inch thickness between parchment paper and chill for 30 minutes.
7. Cut into shapes, place on a lined sheet, and chill again.
8. Bake for 7-9 minutes. Remove before edges turn brown.
9. Cool on sheet for 10 minutes, then transfer to a rack.
Notes
Use mini chips to ensure clean edges when using cookie cutters.
Chilling the dough twice is the secret to no-spread cookies.
Measure flour by spooning and leveling for accuracy.