Oh, friends, do I have a treat for you today! You know how much I love a good snack that feels indulgent but still fits into a busy day. Well, these Reese’s Pieces Protein Bars have become my absolute favorite grab-and-go. They remind me of those childhood candy moments, but with a grown-up twist that keeps me feeling fueled. They’re so easy to whip up, and trust me, your taste buds (and your muscles!) will thank you.
Why You’ll Love These Reese’s Pieces Protein Bars
- They taste just like your favorite candy, but they’re packed with protein!
- No baking required – seriously, just mix and chill.
- Perfect for a quick breakfast, a post-workout snack, or an afternoon pick-me-up.
- Super customizable – feel free to play with your favorite mix-ins!
Ingredients You’ll Need
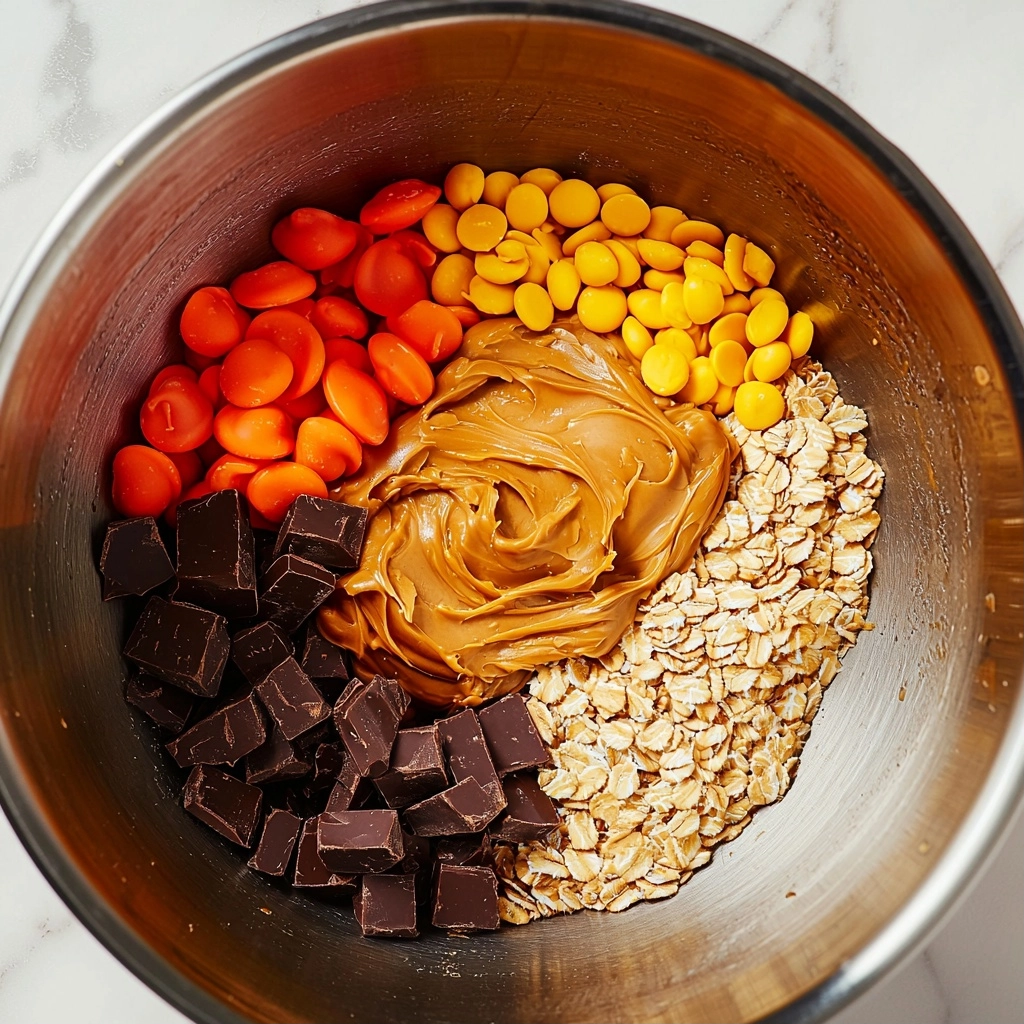
- Rolled Oats: These are the base of our bars, giving them a lovely chewy texture and some good fiber. Don’t use instant oats here, as they’ll absorb liquid differently.
- Chocolate Protein Powder: This is where the protein punch comes in! Use your favorite brand and flavor. A good quality powder will make a big difference in taste.
- Creamy Peanut Butter: This binds everything together and adds that classic peanut butter flavor. Make sure it’s creamy, not crunchy, for the best consistency.
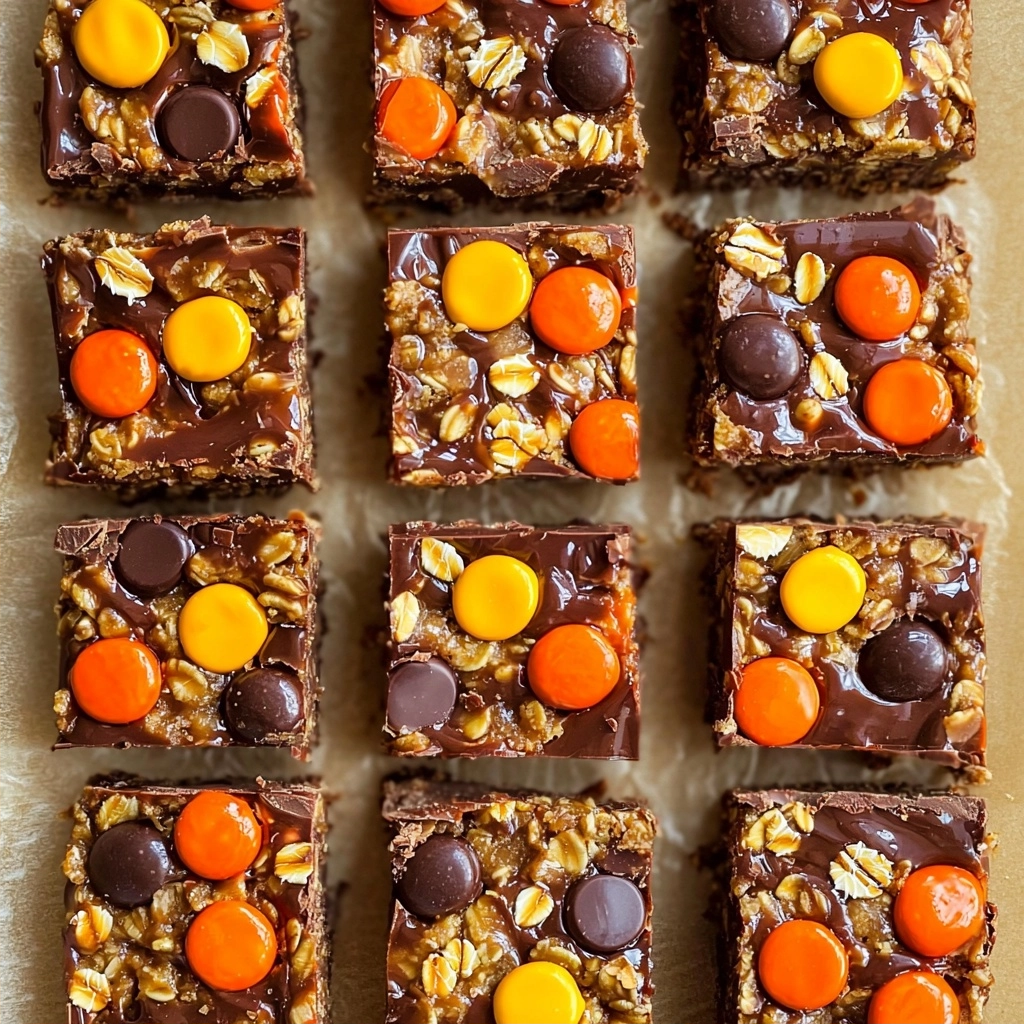
- Reese’s Pieces: The star of the show! These add those iconic peanut butter candy bits and a fun crunch.
- Mini Chocolate Chips: A little extra chocolate never hurt anyone, right? They melt slightly into the bars for extra deliciousness.
- Honey: This acts as a natural sweetener and also helps bind the bars.
- Water: Just a little bit helps bring the mixture to the perfect consistency. You might need a tiny bit more or less depending on your protein powder.
How to Make Reese’s Pieces Protein Bars Step by Step
First things first, let’s get our pan ready. Grab an 8×8 inch baking pan and line it with parchment paper or wax paper. This is super important because it’s how we’ll easily lift our bars out later without any sticking drama. Just make sure the paper hangs over the edges a bit like handles.
Now for the fun part! Get a big mixing bowl – the bigger, the better. Add your rolled oats, chocolate protein powder, creamy peanut butter, Reese’s Pieces, mini chocolate chips, honey, and the initial 4.5 tablespoons of water. Start mixing everything together really well. It might seem a little crumbly at first, and that’s okay! If it feels too dry and won’t come together, don’t worry. This is where the magic happens: add just one teaspoon of water at a time until the mixture is cohesive and you can press it together.
Once your mixture is perfectly combined, transfer it to your prepared pan. Use your hands or a spatula to press it down firmly and evenly into the pan. You want a nice, compact layer. Then, cover the pan with foil or plastic wrap and place it in the fridge for at least 60 minutes, or the freezer for at least 30 minutes, until it’s firm. This chilling time is essential for the bars to set up beautifully!
My Top Tips for Success
- I always make sure to line my pan with parchment paper, leaving an overhang. It makes lifting the set bars out so much easier.
- In my experience, mixing with my hands after the initial spatula mix helps to really incorporate everything and feel the consistency.
- Trust me on this one: don’t skip the chilling time! It’s crucial for the bars to firm up and hold their shape.
- If you’re pressing extra Reese’s Pieces on top, let the bars thaw just a tiny bit first so they’re slightly pliable. That way, the candies will stick better.
- I like to store these in an airtight container in the fridge. They stay fresh and firm for days!
Common Mistakes to Avoid
- Adding too much water at once: This can make your mixture too sticky and hard to handle. Add water gradually, one teaspoon at a time, until it just comes together.
- Not chilling long enough: If your bars are still soft, they’ll be difficult to cut and might fall apart. Be patient and let them chill until firm.
- Not lining the pan: Without parchment paper, your bars will stick to the pan, making them very hard to remove cleanly.
- Using crunchy peanut butter: While delicious, crunchy peanut butter won’t give you the smooth, cohesive texture needed for these bars. Stick to creamy!
How to Store Reese’s Pieces Protein Bars
- Refrigerator: Store in an airtight container for up to 5-7 days.
- Freezer: Wrap individual bars tightly in plastic wrap, then place them in a freezer-safe bag or container for up to 1-2 months. Thaw briefly before enjoying.
Frequently Asked Questions
Can I use a different protein powder?
Yes, absolutely! Feel free to use your favorite chocolate protein powder or even a vanilla one for a different flavor profile. The consistency might vary slightly, so adjust water as needed.
Do I have to use Reese’s Pieces?
While the Reese’s Pieces are key to this recipe’s flavor, you can certainly substitute them with other mix-ins. Try M&Ms, chopped nuts, or even other candy pieces if you prefer.
Can I make these vegan?
To make these vegan, you would need to use a plant-based chocolate protein powder, a vegan peanut butter (most are), and a vegan honey substitute like agave syrup or maple syrup. Also, ensure your chocolate chips and Reese’s Pieces are vegan-friendly.
How long do these take to set?
They will set in about 30 minutes in the freezer or 60 minutes in the refrigerator. The longer they chill, the firmer they will be.
Are these good for meal prep?
Yes, these Reese’s Pieces Protein Bars are fantastic for meal prep! Make a batch at the beginning of the week for easy, healthy snacks on the go.
I hope these Reese’s Pieces Protein Bars bring a little bit of joy and a lot of deliciousness to your day. They’re such a simple way to have a satisfying snack ready whenever you need it. If you give them a try, I’d absolutely love to hear how they turned out for you!
PrintReese’s Pieces Protein Bars

These no-bake protein bars taste like your favorite candy, packed with protein for a delicious and satisfying snack.
- Prep Time: 15
- Total Time: 75
- Yield: 12 bars
- Category: Snack
- Method: No-Bake
- Cuisine: American
- Diet: Vegetarian
Ingredients
- 1 ½ cup rolled oats
- ½ cup chocolate protein powder
- ¾ cup creamy peanut butter
- ⅓ cup Reese’s Pieces plus extra for topping if desired
- 2 tbsp mini chocolate chips
- 4.5 tbsp honey
- 4.5 tbsp water plus extra if/as needed
Instructions
- Line an 8×8 inch baking pan with parchment paper or wax paper.
- Add rolled oats, chocolate protein powder, creamy peanut butter, ⅓ cup Reese’s Pieces, mini chocolate chips, honey, and 4.5 tbsp water to a large bowl.
- Mix all ingredients until well combined.
- If the mixture feels too dry or crumbly, add water one teaspoon at a time until it comes together.
- Press the mixture evenly into the prepared pan.
- Cover the pan with foil or plastic wrap.
- Chill until set, either in the freezer for at least 30 minutes or in the refrigerator for at least 60 minutes.
- Once firm, lift the bars out of the pan by grabbing the parchment or wax paper.
- Transfer the whole block to a cutting board.
- Cut into 12 bars.
- Let the bars thaw slightly so they are pliable.
- Gently press extra Reese’s Pieces onto the tops of the bars.
- Store the bars in the refrigerator or freezer.
Notes
Always line your pan for easy removal.
Add water slowly, one teaspoon at a time, to avoid a sticky mixture.
Don’t skip the chilling time – it’s crucial for firm bars.
Store in an airtight container for best freshness.