
When spring arrives and the flowers start to bloom, there is nothing quite as delightful as a kitchen filled with the scent of fresh-baked sugar cookies. These Patterned Easter Egg Sugar Cookies are the ultimate holiday treat, combining the simplicity of a semi-homemade mix with a high-end, artistic finish. Unlike traditional cookies that require hours of intricate royal icing work, these “painted” cookies use colored dough to create built-in designs that bake right into the cookie itself. This technique results in a smooth, professional-looking surface that is both visually stunning and incredibly delicious. Whether you are hosting an Easter brunch or looking for a creative afternoon project with the kids, these cookies are designed to impress without the stress of perfection. Get ready to transform a simple pouch of cookie mix into a vibrant gallery of edible Easter art.
Why You’ll Love This Recipe
You will absolutely love this recipe because it strikes the perfect balance between convenience and creativity. By starting with a high-quality sugar cookie mix, you bypass the measuring of dry ingredients while still achieving that classic, buttery flavor we all crave. The real magic, however, lies in the “inlay” technique. Instead of messy frosting, you use neon gel colors to create vivid patterns—stripes, polka dots, and zigzags—directly on the dough. It is a tactile, hands-on process that feels like a craft project but ends with a sweet reward. Plus, the extra flour ensures the cookies hold their egg shape perfectly in the oven, making them ideal for gifting or display.
What Is a Patterned Easter Egg Cookie?
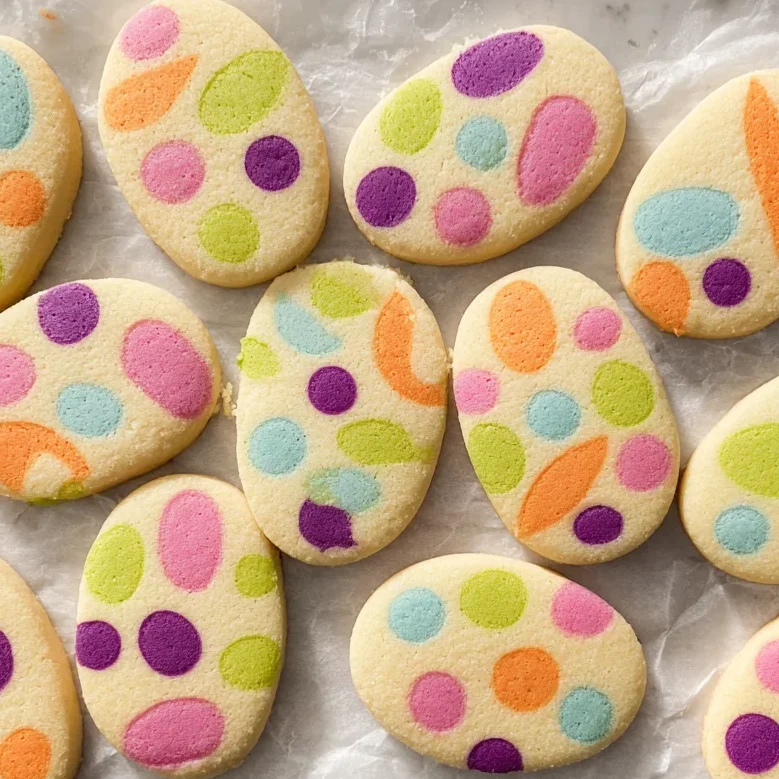
A Patterned Easter Egg Cookie is a modern twist on the classic holiday sugar cookie. Rather than applying decorations after the baking process, the decoration is integrated into the dough itself. By reserving a small portion of the dough and tinting it with vibrant neon gels, you create a palette of “edible clay.” These colored pieces are shaped into patterns and pressed into the main dough sheet using a rolling pin. When cut with an oval cutter, each cookie becomes a unique work of art with a flat, seamless finish. This method is often called “inlay dough” or “painted dough,” and it provides a sophisticated, matte look that is much more durable for transport than delicate icing.
Ingredients
To achieve the best results with these Patterned Easter Egg Sugar Cookies, the quality and type of ingredients you choose are paramount.
First, we use Betty Crocker™ Sugar Cookie Mix (17.5 oz). This serves as our reliable base, providing the ideal ratio of sugar to leavening for a soft yet sturdy cookie. To transform this from a drop cookie mix into a cutout cookie dough, we add 3 tablespoons of Gold Medal™ All Purpose Flour. This additional flour provides the necessary structure and “bite,” preventing the cookies from spreading too much and losing their distinct oval shape.
The 1/2 cup of softened butter is the soul of the cookie. It must be truly softened at room temperature—not melted—to ensure the dough incorporates smoothly without becoming greasy. One large egg acts as the binder, giving the dough its elasticity, which is crucial when you are rolling it thin and pressing in patterns.
Finally, the Betty Crocker™ Neon Gel Food Colors are essential. Gel colors are superior to liquid dyes because they provide intense, concentrated pigment without thinning out the dough. The neon palette—including vibrant pinks, greens, oranges, and purples—creates that iconic spring look that pops against the pale golden hue of the baked sugar cookie.
Ingredient Substitutions & Tips
If you need to pivot based on what is in your pantry, here are a few expert tips. For a dairy-free version, you can substitute the butter with a high-quality vegan butter stick (ensure it is the kind meant for baking, not a spread). If you don’t have neon gel colors, standard primary gel colors work beautifully for a more traditional Easter palette. For those who enjoy a hint of extra flavor, adding half a teaspoon of almond extract or lemon zest to the dough can elevate the “mix” into something that tastes entirely gourmet. Always remember to use a light hand when adding the extra flour; you want the dough to be workable but not tough.
Step-by-Step Instructions
- Prepare the Base Dough: In a large mixing bowl, combine the sugar cookie mix, softened butter, 3 tablespoons of flour, and the egg. Use a wooden spoon or a stand mixer on low speed until a cohesive dough forms. It should be soft but not sticky to the touch.
- Separate for Coloring: Pull away exactly 1/2 cup of the prepared dough. Wrap the remaining large portion of dough in plastic wrap and place it in the refrigerator. Chilling the main dough is vital for a clean cut later.
- Create the Color Palette: Divide that 1/2 cup of dough into four equal small balls. Using a toothpick or a small drop of gel, tint each ball a different neon color. Knead the color in thoroughly until no streaks remain.
- Roll and Decorate: Preheat your oven to 375°F. On a lightly floured surface, roll out the chilled plain dough until it is about 3/16-inch thick. Now, get creative! Roll the colored dough into thin ropes for stripes, tiny balls for polka dots, or flat ribbons for zigzags. Arrange these patterns on top of your rolled-out dough.
- The Pressing Technique: Place a sheet of parchment paper over the patterned dough. Gently but firmly run your rolling pin over the parchment. This “flattens” the colored shapes into the base dough, creating a single, seamless sheet of patterned cookie dough.
- Cut the Eggs: Remove the parchment. Use a 2 1/2-inch oval cookie cutter to cut out your egg shapes. Try to position the cutter to capture the most interesting patterns.
- The Final Chill: Place the cut cookies on an ungreased cookie sheet. Before baking, put the entire sheet in the refrigerator for at least 15 minutes. This “sets” the fats and ensures the patterns don’t distort in the heat.
- Bake and Cool: Bake for 8 to 10 minutes. Look for the edges to be just set and the tops to appear dry. Do not let them brown! Cool on the sheet for 2 minutes, then move to a wire rack to cool completely for about 20 minutes.
Expert Baking Tips
Temperature is your best friend and your worst enemy in cookie baking. To ensure your patterns stay crisp, keep your dough cold. If the dough starts to feel too soft or “floppy” while you are applying the neon patterns, pop it back into the fridge for 5 minutes. Additionally, use a “bench scraper” or a very thin metal spatula to lift the cut ovals. This prevents the dough from stretching and turning your perfect eggs into circles. Finally, always bake on the middle rack of the oven for even heat distribution, which prevents the bottom of the cookies from browning before the patterns are set.
Creative Pattern Ideas
Don’t feel limited to basic stripes! You can create “marbled” eggs by lightly swirling two colored doughs together before rolling them out. Another sophisticated look is the “ombre” effect, where you place different shades of the same color in a gradient across the dough. For a more whimsical approach, try creating “floral” patterns by placing one small dot of color in the center and five dots around it, then pressing them in. Because the dough is so stable, you can even use small star or heart cutters to inlay different colored shapes into the base dough for a mosaic effect.
Serving Suggestions
These Patterned Easter Egg Cookies are a visual feast, so they deserve a beautiful presentation. Serve them on a clean, white ceramic platter to let the neon colors truly pop. They pair wonderfully with a cold glass of milk or a hot cup of Earl Grey tea. If you are hosting an Easter egg hunt, consider placing individual cookies in clear cellophane bags tied with a pastel ribbon; they make for the perfect “grand prize” or party favor that won’t melt in the sun.
Storage & Make-Ahead Tips
These cookies are excellent for planning ahead. Once completely cooled, store them in an airtight container at room temperature for up to 5 days. If you want to make them further in advance, these cookies freeze beautifully. Place them in a single layer in a freezer-safe container with parchment paper between layers; they will stay fresh for up to 3 months. To serve, simply thaw at room temperature for an hour. The colors will remain just as vibrant after freezing!
FAQs
Q: Can I use liquid food coloring instead of gel?
A: It is not recommended. Liquid food coloring adds too much moisture to the small amount of dough, making it sticky and difficult to handle. Gel colors provide the best saturation without changing the dough’s consistency.
Q: My cookies spread and lost their shape. What happened?
A: This usually happens if the dough was too warm when it entered the oven. Make sure to chill the cut cookies on the baking sheet for at least 15 minutes before baking to solidify the butter.
Q: Can I use a different cookie mix?
A: Yes, you can use a gluten-free sugar cookie mix or even a shortbread mix. Just ensure the dough is firm enough for cutouts. You may need to adjust the flour amount slightly.
Q: How do I get the patterns to look “seamless”?
A: The secret is the parchment paper step. Rolling over the parchment allows you to apply even pressure across the entire surface, pushing the colored dough into the base dough without sticking to the rolling pin.
Q: Is the extra flour necessary?
A: Yes. Most pouch mixes are designed for drop cookies. Adding the 3 tablespoons of flour gives the dough the “body” it needs to be rolled and cut without tearing.
Baking during the holidays should be a joy, not a chore. These Patterned Easter Egg Sugar Cookies offer a sophisticated, modern aesthetic with a surprisingly low-effort process. By utilizing the inlay dough technique, you create treats that look like they came from a high-end bakery but carry the nostalgic, delicious flavor of a classic home-baked sugar cookie. Put on some music, get the family involved in shaping the patterns, and enjoy the colorful results of your spring baking!
PrintEaster Egg Sugar Cookies

Delightful, vibrant Easter egg cookies that look professionally decorated but are incredibly simple to make using a sugar cookie mix and neon food gels.
Ingredients
1 pouch (17.5 oz) Betty Crocker™ Sugar Cookie Mix
1/2 cup butter, softened
3 tablespoons Gold Medal™ All Purpose Flour
1 egg
Betty Crocker™ Neon Gel Food Colors
Instructions
1. In large bowl, stir cookie mix, softened butter, flour, and egg until dough forms.
2. Remove 1/2 cup of dough. Wrap remaining dough in plastic wrap; refrigerate.
3. Divide the 1/2 cup of dough into 4 equal portions. Stir a different gel food color into each portion of dough until desired shade is reached.
4. Heat oven to 375°F. Roll refrigerated dough on floured surface until 3/16-inch thick. Shape colored doughs into long ropes, circles, or zigzag patterns. Place on rolled dough.
5. Place a sheet of cooking parchment paper over dough. Gently roll rolling pin over parchment to press colored dough slightly into dough. Remove parchment.
6. Using 2 1/2-inch oval cookie cutter, cut egg shapes from dough. Place 1 inch apart on ungreased cookie sheets. Refrigerate cookie sheets, uncovered, at least 15 minutes before baking.
7. Bake cookies 8 to 10 minutes or until cookies are set and appear dry on top. Cool 2 minutes before removing from cookie sheet. Cool completely, about 20 minutes.
Notes
Ensure the butter is softened but not melted for the best texture.
Chilling the cut cookies before baking is crucial to prevent spreading and maintain the egg shape.
Use a thin spatula to transfer the delicate dough shapes to the baking sheet.


