There is something undeniably nostalgic about the snap of a Twix bar. That perfect trifecta of crunchy biscuit, chewy caramel, and smooth milk chocolate is a flavor profile that has stood the test of time. But what if I told you that you could capture all that magic in a thick, buttery, homemade cookie?

These Twix Cookies are exactly that. Imagine a melt-in-your-mouth shortbread base that is sturdy enough to hold a generous layer of creamy caramel, all sealed under a glossy coating of milk chocolate. Whether you are looking for a show-stopping holiday cookie or a decadent weekend project, this recipe is guaranteed to be a new favorite.
The best part? They are surprisingly easy to make. While they look like they came from a high-end bakery, the process is straightforward enough for any home baker to master. Let’s dive into why these cookies deserve a permanent spot in your recipe box.
Why You’ll Love This Recipe
- Better Than Store-Bought: Unlike the candy bar, these use real butter and high-quality chocolate, resulting in a much richer flavor.
- The Perfect Texture: You get a crunch from the shortbread, a pull from the caramel, and a snap from the chocolate.
- Large & Substantial: These aren’t thin, flimsy cookies. They are thick (1/2 inch!) and incredibly satisfying.
- Crowd Pleaser: From kids to adults, everyone recognizes the “Twix” flavor profile immediately.
- Make-Ahead Friendly: These cookies stay fresh for days and actually taste better as the flavors meld.
Ingredient
To get that iconic Twix taste, the quality of your ingredients matters. Here’s what you need to know:
- Softened Butter: Use unsalted butter for the best control over flavor. Ensure it is truly softened (room temperature) so it creams properly with the sugar to create that tender shortbread crumb.
- Powdered Sugar: Also known as confectioner’s sugar. Using this instead of granulated sugar gives the shortbread a fine, delicate texture that melts in your mouth.
- All-Purpose Flour: This provides the structure. Make sure to measure using the “spoon and level” method to avoid adding too much flour, which can make the base dry.
- Caramels: Use the classic square caramels (like Kraft). They provide the perfect “chew” once melted.
- Evaporated Milk: This is my “secret weapon” for the caramel layer. It keeps the caramel soft enough to bite through without being so runny that it slides off the cookie.
- Milk Chocolate Chips: To stay true to the Twix brand, milk chocolate is the way to go. However, semi-sweet works beautifully if you prefer things a little less sweet.
- Shortening: Adding just a touch of shortening to the chocolate helps it melt smoothly and gives the finished cookie a beautiful, professional sheen.
Step-by-Step Instructions
1. Prepare the Shortbread Base
Start by preheating your oven to 350°F. In a large mixing bowl (or stand mixer), cream together the softened butter and powdered sugar. You want this mixture to be pale and fluffy—don’t rush this step! Once the butter is ready, mix in the vanilla, flour, and salt. The dough will be thick.
2. The Secret Chill
Wrap your dough in plastic wrap and pop it into the freezer for about 20 minutes. This is a crucial step! Chilling the dough prevents the cookies from spreading too much in the oven, ensuring you keep that perfect 1/2-inch thickness.
3. Roll and Bake
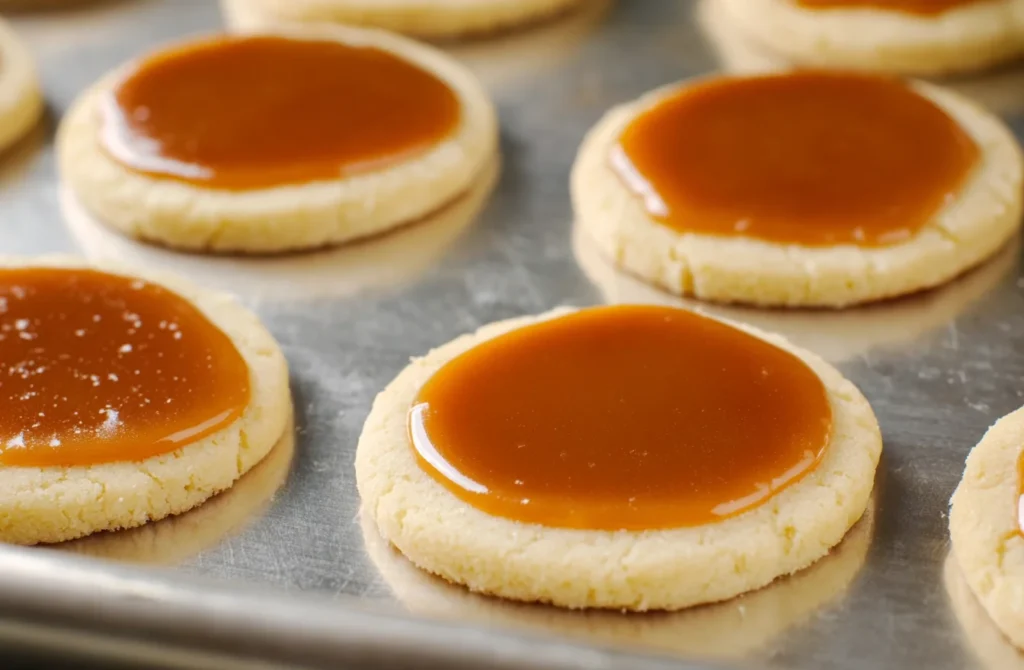
On a lightly floured surface, roll the dough out. You want it thick—about half an inch. Use a round cutter (2 or 3 inches works best) to stamp out your circles. Bake for 12-13 minutes. You aren’t looking for dark brown cookies here; just a light golden edge is perfect. Let them cool completely.
4. The Caramel Layer
Unwrap your caramels and place them in a microwave-safe bowl with the evaporated milk. Microwave in 45-second bursts, stirring in between. Once it’s smooth and silky, spoon a dollop onto each cooled cookie. Use the back of your spoon to swirl it to the edges. Let these sit for about 20 minutes until the caramel is firm.
5. The Chocolate Topping
Finally, melt your chocolate chips and shortening in the microwave (30-second increments). Spread the chocolate over the set caramel. Now comes the hardest part: waiting for the chocolate to harden before you take a bite!
Expert Tips for Best Results
- Don’t Overbake: Shortbread can go from perfect to dry very quickly. Take them out of the oven as soon as the edges show the slightest hint of gold.
- Smooth Caramel: If your caramel starts to thicken while you are topping the cookies, just pop it back in the microwave for 10 seconds to loosen it up.
- The “Spoon Spread”: When applying the chocolate, start in the center and push outward in a circular motion. This creates a clean, rounded look on top of the caramel.
- Avoid Seizing Chocolate: Make sure your bowl and spoon are completely dry. Even a single drop of water can cause melting chocolate to “seize” and become grainy.
Variations and Substitutions
- Salted Caramel Twix: Sprinkle a pinch of Maldon sea salt or flaky salt over the chocolate while it is still wet. It balances the sweetness beautifully.
- Dark Chocolate Twix: Swap the milk chocolate chips for 60% or 70% cacao dark chocolate for a more “grown-up” version.
- Twix Bars: Instead of cutting circles, you can press the dough into a 9×13 pan, bake, and then layer the caramel and chocolate on top before slicing into bars.
- Nutty Twist: Add a layer of chopped toasted pecans or peanuts on top of the caramel before adding the chocolate.
Storage and Freezing
To Store: Keep your Twix Cookies in an airtight container at room temperature for up to 5 days. If your kitchen is very warm, you may want to store them in the fridge to keep the chocolate from softening.
To Freeze: These cookies freeze beautifully! Place them in a single layer on a baking sheet to freeze solid, then transfer to a freezer-safe bag for up to 3 months. Thaw at room temperature for an hour before serving.
FAQ
Can I use store-bought caramel sauce?
I don’t recommend using jarred caramel sauce (like the kind for ice cream). It is too thin and won’t hold its shape on the cookie. Stick to melting down caramel squares or making a thick stovetop caramel.
Why is my shortbread crumbly?
If the dough is too crumbly to roll, you may have added too much flour. Try adding a teaspoon of room-temperature water or milk to the dough to help it bind. Also, ensure your butter was properly softened.
Can I use coconut oil instead of shortening?
Yes! Coconut oil will also help the chocolate melt smoothly and provide a nice shine, though it may make the chocolate soften faster at room temperature.
These Homemade Twix Cookies are a labor of love that pays off in every bite. They are the perfect addition to a holiday cookie tray, a backyard BBQ, or just a Tuesday afternoon when you need a little something sweet. The combination of the buttery base and the rich toppings is simply irresistible.
If you make these, be sure to leave a comment and let me know how they turned out! Happy baking!
PrintEasy Twix Cookies

These Twix Cookies are a dream come true for candy lovers! A thick, buttery shortbread base is topped with chewy caramel and a smooth layer of milk chocolate. They taste just like the classic candy bar but even better because they are homemade.
Ingredients
1 1/2 cups butter softened
1 cup powdered sugar
1 1/2 teaspoons vanilla extract
3 cups all purpose flour
1/4 teaspoon salt
11 ounces caramels (unwrapped)
1 tablespoon evaporated milk or cream
2 cups milk chocolate chips
2 teaspoons shortening
Instructions
1. Preheat the oven to 350 degrees F. Line a sheet pan with parchment paper or a nonstick baking mat.
2. Place the butter in the bowl of a mixer and beat until light and fluffy. Add the powdered sugar and beat until combined.
3. Add the vanilla extract, flour and salt to the bowl. Mix until combined.
4. Place the dough on a sheet of plastic wrap. Fold the plastic wrap around the dough and chill in the freezer for 20 minutes.
5. Flour your work surface and roll out the dough into a 1/2 inch sheet.
6. Use a 2 or 3 inch round cookie cutter to cut out cookies. Place the cookies 1 inch apart on the prepared baking sheet.
7. Bake the cookies for 12-13 minutes or until edges are light brown. Repeat the process with the remaining dough.
8. Cool the cookies on a rack.
9. Place the caramels and evaporated milk in a bowl. Microwave at 45 second increments until caramel is melted. Stir until smooth.
10. Place a spoonful of caramel onto each cookie, using the back of the spoon to spread it to the edges of the cookie.
11. Let the cookies sit until caramel has firmed up, about 20 minutes.
12. Place the milk chocolate chips and shortening into a bowl. Microwave in 30 second increments until chocolate is melted. Stir until smooth.
13. Place a spoonful of melted chocolate onto each cookie and spread it over the caramel layer.
14. Let the cookies sit until the chocolate has hardened, then serve.
Notes
Recipe adapted from Chef in Training.
Make sure the shortbread is completely cool before adding the caramel layer.
For a salted version, sprinkle a tiny pinch of flakey sea salt over the wet chocolate layer.