Every year, Halloween rolls around, and I find myself wanting to make something spooky and fun, but also super easy and delicious. That’s how I stumbled upon these adorable Ghost Taco Hand Pies (Cute and Easy!)! They’ve become a total hit in my house, perfect for a festive snack or a fun dinner with the kids. There’s just something so joyful about biting into a warm, savory hand pie shaped like a friendly little ghost!
Why You’ll Love This Ghost Taco Hand Pies (Cute and Easy!)
- They’re incredibly cute and perfect for Halloween parties or a fun family meal.
- Super easy to make, even for beginner bakers – no complicated techniques here!
- The savory taco filling is so flavorful and comforting in every bite.
- They’re perfectly portioned and easy to eat, especially with a dip!
Ingredients You’ll Need
- Ground Meat (Beef, Turkey, or Chicken): I usually go for lean ground beef, but ground turkey or chicken work beautifully if you prefer. Just make sure to brown it well!
- Taco Seasoning: This is where all that classic taco flavor comes from! Use your favorite brand.
- Shredded Carrot or Chopped Bell Pepper/Baby Spinach: These are totally optional, but they’re a great way to sneak in some extra veggies. They blend right into the filling!
- Pie Crusts: You’ll want the pre-made, defrosted kind for ultimate ease. No need to make pie dough from scratch unless you want to!
- Shredded Mexican Cheese: This melts beautifully and adds a lovely creamy, cheesy element to the savory filling.
- Egg: Just one egg, mixed with a splash of water or milk, creates a gorgeous golden-brown crust.
- Salsa: Essential for dipping! Choose your favorite mild or spicy salsa.
How to Make Ghost Taco Hand Pies (Cute and Easy!) Step by Step
First things first, let’s get that delicious taco filling cooking! Grab a medium skillet and set it over medium-high heat. Once it’s nice and hot, add your ground beef (or turkey/chicken – if using poultry, a little olive oil first helps prevent sticking). Break it up with a spoon until it’s all crumbly. Now, stir in your taco seasoning and any optional veggies like shredded carrot or bell pepper. Cook it for about 5-6 minutes until the meat is fully browned, continuing to break up any larger pieces. Once it’s done, take it off the heat and set it aside to cool a bit.
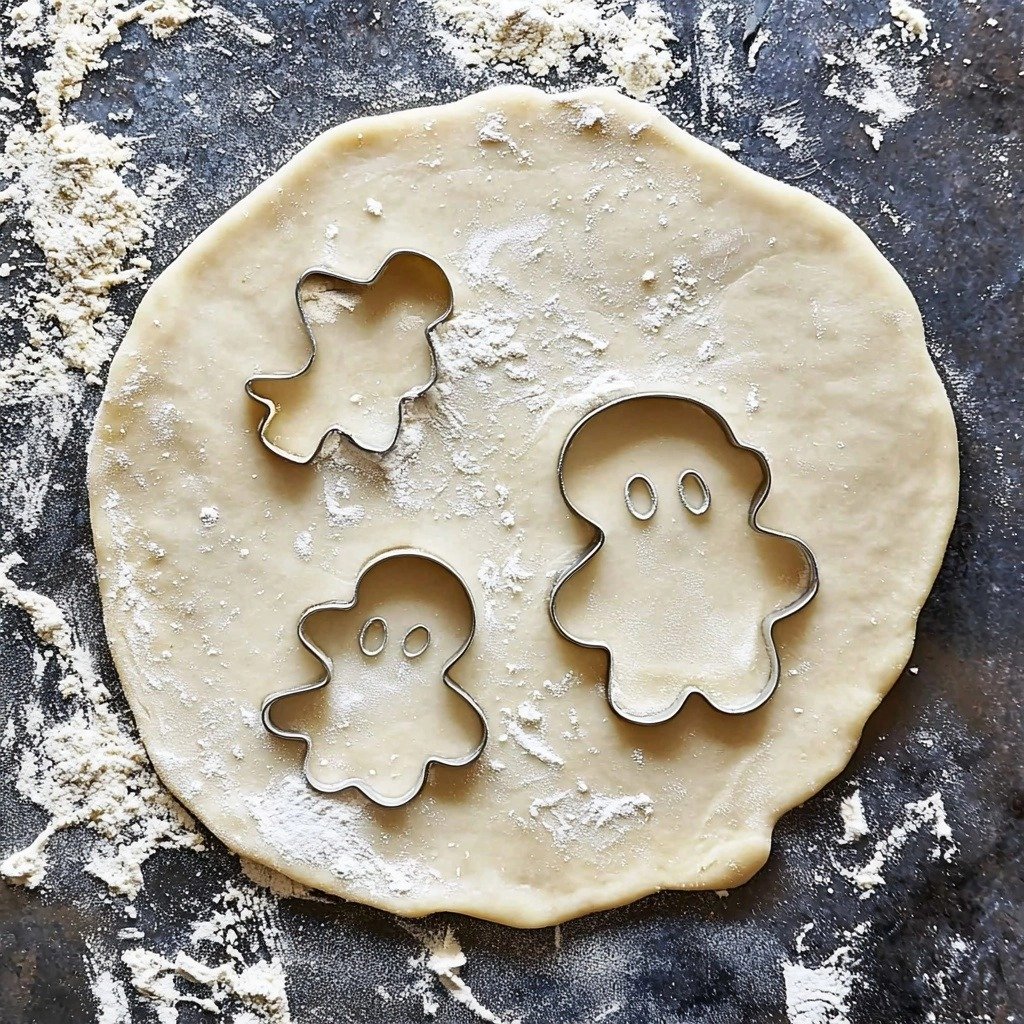
While your filling cools, preheat your oven to a cozy 425 degrees F. Line two large baking sheets with parchment paper or silicone mats – this makes cleanup a breeze! Now for the fun part: roll out your defrosted pie crusts on a lightly floured surface. Use your ghost-shaped cookie cutters to cut out as many ghosts as you can. Remember, you’ll need two ghosts for each hand pie – one for the bottom and one for the top. Don’t worry about the scraps; just gather them up, re-roll, and cut out more ghosts until you’ve used all the dough.
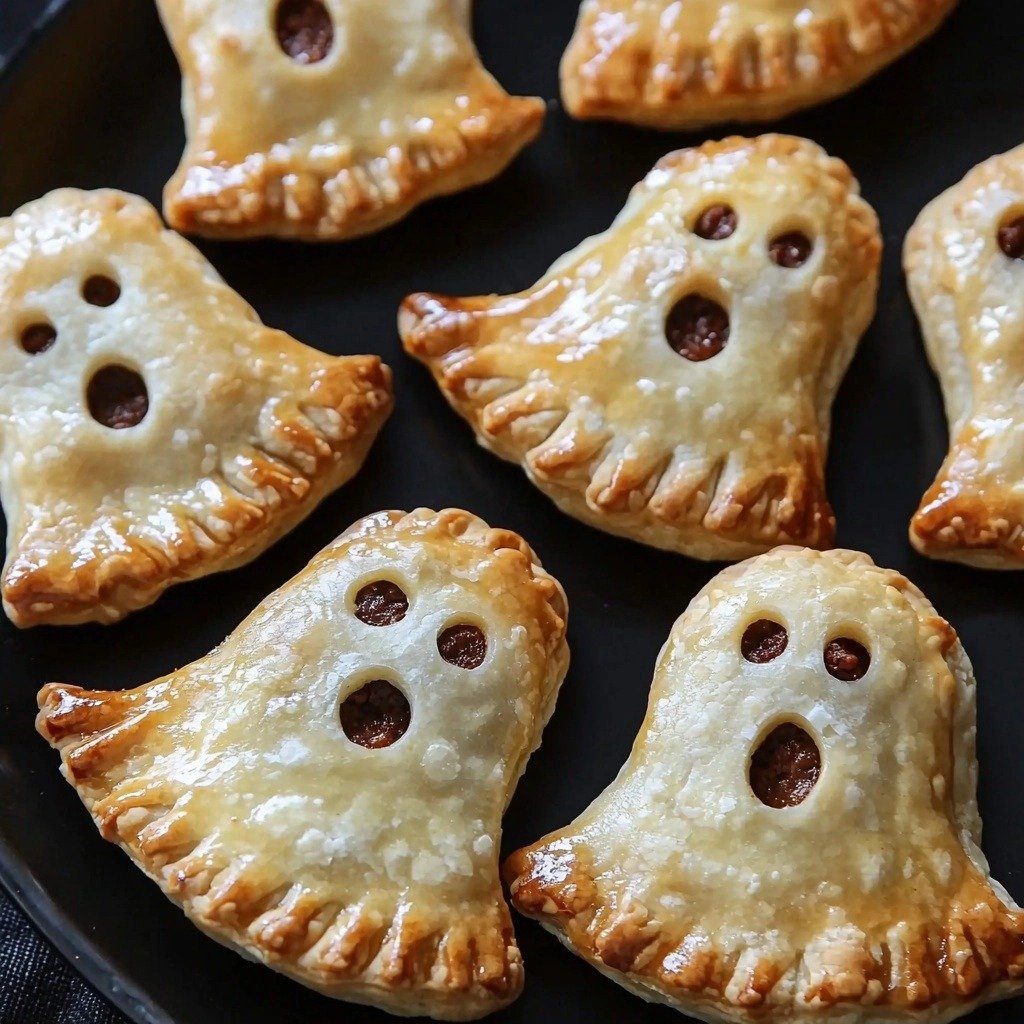
Arrange half of your ghost shapes on your prepared baking sheets, leaving a little space between each. Spoon a small amount of that yummy taco filling right into the center of each ghost, then sprinkle a bit of shredded Mexican cheese on top. Now, for the ghost faces! Take the remaining ghost shapes and use something small and round (like a marker lid or a piping tip) to cut out little eyes and maybe a mouth. Place one of these cut-out ghosts over each filled ghost on the baking sheet. Use the tines of a fork to gently press and seal all the edges around each hand pie – this keeps all that delicious filling inside! Finally, whisk an egg with a splash of water or milk to make an egg wash, and brush it over the top of each mini pie. This will give them that beautiful golden-brown finish. Bake for 10-14 minutes, until they’re perfectly golden. Let them cool for just a minute or two, and then they’re ready to be devoured with some salsa!
My Top Tips for Success
- I always make sure my pie crusts are fully defrosted but still cold before I start cutting. It makes them much easier to work with.
- In my experience, don’t overfill the ghosts! A small spoonful of filling is just right to ensure they seal well.
- Trust me on this one: use parchment paper or silicone mats. It prevents sticking and makes transferring them a breeze.
- If you don’t have a ghost cookie cutter, you can totally freehand cut ghost shapes with a knife – they’ll be charmingly rustic!
- Make sure your egg wash covers the entire top surface for that beautiful, even golden color.
Common Mistakes to Avoid
- Overfilling the hand pies: This can cause them to burst open during baking, and all that delicious filling will leak out. Keep the filling amount modest!
- Not sealing the edges properly: If the edges aren’t pressed firmly with a fork, your hand pies might pop open. Take your time with this step.
- Baking at too low a temperature: These need a hot oven (425°F) to get that lovely golden, flaky crust quickly. Don’t be tempted to lower the heat.
- Skipping the egg wash: Without it, your hand pies won’t get that beautiful golden brown color and slightly crisp finish.
How to Store Ghost Taco Hand Pies (Cute and Easy!)
- Room Temperature: Up to 1 day in an airtight container.
- Refrigerator: Up to 3-4 days in an airtight container. Reheat in the oven or air fryer for best results.
- Freezer (Unbaked): Place cut and filled hand pies (before egg wash) on a baking sheet and freeze until solid. Transfer to a freezer-safe bag for up to 1 month. Bake from frozen, adding an extra few minutes to the baking time.
- Freezer (Baked): Once completely cooled, wrap individually in plastic wrap, then place in a freezer-safe bag for up to 1 month. Reheat in the oven or air fryer.
Frequently Asked Questions
Can I make these ahead of time?
Yes, absolutely! You can prepare the taco filling a day or two in advance. You can also assemble the unbaked hand pies and freeze them for later.
What if I don’t have a ghost cookie cutter?
No problem! You can use any round or even square cookie cutter and then gently pinch the top to create a ghost-like shape. Or simply cut freehand with a knife.
Can I use different fillings?
While this recipe is for Ghost Taco Hand Pies, the concept works with other fillings! Just make sure any filling isn’t too wet, or it might make the crust soggy.
How do I reheat leftover hand pies?
The best way to reheat them is in a toaster oven or conventional oven at about 350°F (175°C) for 5-10 minutes, until warmed through and crispy. An air fryer also works great!
Can I make these vegetarian?
Definitely! You can easily substitute the ground meat with a plant-based ground crumble or black beans seasoned with taco seasoning.
I hope these Ghost Taco Hand Pies (Cute and Easy!) bring a smile to your face and a delicious aroma to your kitchen! They’re such a fun way to celebrate the season. If you make them, I’d absolutely love to hear how they turned out and see your adorable ghost creations!
PrintGhost Taco Hand Pies (Cute and Easy!)

Adorable, savory hand pies shaped like ghosts, filled with a delicious taco meat and cheese filling, perfect for a fun and easy snack or meal.
- Prep Time: 20
- Cook Time: 12
- Total Time: 32
- Yield: 8-12 hand pies
- Category: Appetizer, Snack, Dinner
- Method: Baking
- Cuisine: American
Ingredients
- 1 pound lean ground beef, ground turkey, or chicken
- 1 Tablespoon taco seasoning
- 1/4 cup shredded carrot (optional)
- 1/4 cup chopped bell pepper or baby spinach (optional)
- 2 pie crusts, defrosted but unbaked
- 1/3 cup shredded Mexican cheese
- 1 egg for brushing
- salsa for dipping
Instructions
- Set a medium skillet over medium-high heat.
- Add the ground beef to the hot skillet.
- Break the ground beef apart into crumbles as it cooks.
- (If using ground turkey or chicken, warm a drizzle of olive oil in the skillet first).
- Add taco seasoning to the meat.
- Add shredded carrot or pepper, if using.
- Cook for 5-6 minutes, until the meat is browned and fully cooked.
- Continue to break the meat into small pieces as it cooks.
- Remove the skillet from the heat and set the filling aside to cool slightly.
- Preheat the oven to 425 degrees F.
- Line two large baking sheets with parchment paper or silicone baking mats.
- Roll out the defrosted pie crusts on a lightly floured pastry mat or counter.
- Use ghost-shaped cookie cutters to cut out shapes from the pie crusts.
- Ensure you have an even number of ghost shapes for tops and bottoms.
- Gather and re-roll any pie crust scraps until all dough is used.
- Arrange half of the cut ghost shapes on the prepared baking sheets, leaving space between each.
- Spoon a small amount of the cooled taco filling into the middle of each ghost shape.
- Sprinkle a bit of shredded Mexican cheese on top of the filling.
- From the remaining ghost shapes, use a small, round object (like a marker lid) to cut out eyes and/or a mouth.
- Place one of the ghost shapes with cut-outs over each filled ghost on the baking sheets.
- Use the tines of a fork to gently seal all the edges of each hand pie.
- Mix the egg with a splash of water or milk in a small bowl to make an egg wash.
- Brush the egg wash on top of each mini pie.
- Bake for 10-14 minutes, until the tops are golden brown.
- Remove the hand pies from the oven.
- Let them cool for a minute or two before serving.
- Serve with salsa for dipping.
Notes
Don’t overfill the hand pies to prevent bursting.
Ensure pie crusts are defrosted but still cold for easy handling.
Press the edges firmly with a fork to seal completely.
For extra flaky crust, make sure your oven is preheated to 425°F.


