
I’ll never forget the first time I attempted ginger molasses cookies. It was a chilly autumn evening, and I had this romantic vision of producing perfectly spiced, bakery-quality cookies. What I got instead? Flat, burnt-edged disasters that tasted more like gingerbread gone wrong than the comforting treat I craved.
But here’s the thing about failure—it teaches you everything. After testing this recipe nine times (yes, nine!), I discovered the secret ingredient that transforms ordinary ginger molasses cookies into something extraordinary: brown butter. That nutty, caramel-like depth takes these classic comfort cookies from nostalgic to next-level delicious.
As someone who loves the warm, cozy flavors of fall and winter baking, I’ve made it my mission to perfect this recipe. Whether you’re searching for the ultimate holiday cookie platter addition or simply craving something sweet and spicy with your afternoon coffee, these ginger molasses cookies deliver every single time.
Why This Ginger Molasses Cookie Recipe Works
The Brown Butter Secret
Let me tell you about the game-changer in this recipe: brown butter. When you heat butter past its melting point, the milk solids caramelize and create this incredible nutty aroma. It’s like adding an extra layer of flavor complexity without any additional ingredients.
I tested this recipe with both regular melted butter and brown butter side by side. The brown butter version won unanimously among my taste testers (aka my family). The nutty undertones complement the warm ginger and molasses perfectly, creating a depth of flavor that makes people ask, “What’s that amazing taste I can’t quite identify?”
The key is watching your butter carefully. You’ll hear it crackle, see it foam, then suddenly smell that unmistakable nutty aroma. The color shifts from golden to amber—that’s your cue to remove it from heat immediately.
Perfect Spice Balance
After nine rounds of testing, I landed on the ideal spice ratio: two teaspoons of ground ginger paired with one teaspoon of cinnamon. Too much ginger and the cookies taste medicinal. Too little, and you lose that signature warmth. This ratio gives you bold ginger flavor with cinnamon providing a sweet, aromatic background note.
The molasses adds its own subtle spice notes along with that characteristic dark, almost bittersweet flavor. Using dark brown sugar instead of light adds extra molasses notes and creates a chewier texture.
The Chill Factor
Here’s something I learned the hard way: skipping the chill time is a recipe for disappointment. During my third test batch, I was impatient and baked the cookies immediately after mixing. They spread too thin and lost that perfect chewy center.
The one-hour chill time serves multiple purposes. It allows the flour to fully hydrate, creates a better texture, and most importantly, prevents excessive spreading during baking. Trust me on this one—set that timer and wait.
Ingredients You’ll Need
Main Ingredients
For the Perfect Cookie Base:
- 9 tablespoons unsalted butter (127g) – The star of the show once browned to perfection
- 1/2 cup dark brown sugar (96g) – Packed, for extra moisture and molasses flavor
- 1/4 cup granulated sugar (48g) – Balances the sweetness and helps with spreading
- 3 tablespoons molasses – Use regular (not blackstrap) for the best flavor
For Structure and Flavor:
- 2 large egg yolks at room temperature – Creates richness without excess moisture; room temp ensures proper emulsification
- 1 teaspoon vanilla extract – Enhances all the warm spices
- 1 cup + 2 tablespoons all-purpose flour (135g) – Just enough structure without making them cakey
Spice Blend:
- 2 teaspoons ground ginger – The star spice; don’t skimp on this
- 1 teaspoon cinnamon – Warm, sweet aromatics
- 1/2 teaspoon baking soda – Creates lift and spread
- 1/4 teaspoon salt – Balances sweetness and enhances flavors
Pro tip: I always take my eggs out of the fridge about 30 minutes before starting. Cold eggs can cause the brown butter to seize up, creating a grainy texture instead of a smooth, glossy dough.
Optional Add-ins
While I love these cookies exactly as written, here are some variations I’ve tested:
- Crystallized ginger pieces – Fold in 1/4 cup for extra ginger punch
- Coarse sugar for rolling – Roll dough balls in turbinado sugar before chilling for a sparkly, crunchy exterior
- White chocolate chips – The sweetness pairs beautifully with the spicy ginger
Smart Substitution Guide
Can’t find dark brown sugar? Light brown sugar works, though you’ll lose some molasses depth. You can also make your own by mixing 1/2 cup granulated sugar with 1 tablespoon molasses.
Out of molasses? In a pinch, you can use honey or maple syrup, but know that you’ll lose that distinctive molasses flavor that makes these cookies special. Check out my white chocolate stuffed cookies for a molasses-free alternative.
Need to use whole eggs instead of yolks? You can use one whole egg, but the cookies will be slightly cakier and less rich. The yolks create that dense, chewy texture we’re after.
Step-by-Step Instructions
Step 1: Master the Brown Butter (5-7 minutes)
Place your 9 tablespoons of butter into a nonstick, heavy-bottomed pot or light-colored pan (this helps you see the color change). Heat over medium heat—not high, as you need time to develop flavor without burning.
Watch as the butter melts completely. It will begin to foam and you’ll hear a gentle crackling sound. This is the water in the butter evaporating. Keep stirring with a spatula, scraping the bottom of the pan frequently.
After about 5 minutes, you’ll notice the foam settling and brown flecks appearing at the bottom. Suddenly, you’ll smell it—that unmistakable nutty, almost caramel-like aroma. The butter will turn from bright yellow to golden amber.
Critical moment: As soon as you see amber color and smell that nutty aroma, immediately remove from heat and pour everything—including all those precious brown bits—into a large, heat-proof bowl. The residual heat in the pan can quickly turn your perfectly brown butter into burnt butter, so don’t delay this step.
Let it cool for about 5 minutes. You want it warm, not hot, before adding the sugars.
Step 2: Build Your Cookie Base (3-4 minutes)
Add both your dark brown sugar and granulated sugar to the slightly cooled brown butter. Using a whisk or sturdy spatula, mix vigorously for about a minute. The mixture won’t be smooth yet—that’s normal. You’re essentially creating a brown butter caramel base.
Pour in your 3 tablespoons of molasses. Keep stirring until the mixture thickens and becomes glossy. This takes about 30-60 seconds. The molasses adds moisture and that deep, complex sweetness.
Now add your room-temperature egg yolks and vanilla extract. This is where the magic happens. Whisk vigorously for 1-2 minutes until the mixture transforms into a thick, glossy, almost mousse-like consistency. Make sure to scrape the bottom and sides of your bowl—you don’t want any unmixed butter lurking around.
Why this matters: Proper emulsification at this stage creates a cohesive dough that bakes up with perfect texture. Undermixing leaves you with greasy cookies.
Step 3: Add the Dry Ingredients (2 minutes)
In this step, restraint is your friend. Measure out your flour, cinnamon, ground ginger, baking soda, and salt. You can whisk them together in a separate bowl, or simply add them directly to your wet ingredients.
Using a spatula or large spoon (not a whisk anymore), gently fold the dry ingredients into the wet mixture. Use a folding motion—cutting down through the center, scraping along the bottom, and bringing the batter up and over.
Mix just until no dry flour streaks remain. You’ll notice the dough is quite soft and sticky—that’s perfect. Overmixing develops gluten, which creates tough, cakey cookies instead of the chewy texture we want.
Step 4: The Essential Chill (1 hour)
Line a cookie sheet with parchment paper. Using a cookie scoop (2 1/2 to 3 tablespoons capacity) or a large spoon, portion out 8 equal mounds of dough onto your prepared sheet. They can be close together since they’re just chilling, not baking yet.
Place the entire sheet in the refrigerator for one hour. I know it’s tempting to skip this, but don’t. I’ve tested it both ways, and chilled dough produces dramatically better cookies—thicker, chewier, with better flavor development.
Pro tip: If you need cookies faster, you can chill for a minimum of 30 minutes, but one hour is ideal. You can also prepare the dough the night before and chill overnight—just cover with plastic wrap.
Step 5: Bake to Perfection (9-11 minutes)
When you’re ready to bake, preheat your oven to 350°F (177°C). This is important—don’t put cookies into a still-warming oven.
If you’re baking all 8 cookies at once, you’ll likely need two cookie sheets lined with parchment paper. Space the cookies about 3 inches apart to allow for spreading.
Bake for 9-11 minutes. Here’s what you’re looking for: the edges should be set and just starting to turn golden, while the centers still look slightly underdone and puffy. They may even look a bit wet in the middle—that’s perfect.
The hardest part: Let them cool on the baking sheet for 15-30 minutes before transferring. I know it’s torture, but these cookies continue cooking from residual heat. Move them too soon and they’ll fall apart. Wait, and they’ll firm up into perfectly chewy cookies with slightly crisp edges.
Expert Tips & Tricks
Pro Chef Secrets I Learned the Hard Way
Use a kitchen scale: After my first failed batch, I invested in a digital scale. Measuring flour by weight (135g) instead of volume ensures consistency every time. Too much flour creates dry, crumbly cookies.
Don’t skip the room temperature eggs: I tested this variable specifically. Cold eggs from the fridge made the brown butter seize and solidify, creating a chunky, separated dough instead of smooth and emulsified. The 30-minute wait is worth it.
Rotate your baking sheet: My oven (like most home ovens) has hot spots. Halfway through baking, rotate your sheet 180 degrees for even browning. This simple step prevents some cookies from overbaking while others underbake.
The crackle test: A perfectly baked ginger molasses cookie should have a crackled, slightly matte surface when it comes out of the oven. If they’re shiny and smooth, they need another minute.
Troubleshooting Guide
Cookies spreading too thin?
- Your butter may have been too warm when you added the sugar
- You may have undermixed the flour
- The dough didn’t chill long enough
- Your oven temperature might be too low (use an oven thermometer to verify)
Cookies too cakey?
- Likely too much flour—spoon and level your flour rather than scooping
- Overmixing after adding flour develops excess gluten
- Using whole eggs instead of just yolks adds too much moisture
Cookies taste burnt but look okay?
- Your brown butter went too far—it should be amber, not dark brown
- The brown bits (milk solids) burnt in the pan before you transferred to a bowl
Not enough ginger flavor?
- Ground ginger loses potency over time—check your spice’s freshness
- You may prefer a spicier cookie—try increasing to 2 1/2 teaspoons next time
- Consider adding 2 tablespoons minced crystallized ginger for extra punch
Make-Ahead Instructions
Prep the dough in advance: You can prepare the entire dough up to 2 days ahead. After scooping, cover the cookie sheet tightly with plastic wrap and refrigerate. Bake directly from the fridge, adding an extra minute to baking time if needed.
Freeze for later: This is my favorite trick for having fresh cookies anytime. After scooping the dough, place the baking sheet in the freezer for 12-24 hours until the dough balls are solid. Transfer to a freezer-safe bag or container and freeze for up to 3 months. To bake from frozen, reduce oven to 325°F and bake for 12-14 minutes.
Brown the butter ahead: You can brown butter up to one week in advance. Store in an airtight container in the refrigerator, then gently warm to room temperature (or slightly warm) before proceeding with the recipe.
Serving Suggestions & Storage
Perfect Pairings
These ginger molasses cookies shine alongside:
Beverages:
- Hot coffee with cream (the bitter coffee cuts the sweetness perfectly)
- Spiced chai tea latte
- Cold glass of whole milk
- Hot apple cider
Dessert Platters: These are perfect for cookie exchanges or holiday gatherings. I love pairing them with lighter, less spicy options for contrast. Try them alongside my stuffed red velvet cookies or pistachio NYC cookies for a diverse cookie platter.
Ice Cream Sandwiches: Let the cookies cool completely, then sandwich a scoop of vanilla ice cream or dulce de leche between two cookies. Roll the edges in toffee bits or mini chocolate chips. Freeze for 30 minutes before serving.
Presentation Ideas
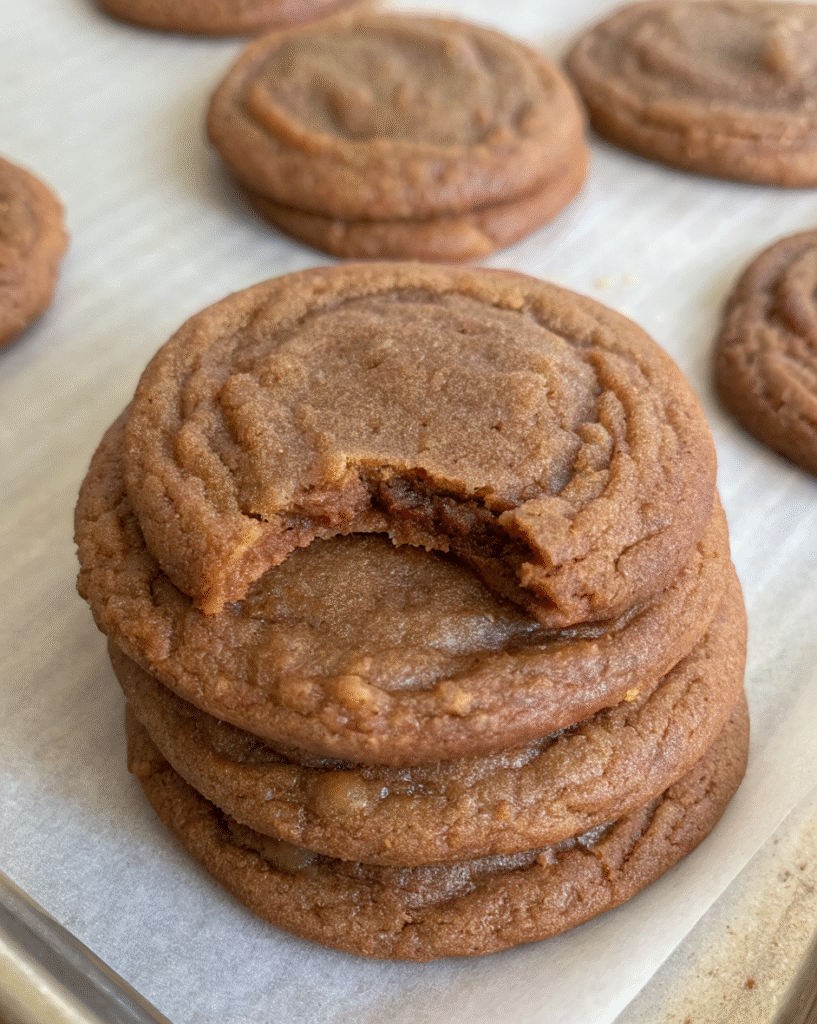
The Stack: Photograph them stacked on a rustic wooden board with a glass of milk nearby. The height creates visual drama.
The Plate: Arrange on a vintage plate with a linen napkin underneath. Break one cookie in half to show the chewy interior.
The Gift: Package 4 cookies in a cellophane bag tied with baker’s twine. Add a small tag with baking instructions if gifting the frozen dough.
Storage & Reheating
Room Temperature: Store fully cooled cookies in an airtight container at room temperature for 3-5 days. They’ll taste best within the first day or two when the edges are still slightly crisp.
Refrigerator: For longer storage (up to one week), keep them in an airtight container in the fridge. This is especially important if your kitchen is warm or humid.
Freezing Baked Cookies: Fully cooled cookies can be frozen for up to 2 months. Layer between parchment paper in a freezer-safe container. Thaw at room temperature for 30 minutes before serving.
Reheating Tip: Warm cookies in a 300°F oven for 3-5 minutes to recreate that fresh-baked texture and aroma. They’ll taste like they just came out of the oven!
Frequently Asked Questions
Can I use blackstrap molasses instead of regular molasses?
I don’t recommend it. Blackstrap molasses has a much stronger, more bitter flavor that can overpower the other ingredients. It’s also less sweet. Stick with regular (or “fancy”) molasses for the best flavor balance. If you accidentally use blackstrap, reduce the amount to 2 tablespoons and add an extra tablespoon of dark brown sugar.
Why do you use only egg yolks instead of whole eggs?
Egg yolks contain fat and lecithin, which create richness and help emulsify the dough, resulting in a dense, chewy texture. Egg whites contain mostly water and protein, which would make these cookies cakier and puffier—more like a ginger cookie cake than a chewy ginger molasses cookie. I tested both versions, and the yolk-only version won by a landslide.
Can I double this recipe?
Absolutely! This recipe doubles beautifully. Just make sure you have a large enough bowl for mixing. I recommend browning the butter in batches if doubling—it’s easier to control and less likely to burn. You’ll get 16 cookies from a double batch, perfect for cookie exchanges or freezing half for later.
My cookies turned out flat. What went wrong?
The most common causes are: (1) butter that was too warm when you added the sugar, (2) not chilling the dough long enough, (3) too much liquid or not enough flour, or (4) old baking soda that’s lost its leavening power. Make sure you’re measuring flour correctly—spoon it into the measuring cup and level off rather than scooping directly from the bag.
Can I make these cookies vegan?
The brown butter is central to this recipe’s flavor, so I haven’t successfully tested a vegan version. However, you could try using vegan butter for browning and replacing the egg yolks with 3 tablespoons of aquafaba (chickpea liquid) or a commercial egg replacer. The texture will be different, but you’ll still get great ginger molasses flavor.
Are these cookies crispy or chewy?
These are primarily chewy cookies with slightly crisp edges. If you prefer crispier cookies, bake for 12-13 minutes instead of 9-11. For extra chewy centers, pull them at exactly 9 minutes—the centers will look underdone but will set as they cool.
How do I know when the brown butter is done?
You’re looking for three indicators happening simultaneously: (1) the color changes from golden yellow to amber, (2) you smell a distinct nutty aroma (like toasted hazelnuts), and (3) you see brown specks settling at the bottom of the pan. This typically takes 5-7 minutes over medium heat. If it starts smelling acrid or turning dark brown, you’ve gone too far.
Can I add chocolate chips to these cookies?
While I love chocolate, I personally think it competes with the ginger and molasses flavors rather than complementing them. If you want to try it, fold in 1/2 cup of dark chocolate chips after adding the flour. For a chocolate-forward cookie, check out my peanut butter Nutella cookies or crème egg stuffed cookies.
The Secret to Perfect Ginger Molasses Cookies
After testing this recipe nine times, baking countless batches, and yes, eating far too many cookies in the name of recipe development, I can confidently say this is the best ginger molasses cookie recipe you’ll find. The brown butter creates complexity that elevates these from simple spice cookies to something truly special.
What I love most about this recipe is how it brings people together. Every time I bake these, my kitchen fills with the most incredible aroma—warm ginger, sweet molasses, and that nutty brown butter scent. Neighbors suddenly remember they need to “borrow something,” and family members appear asking “what smells so good?”
These cookies embody everything I love about comfort food baking. They’re not fussy or complicated, but they deliver sophisticated flavor. They’re perfect for holiday cookie platters, afternoon tea, or simply treating yourself after a long day.
Whether you’re an experienced baker or just starting your cooking journey, this recipe will serve you well. The techniques you’ll learn—especially browning butter—will translate to countless other recipes. Take your time, follow the steps, and don’t skip the chill time. Trust the process.
I hope these ginger molasses cookies become a staple in your home like they have in mine. There’s something deeply satisfying about pulling a tray of perfectly golden, aromatic cookies from the oven. It’s a small act of love—for yourself, your family, or whoever you choose to share them with.
Ready to start baking? Grab your ingredients, set aside two hours, and get ready to fall in love with the best ginger molasses cookies you’ve ever tasted. Don’t forget to share your results—I love seeing how your cookies turn out!
PrintGinger Molasses Cookies
These Ginger Molasses Cookies are made with rich brown butter, warm ginger spice, and a chewy center with crisp edges. A cozy cookie perfect for the holidays or anytime you crave deep caramel flavor with a hint of spice.
- Prep Time: 15–20 minutes
- Cook Time: 9–11 minutes
- Total Time: 2 hours
- Yield: 8 large cookies
- Category: Dessert, Cookies
- Cuisine: American
Ingredients
9 tablespoons unsalted butter (127g)
1/2 cup dark brown sugar, packed (96g)
1/4 cup granulated sugar (48g)
3 tablespoons molasses
2 large egg yolks, at room temperature
1 teaspoon vanilla extract
1 cup + 2 tablespoons all-purpose flour (135g)
2 teaspoons ground ginger
1 teaspoon cinnamon
1/2 teaspoon baking soda
1/4 teaspoon salt
Instructions
1. Brown the butter: In a nonstick heavy-bottomed pot over medium heat, melt butter and cook, stirring constantly, until amber-colored and nutty, about 5–7 minutes. Immediately transfer to a large heat-proof bowl and cool for 5 minutes.
2. Mix wet ingredients: Add both sugars to the brown butter and whisk for 1 minute. Add molasses and stir until thick. Whisk in egg yolks and vanilla for 1–2 minutes until thick and glossy.
3. Add dry ingredients: Add flour, ginger, cinnamon, baking soda, and salt. Fold gently with a spatula just until no dry streaks remain. Do not overmix.
4. Chill: Scoop 8 cookie portions (2½–3 tbsp each) onto a parchment-lined baking sheet. Refrigerate for 1 hour.
5. Bake: Preheat oven to 350°F (175°C). Arrange dough 3 inches apart on two lined sheets if needed. Bake 9–11 minutes until edges set and centers look slightly underbaked. Cool 15–30 minutes on the pan before serving.
Notes
Storage: Store in airtight container at room temperature for 3–5 days, or refrigerate up to 1 week.
Freezing: Freeze unbaked cookie dough balls up to 3 months. Bake from frozen at 325°F for 12–14 minutes.
Pro Tip: Don’t skip browning the butter — it deepens the cookie’s toffee-like flavor.
Nutrition: 38g carbohydrates per cookie (calculated for diabetes management).


