
There’s something deeply nostalgic about biting into a thick chocolate shell and discovering a soft, fluffy marshmallow center inside. These Homemade Chocolate Marshmallow Eggs bring back memories of Easter baskets, candy-filled tables, and that unmistakable sweetness that only comes once a year.
While store-bought versions are easy to grab, making them from scratch feels special. You control the texture. You control the chocolate. And best of all, you get that ultra-fresh marshmallow center that tastes lighter and softer than anything wrapped in foil.
Yes, this recipe takes a little time. But the process feels almost magical. You create egg molds using flour, whip up glossy marshmallow filling, and dip each piece in rich chocolate before finishing with colorful drizzles.
If you love classic Easter candy and want something that truly stands out, these Homemade Chocolate Marshmallow Eggs deliver.
Why You’ll Love These Homemade Chocolate Marshmallow Eggs
- Thick chocolate shell with soft, fluffy center
- Classic Easter candy made from scratch
- Perfect for gifting or Easter baskets
- Impressive yet surprisingly simple technique
- Customizable with different chocolate colors
- Long-lasting and freezer-friendly
These look like they came from a candy shop, but they come straight from your kitchen.
Ingredient Notes and Important Tips
Before starting, read through this section carefully. Candy-making requires attention to detail.
All-Purpose Flour
You’ll use flour to create egg-shaped molds. It acts as a supportive base for shaping the marshmallow. Make sure it’s evenly spread and smooth.
Egg (Washed)
You will use a real egg to create indentations in the flour. Wash it in a mild bleach solution as directed to sanitize it.
Unflavored Gelatin
Gelatin gives structure to the marshmallow filling. Sprinkle it over cold water and allow it to bloom fully before mixing.
Sugar and Corn Syrup
These create the marshmallow base. Corn syrup prevents crystallization and keeps the texture smooth.
Candy Thermometer
This is essential. The sugar mixture must reach 238 degrees (soft-ball stage). Guessing the temperature can ruin the texture.
Chocolate Candy Coating
Candy coating works better than regular chocolate because it sets firmly without tempering.
Colored Candy Coating Disks
These add festive flair. Melt them separately for drizzling.
Step-by-Step Instructions
Step 1: Prepare the Flour Molds
Spread:
- 7 cups flour in each of three 13×9-inch pans
- 4 cups flour in a 9-inch square pan
Smooth the flour evenly.
Wash the egg in a mild bleach solution (1 teaspoon bleach to 1 quart warm water). Rinse and dry completely.
Press the egg halfway into the flour to create an egg-shaped indentation.
Repeat 35 times, spacing them about 2 inches apart.
Set the pans aside.
Step 2: Bloom the Gelatin
In a small bowl, sprinkle gelatin over 1/2 cup cold water.
Let it sit and bloom while you prepare the sugar mixture.
Step 3: Cook the Sugar Mixture
In a large saucepan, combine:
- 2 cups sugar
- 1/2 cup corn syrup
- 3/4 cup hot water
Bring to a boil over medium heat, stirring constantly.
Continue cooking until a candy thermometer reads 238 degrees.
Remove from heat and stir in the remaining 1/2 cup corn syrup.
Step 4: Whip the Marshmallow
Carefully pour the hot syrup into a large mixing bowl.
Add the bloomed gelatin one tablespoon at a time while beating on high speed.
Beat for about 10 minutes until the mixture thickens and cools to lukewarm.
Add vanilla and beat until incorporated.
The mixture should look glossy and fluffy.
Step 5: Fill the Molds
Spoon the lukewarm marshmallow mixture into each flour indentation.
Dust lightly with flour.
Let stand for 3 to 4 hours until fully set.
Do not rush this step. Proper setting ensures clean dipping later.
Step 6: Remove and Clean the Eggs
Carefully brush excess flour off each marshmallow egg using a soft pastry brush.
Handle gently to maintain shape.
Step 7: Dip in Chocolate
Melt the dark chocolate candy coating according to package instructions.
Dip each marshmallow egg into the melted chocolate, coating fully.
Place flat side down on waxed paper.
Allow chocolate to set completely.
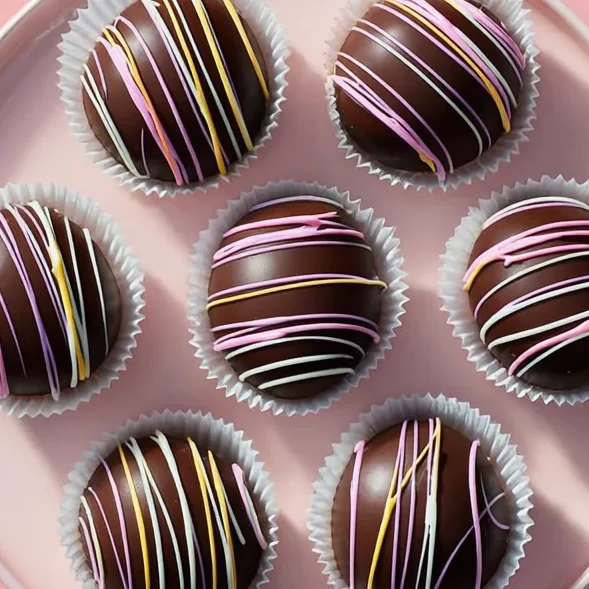
Step 8: Decorate
Melt colored candy coating disks.
Drizzle over the set chocolate eggs in decorative patterns.
Let stand until fully hardened.
Now your Homemade Chocolate Marshmallow Eggs are ready.
Expert Candy-Making Tips
- Use a reliable candy thermometer.
- Avoid humid days if possible; moisture affects candy texture.
- Work quickly when filling molds.
- Keep chocolate warm but not overheated.
- Let eggs set fully before dipping.
If chocolate thickens while dipping, rewarm gently.
Variations and Flavor Ideas
These Homemade Chocolate Marshmallow Eggs adapt easily.
White Chocolate Coating
Dip in white candy coating for a softer look.
Coconut Marshmallow
Fold in 1/2 cup finely shredded coconut before piping.
Peppermint Twist
Add 1/4 teaspoon peppermint extract instead of vanilla.
Peanut Butter Layer
Add a thin peanut butter layer between marshmallow and chocolate shell.
Storage and Make-Ahead Tips
Room Temperature
Store in an airtight container for up to one week.
Refrigerator
Refrigerate if your kitchen runs warm, but bring to room temperature before serving.
Freezer
Freeze up to one month in an airtight container. Thaw at room temperature.
These hold their shape well, making them perfect for Easter baskets.
Frequently Asked Questions
Why do I need so much flour?
The flour creates stable molds that hold the marshmallow shape while it sets.
Can I reuse the flour afterward?
Because of moisture and food safety concerns, discard the used flour.
What happens if I do not reach 238 degrees?
The marshmallow may not set properly. Accurate temperature matters.
Can I use regular chocolate instead of candy coating?
You can, but you will need to temper it for proper setting.
A Handmade Easter Tradition
Homemade Chocolate Marshmallow Eggs require patience, but they reward you with flavor and texture that store-bought versions rarely match. The thick chocolate shell cracks cleanly. The marshmallow center feels soft and fresh. The colorful drizzle adds that festive Easter charm.
When you place these in an Easter basket or on a dessert table, people notice. They taste the difference immediately.
Make them once, and you may never go back to packaged versions again.
Recipe Card Summary
Recipe Name: Homemade Chocolate Marshmallow Eggs
Prep Time: 45 minutes
Set Time: 3–4 hours
Total Time: About 5 hours
Yield: About 35 eggs
Ingredients
- 25 cups all-purpose flour
- 1 large egg
- 2 tablespoons unflavored gelatin
- 1/2 cup cold water
- 2 cups sugar
- 1 cup light corn syrup
- 3/4 cup hot water
- 2 teaspoons vanilla extract
- 1 pound dark chocolate candy coating
- Colored candy coating disks
Instructions
- Spread flour into pans and create egg-shaped indentations.
- Bloom gelatin in cold water.
- Cook sugar mixture to 238 degrees.
- Beat in gelatin and vanilla until fluffy.
- Spoon into flour molds and let set.
- Brush off excess flour.
- Dip in melted chocolate.
- Drizzle with colored coating and let set.
These Homemade Chocolate Marshmallow Eggs make a beautiful, nostalgic Easter treat that tastes as good as it looks.


