There is something truly magical about a neighborhood 4th of July celebration. The smell of the charcoal grill heating up, the distant sound of parade drums, and that golden hour light that seems to linger just a little longer. But let’s be honest—the real star of any summer BBQ is the dessert table.

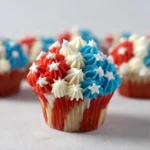
If you’re looking for a showstopper that looks like it came from a professional bakery but is actually easy enough for a beginner to master, these 4th of July Cupcakes are for you. By using a simple star piping technique, we are going to transform ordinary cupcakes into patriotic American flags.
Whether you’re heading to a lake house or hosting a backyard bash, these red, white, and blue treats are guaranteed to be the first thing to disappear!
Why You’ll Love This Recipe
- Semi-Homemade Magic: We’re using pre-baked cupcakes and store-bought frosting to save time, focusing all our energy on the beautiful decorating.
- Skill Builder: This is the perfect project to practice your piping skills. The star tip is very forgiving!
- Instagram-Worthy: The vibrant red, white, and blue colors look incredible in photos and even better on a dessert platter.
- Make-Ahead Friendly: These actually look better if you prep the frosting colors a day in advance.
- Kid-Friendly: Little hands love helping with the star sprinkles at the very end.
Ingredient Notes
Before we dive into the piping bags, let’s talk about what you’ll need to get those vibrant, patriotic colors.
- Cupcakes: You can use any flavor you like! I personally love a classic white or yellow cake for the 4th, but chocolate provides a nice contrast to the bright frosting. Just make sure they are completely cool before you start frosting, otherwise, your stars will slide right off.
- Vanilla Frosting: We’re using three tubs of store-bought vanilla frosting. It’s consistent, easy to tint, and holds its shape well for star piping.
- Gel Food Coloring: This is the most important tip I can give you! Do not use liquid food coloring from the grocery store spice aisle. Liquid coloring can thin out the frosting and make it runny. Gel coloring (like Wilton or Americolor) provides intense, deep red and royal blue without changing the consistency of the frosting.
- White Star Sprinkles: These represent the stars on the flag and really tie the whole look together. If you can’t find stars, white nonpareils or even tiny silver dragées will work in a pinch.
Step-by-Step Instructions
1. Prepare Your Colors
Start by scooping one tub of frosting into a bowl. Use a toothpick to add a small amount of red gel coloring. Stir well with a spoon. Red can be tricky—it often starts out pink! Keep adding color a little at a time until you reach a deep crimson. Repeat this process with a second tub for the blue frosting. Leave the third tub white.
Pro-tip: Let the colored frosting sit for 30 minutes. The colors will deepen and intensify as they “cure.”
2. Set Up the Piping Bags
Fit your piping bag with a Wilton #18 star tip. If you have three tips, prepare three bags. If you only have one, I highly recommend using a coupler. This allows you to unscrew the tip, rinse it, and move it to the next bag without having to empty the frosting!
3. The Star Piping Technique
The “star” is one of the most basic but beautiful piping techniques. Hold the bag vertically (90 degrees to the cupcake). Squeeze gently to let the frosting build up into a star shape, then stop squeezing and pull the bag straight up. Practice a few on a piece of parchment paper first to get your rhythm down.
4. Assemble the Flag
- White Stripes: Start at the very bottom of the cupcake. Pipe one solid row of white stars from left to right. Above that, pipe two “partial” rows on the right side, leaving the top-left quarter of the cupcake empty.
- Red Stripes: Pipe one full row of red stars above your first white row, then fill in the partial rows in between the white sections.
- Blue Field: Fill in the empty top-left space with blue stars.
- The Stars: Gently press a few white star sprinkles into the blue section.
Expert Tips for Best Results
- Watch the Heat: Buttercream and summer heat don’t always mix. If your hands are warm, the frosting in the bag might become too soft. If it starts to look “melted,” put the bag in the fridge for 5 minutes.
- The “Crumb Coat” (Optional): If you find it hard to pipe stars directly onto the cake, you can spread a very thin layer of white frosting over the cupcake first to act as a “primer.”
- Consistent Pressure: The key to uniform stars is consistent squeezing. Try to count “one-two” for every star you pipe to keep the size even.
- Gel Coloring Trick: To get a “true” red, sometimes adding a tiny drop of brown or black can help take the “pink” edge off, but usually, a high-quality “No-Taste Red” gel does the trick perfectly.
Variations and Substitutions
- Homemade Buttercream: If you prefer the taste of homemade, a stiff American Buttercream (butter, powdered sugar, heavy cream, and vanilla) works beautifully for piping stars.
- Flavor Twists: Try filling the cupcakes with a strawberry jam or blueberry compote for a hidden patriotic surprise inside!
- Mini Cupcakes: You can use this same technique on mini cupcakes, but you may need a smaller star tip (like a #16) to fit the flag design.
Storage and Freezing
At Room Temperature: These cupcakes will stay fresh in an airtight container for up to 2 days. Because of the food coloring, keep them out of direct sunlight to prevent fading.
In the Fridge: If your house is very warm, store them in the fridge. Bring them back to room temperature about 30 minutes before serving so the frosting softens.
Freezing: I don’t recommend freezing these after decorating, as the food coloring can sometimes bleed or “sweat” as they thaw, which might ruin your beautiful flag design.
FAQ
Can I make these a day early?
Absolutely! In fact, the colors often look more vibrant the next day. Just keep them in a cool, dry place in an airtight container.
What if I can’t find a #18 tip?
Any small or medium open star tip will work. Tips like the #16, #17, or even #21 will produce similar results, though the size of the stars will vary slightly.
My red frosting looks pink. What do I do?
Don’t panic! Red pigment takes time to develop. Add a little more gel, stir, and let it sit for an hour. It will darken significantly.
A Patriotic Finish
There you have it—a simple, stunning way to bring some Americana to your dessert table. These 4th of July Cupcakes are more than just a treat; they’re a conversation starter. There’s something so satisfying about seeing a tray of these lined up, ready for the fireworks.
If you make these, I’d love to see them! Tag me in your photos or leave a comment below. Happy 4th of July!
PrintEasy 4th of July Cupcakes
Celebrate Independence Day with these eye-catching 4th of July cupcakes! These patriotic treats feature a beautiful American flag design made entirely of tiny buttercream stars. They are the perfect addition to any summer cookout or fireworks viewing party.
- Prep Time: 30
- Total Time: 30
- Yield: 24
- Category: Dessert
- Method: Piping
- Cuisine: American
Ingredients
24 cupcakes (baked and cooled)
3 tubs vanilla frosting
Red and Blue Gel food coloring
White star sprinkles
Instructions
1. Scoop one tub of vanilla frosting into a bowl and tint with red gel food coloring until vibrant.
2. Scoop the second tub of frosting into another bowl and tint with blue gel food coloring.
3. Prepare your piping bags with a Wilton #18 star tip (use a coupler if you only have one tip).
4. Fill the three bags with white, red, and blue frosting.
5. Pipe one full row of white stars across the bottom of the cupcake.
6. Pipe two partial rows of white stars, leaving space on the left for the blue section.
7. Repeat the process with red frosting: one full row and two partial rows.
8. Fill in the remaining top-left space with blue stars.
9. Finish by placing white star sprinkles onto the blue section.
Notes
For the brightest colors, tint your frosting the night before to let the pigments develop.
If the frosting gets too soft while piping, pop the bags in the fridge for 5-10 minutes to firm up.