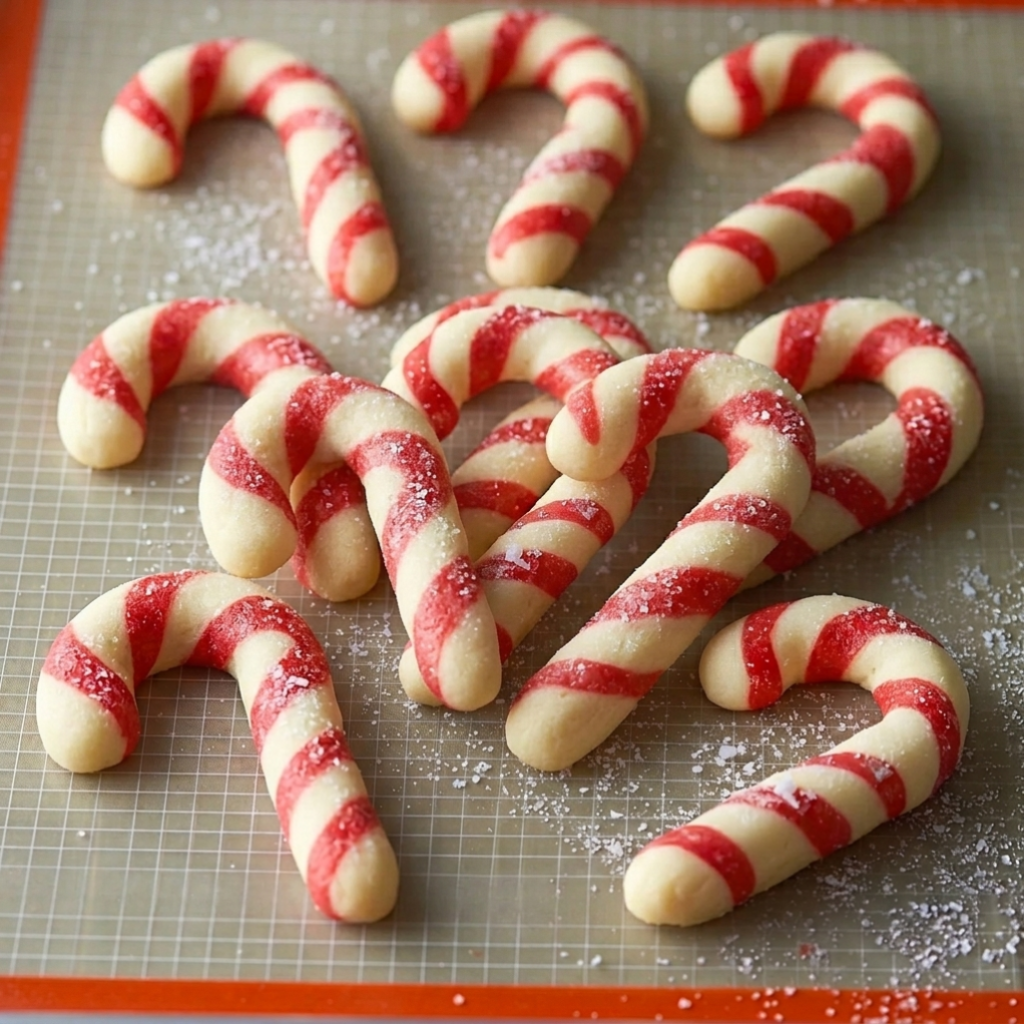
Oh, these cookies! Every year, as soon as the holiday season twinkles into view, I start dreaming of these festive treats. There’s something so magical about twisting together the red and white dough, watching them transform into those iconic candy cane shapes. It’s a tradition in my kitchen, a little touch of edible holiday cheer that always makes me smile. And honestly, the best part is how simple the Ingredients are for such an impressive cookie!
Why You’ll Love These Ingredients
- They are so festive and beautiful for the holidays!
- The peppermint and vanilla flavor is perfectly balanced.
- The dough is surprisingly easy to work with for a rolled cookie.
- They’re a fun baking project to do with family or friends.
Ingredients You’ll Need
- Unsalted Butter: Make sure it’s at room temperature! This helps it cream beautifully with the sugar, creating a light and airy base for your cookies. If it’s too cold, it won’t combine properly; too warm, and your dough might be greasy.
- Peppermint Extract: This is where the classic candy cane flavor comes in. Don’t skip it!
- Vanilla Extract: A touch of vanilla balances the peppermint and adds depth to the overall flavor.
- Baking Powder: This gives the cookies a little lift and keeps them from being too dense.
- Kosher Salt: Don’t underestimate salt in baking! It enhances all the other flavors and balances the sweetness.
- All-Purpose Flour: The structure of our cookies! Make sure to measure it correctly by spooning it into your measuring cup and then leveling it off.
- Liquid Red Food Coloring: This is essential for getting that vibrant red stripe. Liquid food coloring works best here.
- Sparkling Sugar: This isn’t just for looks – it adds a lovely crunch and extra sparkle that makes these cookies feel extra special.
How to Make Ingredients Step by Step
First things first, we’re going to get our dough started. Grab your stand mixer and toss in the room temperature butter, sugar, both extracts (peppermint and vanilla!), baking powder, and salt. Beat it all together until it forms a nice paste that clings to the sides of your bowl. Don’t worry if it looks a little clumpy at first; just keep going!
Next, scrape down the sides of the bowl to make sure everything is mixed. Then, beat in that large egg until it’s completely absorbed into your butter mixture. This is where the magic happens and everything starts to come together. Finally, add your all-purpose flour and mix on low speed just until no dry streaks of flour remain. Be careful not to overmix here – overmixing can lead to tough cookies!
Now for the fun part: dividing and coloring the dough! Carefully remove about half of the dough from the bowl. To the remaining dough, add your liquid red food coloring. Mix it on low speed until the color is beautifully and evenly distributed. You’ll end up with one bowl of white dough and one bowl of vibrant red dough. Pat each piece into a disk, wrap them tightly in plastic wrap, and pop them into the fridge for at least 3 hours, or even overnight. This chilling step is super important for making the dough easy to work with later.
My Top Tips for Success
- I always make sure my butter is truly at room temperature – it makes a huge difference in the dough’s consistency.
- In my experience, chilling the dough for at least 3 hours (or even overnight!) really helps make it manageable for rolling and twisting. Don’t skip this step!
- Trust me on this one: don’t overmix the flour. Mix just until combined to keep your cookies tender.
- When shaping the ropes, try to make them as even in length and thickness as possible for perfectly twisted candy canes.
- Don’t overcrowd your baking sheet; give those cookies some space to bake evenly.
- Keep an eye on the cookies in the oven – they can go from perfectly baked to overdone very quickly. Look for just barely brown edges.
Common Mistakes to Avoid
- Overmixing the dough: This develops too much gluten, leading to tough, chewy cookies instead of tender ones. Mix only until the flour streaks disappear.
- Not chilling the dough enough: Warm dough will be sticky and hard to handle, making it difficult to form the ropes and candy cane shapes. Chill for at least 3 hours.
- Baking on a hot cookie sheet: This can cause the butter to melt too quickly, leading to spread-out, misshapen cookies. Always ensure your baking sheets are cool before adding cookie dough.
- Overbaking the cookies: They can quickly become dry and crispy. Bake just until the edges are barely golden brown.
- Uneven rope thickness: If your red and white ropes aren’t the same thickness, one color might dominate or they won’t twist together smoothly.
How to Store Ingredients
- At Room Temperature: Store baked cookies in an airtight container for up to 5-7 days.
- In the Freezer (Dough): Wrap individual dough disks tightly in plastic wrap, then place in a freezer-safe bag for up to 3 months. Thaw in the refrigerator overnight before shaping.
- In the Freezer (Baked Cookies): Place cooled cookies in a single layer on a baking sheet to freeze solid, then transfer to an airtight freezer-safe container or bag for up to 2-3 months. Thaw at room temperature.
Frequently Asked Questions
Can I use salted butter instead of unsalted?
Yes, you can. Just reduce the added kosher salt to 1/4 teaspoon to account for the salt in the butter.
What if my dough is too sticky after chilling?
If your dough is still too sticky, try chilling it for another 30-60 minutes. Sometimes humidity can affect dough consistency.
Can I make these cookies without a stand mixer?
Absolutely! You can use a hand mixer for the initial creaming steps. For mixing in the flour and coloring, a sturdy wooden spoon or spatula will work just fine.
How do I get the perfect candy cane shape?
Once you’ve twisted the red and white ropes together, gently curve one end down to form the hook of the candy cane. Don’t press too hard, just a gentle curve.
Can I use gel food coloring instead of liquid?
Yes, you can use gel food coloring. You’ll likely need less of it to achieve a vibrant red, so start with a small amount and add more as needed.
I hope these festive candy cane cookies bring a little extra sparkle and joy to your kitchen this season. There’s something so satisfying about making these beautiful Ingredients from scratch. Give them a try, and let me know how they turn out – I’d love to hear about your baking adventures!
PrintCandy Cane Cookies

Festive red and white peppermint-vanilla cookies twisted into classic candy cane shapes, perfect for holiday baking.
- Prep Time: 30
- Cook Time: 10
- Total Time: 220
- Yield: 24 cookies
- Category: Dessert
- Method: Baking
- Cuisine: American
- Diet: Vegetarian
Ingredients
- 2 sticks (227g) unsalted butter, at room temperature
- 1 cup (200g) sugar
- 1 1/2 teaspoons peppermint extract
- 1 teaspoon vanilla extract
- 1 teaspoon baking powder
- 1/2 teaspoon kosher salt
- 1 large egg
- 2 3/4 cup (385g) all-purpose flour
- 1 teaspoon liquid red food coloring
- 1 egg white
- 2 tablespoons sparkling sugar
Instructions
- Place the butter, sugar, peppermint extract, vanilla extract, baking powder, and kosher salt in the bowl of a stand mixer.
- Beat the ingredients together until a paste forms and clings to the side of the bowl.
- Scrape down the side of the bowl with a spatula.
- Beat in the large egg until it is fully absorbed into the mixture.
- Add the all-purpose flour to the mixer bowl.
- Beat on low speed until just combined and no dry streaks of flour remain.
- Divide the dough in half and remove one half from the bowl.
- Carefully add the liquid red food coloring to the remaining dough in the bowl.
- Mix on low speed until the red color is evenly distributed throughout the dough.
- Pat each piece of dough (one white, one red) into a disk shape.
- Wrap each dough disk tightly in plastic wrap.
- Refrigerate the dough for at least 3 hours or overnight.
- Preheat your oven to 350ºF (175ºC) when ready to bake.
- Line a baking sheet with parchment paper or a silicone baking mat.
- Remove the chilled dough from the refrigerator.
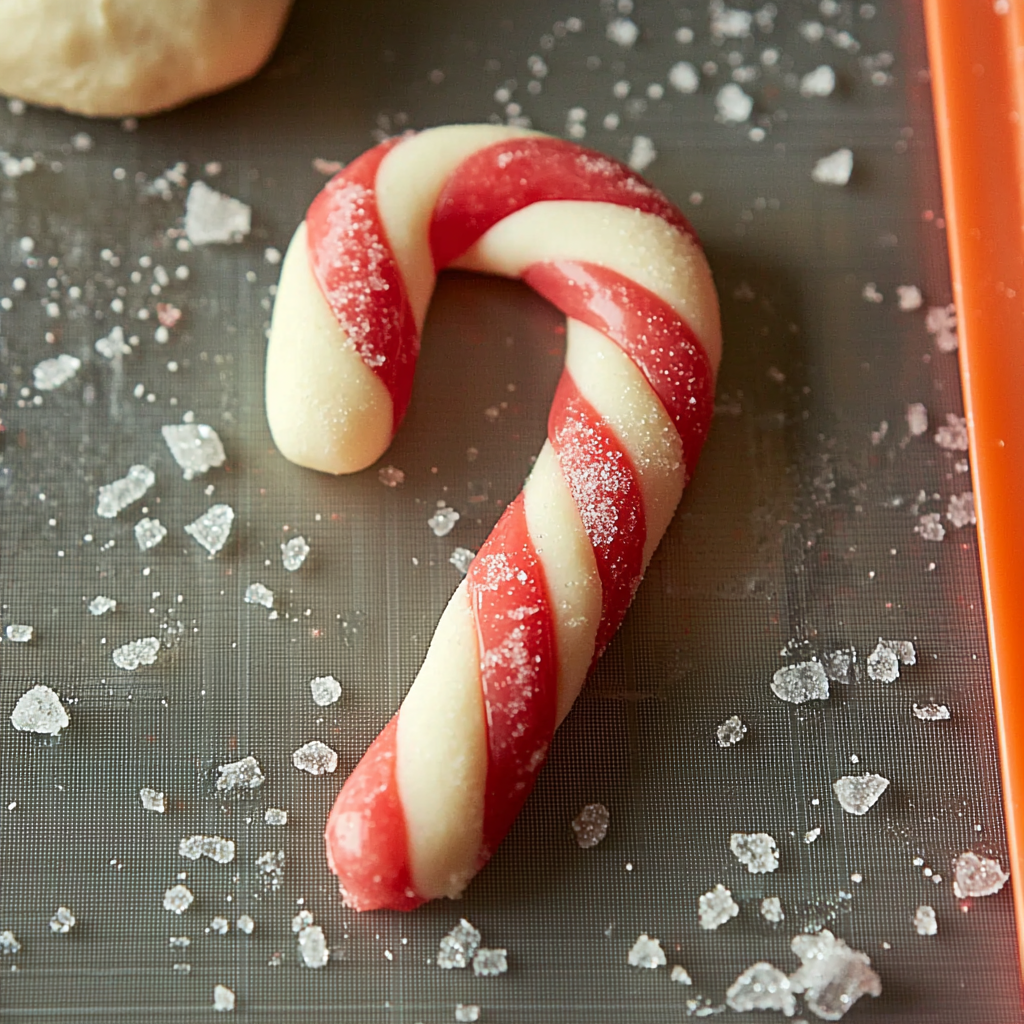
- Pinch off a 1-inch round piece of the white dough.
- Roll the white dough piece into a 5-inch rope.
- Pinch off a 1-inch round piece of the red dough.
- Roll the red dough piece into a 5-inch rope, ensuring it is the same length as the white rope.
- Place the red and white ropes next to each other.
- Carefully twist the two ropes together.
- Transfer the twisted dough to the prepared baking sheet.
- Curve the top of the twisted dough into a candy cane shape.
- Repeat the shaping process with the remaining dough, spacing cookies about 2 inches apart on the baking sheet.
- Prepare the egg white wash by beating the egg white with 1 tablespoon of water until foamy.
- Brush the top of each cookie with the egg white wash.
- Sprinkle sparkling sugar generously over each brushed cookie.
- Bake the cookies for 8 to 10 minutes, or until the edges are just barely brown.
- Let the cookies cool on the baking sheet for 10 minutes.
- Transfer the cooled cookies to a wire cooling rack to cool completely.
- Allow the baking sheets to cool completely before baking the next batch of cookies.
Notes
Ensure butter is at room temperature for best results.
Chill dough thoroughly for easier handling and shaping.
Do not overmix the flour into the dough.
Watch cookies closely in the oven to prevent overbaking.