Every Halloween, my kitchen turns into a little pumpkin patch, filled with warm spices and the promise of something sweet. There’s just something about autumn baking that feels so cozy, right? This year, I’m so excited to share one of our absolute favorite festive treats: these adorable and delicious Mummy Pumpkin Cookies. They’re such a fun way to celebrate the season!
Why You’ll Love This Mummy Pumpkin Cookies
- They’re incredibly fun to make with kids (or just for the kid in you!).
- The pumpkin filling is perfectly spiced and super creamy.
- The flaky crust and sweet cinnamon-sugar topping are just divine.
- They’re perfect for Halloween parties, fall gatherings, or just a cozy evening treat.
Ingredients You’ll Need
- Unsalted Butter: Make sure it’s chilled and cut into cubes. This helps create that super flaky crust we all love.
- All-Purpose Flour: The backbone of our delicious crust. No special flour needed here!
- Ice Water: This is key for a tender, flaky pie crust. Don’t use warm water!
- Reduced Pumpkin Puree: This isn’t just regular canned pumpkin! We press out extra moisture to make the filling rich and not watery.
- Cream Cheese: Slightly softened, it adds a wonderful tang and creaminess to the pumpkin filling.
- Brown Sugar & Granulated Sugar: A perfect blend for sweetness and a hint of molasses flavor in the filling.
- Spices (Cinnamon, Ginger, Nutmeg, Allspice): These are the stars of the show, giving our cookies that classic fall pumpkin pie flavor.
- Egg Yolk: Helps bind the filling and adds richness.
- Vanilla Extract: A touch of warmth and sweetness.
- Egg White & Water: This mixture acts as our “glue” for the mummy strips and gives them a nice shine.
- Candy Eyes: These are for decorating once the cookies are baked and cooled – so fun!
How to Make Mummy Pumpkin Cookies Step by Step
First things first, let’s get that flaky crust ready. You’ll want to pulse your flour, salt, and sugar together in a food processor. Then, add in your chilled butter cubes and pulse until it looks like a coarse meal – don’t overdo it, we want little bits of butter left! Now, slowly add the ice water, a tablespoon or two at a time, pulsing until the dough starts to come together in clumps. If you don’t have a food processor, no worries! You can use a pastry blender or two forks. Gather the dough, divide it into two discs, wrap them up, and pop them in the fridge for an hour. This chilling time is super important for a tender crust!
While your dough is chilling, let’s make that delicious pumpkin filling. In a bowl, stir together the softened cream cheese, both sugars, and then add your reduced pumpkin puree along with all those wonderful spices: cinnamon, ginger, nutmeg, and allspice. Mix in the egg yolk and vanilla extract until everything is well combined. Cover this bowl and put it in the fridge too, until you’re ready to assemble. Oh, and don’t forget to preheat your oven to 375°F (190°C) and line a baking sheet with parchment paper!
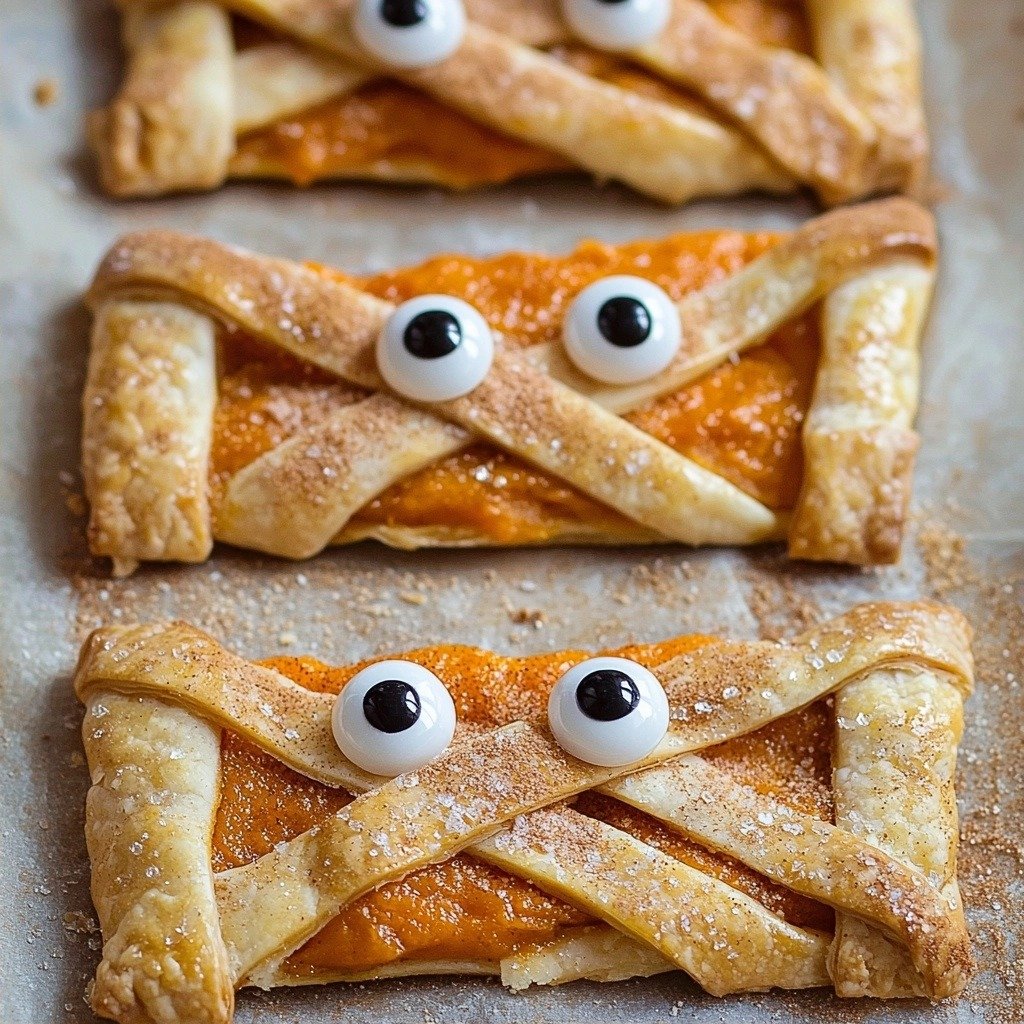
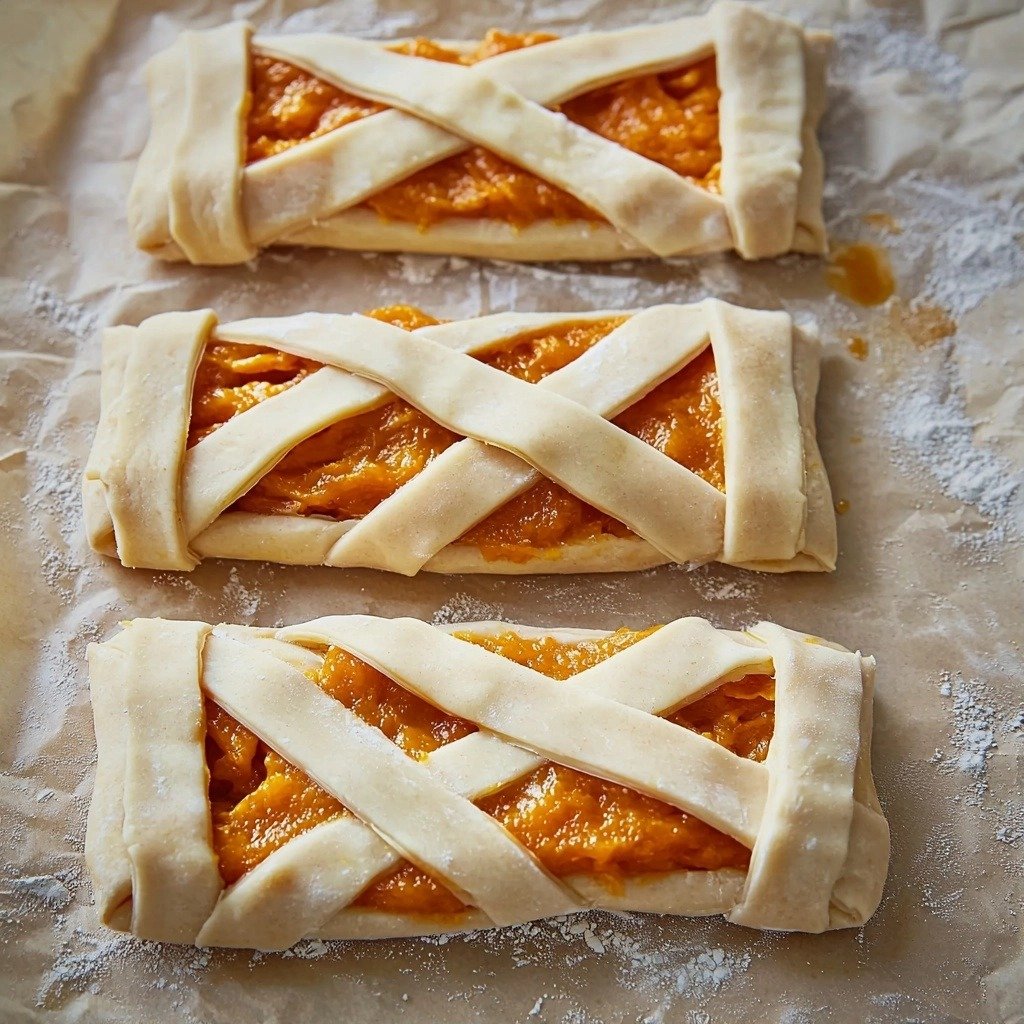
Now for the fun part: assembling our mummies! Take one disc of dough and roll it out on a lightly floured surface into a rectangle, about 13×11 inches. Don’t worry if the edges crack a little; just gently press them back together. Trim the edges to make them straight, then cut your dough into rectangles – I usually get about nine 4×3 inch ones, but you can adjust the size. Place these rectangles on your prepared baking sheet. Spoon about 1 ½ to 2 tablespoons of the pumpkin filling onto each rectangle, leaving a small border all around. Brush those uncoated edges with a mixture of lightly beaten egg white and a tablespoon of water. Now, roll out your second dough disc and cut it into ½-inch wide strips. Lay these strips over the pumpkin filling to create that mummy look, then press the edges to seal and trim any excess. Brush the strips with more egg white and sprinkle with a mixture of sugar and cinnamon. Bake for about 20 minutes, or until they’re beautifully golden brown. Once they’ve cooled, stick on those candy eyes, and voilà!
My Top Tips for Success
- Chill your butter and dough: Trust me on this one, cold butter makes for a super flaky crust. Don’t skip the chilling steps!
- Don’t over-process the dough: You want some small butter pieces visible in the crust dough for flakiness, not a completely smooth ball.
- Reduce your pumpkin puree: This step is crucial! Excess moisture will make your filling watery, so press out that extra liquid for a rich, flavorful filling.
- Don’t overfill: Too much filling can cause your cookies to burst. Stick to the recommended amount.
- Brush with egg white: This helps the mummy strips stick and gives them a lovely golden sheen.
- Let them cool completely: Resist the urge to add candy eyes to warm cookies; they’ll just melt off!
Common Mistakes to Avoid
- Overworking the dough: This develops the gluten too much, leading to a tough crust instead of a tender, flaky one. Handle the dough as little as possible.
- Not chilling the dough: Warm dough is sticky and hard to work with, and it won’t give you that desirable flaky texture.
- Using unreduced pumpkin puree: The extra moisture will make your filling runny and less flavorful. Always reduce it!
- Baking at the wrong temperature: Too low, and the crust won’t get golden; too high, and it might burn before the filling is set. Stick to 375°F (190°C).
- Adding candy eyes too soon: If the cookies are still warm, your candy eyes will melt and slide right off. Wait until they’re completely cool.
How to Store Mummy Pumpkin Cookies
- Room Temperature: Store in an airtight container for up to 2-3 days.
- Refrigerator: For longer storage, place in an airtight container in the fridge for up to 5 days.
- Freezer: Once fully cooled, flash freeze individually on a baking sheet, then transfer to a freezer-safe bag or container for up to 1 month. Thaw at room temperature.
Frequently Asked Questions
Can I use store-bought pie crust?
Yes, absolutely! The recipe provides an option to use 1 package of refrigerated pie crust (2 crusts) if you’re short on time. It’s a great shortcut!
Why do I need to reduce the pumpkin puree?
Reducing the pumpkin puree removes excess moisture, which prevents the filling from becoming watery and ensures a richer, more flavorful pumpkin taste in your cookies.
Can I make these ahead of time?
You can prepare the dough and the filling a day in advance and store them separately in the refrigerator. Assemble and bake on the day you plan to serve them for the freshest result.
What if I don’t have a food processor for the crust?
No problem! You can use a pastry blender or two forks to cut the cold butter into the flour mixture by hand until it resembles coarse crumbs.
How do I know when the cookies are done baking?
The cookies are done when the crust is golden brown and the filling appears set. This usually takes about 20 minutes at 375°F (190°C).
I hope these Mummy Pumpkin Cookies bring as much joy and deliciousness to your fall season as they do to mine. They’re truly a treat! If you give them a try, I’d absolutely love to hear how they turned out and see your adorable mummy creations!
PrintMummy Pumpkin Cookies

Festive and fun, these Mummy Pumpkin Cookies feature a flaky crust filled with spiced pumpkin cream cheese and decorated with pastry strips and candy eyes.
- Prep Time: 45
- Cook Time: 20
- Total Time: 105
- Yield: 9 cookies
- Category: Dessert
- Method: Baking
- Cuisine: American
- Diet: Vegetarian
Ingredients
- 1 cup (2 sticks) unsalted butter cut into cubes-chilled
- 2 and 1/2 cups all-purpose flour
- 1 teaspoon salt
- 1 teaspoon sugar
- 4 Tablespoons ice water
- 3/4 cup reduced pumpkin puree
- 2 oz cream cheese -slightly softened
- 2 tablespoons packed light-brown sugar
- 2 tablespoons granulated sugar
- 1 teaspoon ground cinnamon
- 1/2 teaspoon ground ginger
- 1/4 teaspoon of nutmeg
- 1/8 teaspoon allspice
- 1 egg yolk
- 1/2 teaspoon vanilla extract
- 1 egg white-lightly beaten
- 1/2 tablespoon water
- 2 tablespoon sugar
- 1 teaspoon cinnamon
- Candy eyes (for decorating)
Instructions
- Pulse together flour, salt, and 1 teaspoon sugar in a food processor.
- Add chilled butter cubes to the food processor.
- Pulse until the mixture resembles coarse meal (do not over-process).
- Add 1-2 tablespoons of ice water at a time.
- Pulse several times until the dough starts to come together in clumps.
- Gather the dough onto a working surface.
- Divide the dough into two equal portions.
- Shape each portion into a 5-inch disk.
- Cover each disk with plastic wrap.
- Chill the dough disks for 1 hour.
- Place 1 cup pumpkin puree on several layers of paper towel.
- Wrap and press the pumpkin puree to soak excess moisture until you get 3/4 cup.
- In a bowl, stir together softened cream cheese, granulated sugar, and light-brown sugar until blended.
- Add the reduced pumpkin puree to the cream cheese mixture.
- Add 1 teaspoon ground cinnamon, 1/2 teaspoon ground ginger, 1/4 teaspoon nutmeg, and 1/8 teaspoon allspice to the mixture.
- Mix in the egg yolk and vanilla extract.
- Cover the bowl with the filling and chill until ready to assemble.
- Preheat oven to 375 F (190 C).
- Line a large baking sheet with parchment paper.
- Roll out the first dough disk onto a floured surface to about a 13 x 11-inch rectangle.
- If the edges crack, seal them and continue rolling.
- Trim the edges to get straight edges.
- Cut the dough into rectangles (e.g., nine 4×3-inch rectangles).
- Arrange the rectangles, spaced apart, on the prepared baking sheet.
- Spread 1 1/2-2 tablespoons of pumpkin pie filling onto each rectangle, leaving a rim uncoated on all sides.
- In a small bowl, whisk together the lightly beaten egg white and 1/2 tablespoon water.
- Brush the uncoated edges of the rectangles with the egg white mixture.
- Roll out the second dough disk.
- Cut the second dough disk into 1/2 inch wide strips.
- Arrange the strips over the pumpkin filling to create a mummy look.
- Seal the edges of the strips with your fingertips.
- Trim any excess of the strips.
- Brush the strips with the remaining egg white mixture.
- In a small bowl, combine 2 tablespoons sugar and 1 teaspoon cinnamon.
- Sprinkle the sugar-cinnamon mixture over the brushed strips.
- Bake for about 20 minutes, or until golden brown.
- Allow the cookies to cool completely on the baking sheet.
- Stick candy eyes onto the cooled mummies for decoration.
Notes
Ensure butter is very cold for a flaky crust.
Do not overwork the dough; handle minimally for tenderness.
Press excess moisture from pumpkin puree for a rich filling.
Wait until cookies are completely cool before adding candy eyes.