Soft, chewy, and packed with natural sweetness, these no-bake date energy balls are the perfect snack for busy days or post-workout fuel. Made with just a handful of wholesome ingredients, they offer a delightful balance of textures—crunchy almonds, chewy dates, and the subtle nuttiness of coconut flakes. These energy balls are not only satisfying but also a breeze to make, requiring no baking or complicated steps. Whether you’re looking for a quick pick-me-up or a healthy treat to share, these little bites are guaranteed to hit the spot.
Why You’ll Love No-Bake Date Energy Balls
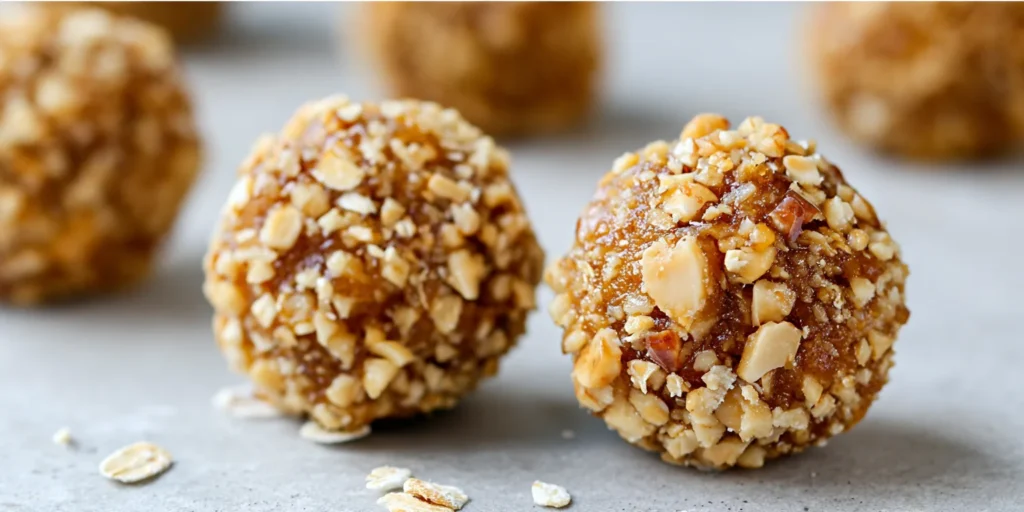
There’s something incredibly satisfying about the soft, chewy texture of these energy balls, which is a direct result of the natural stickiness of dates and the crunch of finely chopped almonds. The subtle bitterness of the almonds pairs beautifully with the caramel-like sweetness of the dates, creating a rich and balanced flavor that isn’t overly sweet. A hint of vanilla and a sprinkle of salt elevate the flavors, making each bite feel like a mini dessert. The addition of coconut flakes adds a delicate crispiness that contrasts with the chewy base, adding depth to every mouthful. Best of all, these energy balls are endlessly customizable—swap in different nuts, add a pinch of cinnamon, or toss in some chocolate chips for a twist. They’re the ideal mix of convenience and indulgence.
With no baking involved, these energy balls are a quick and healthy snack that can be whipped up in minutes. They’re perfect for breakfast on the go, a quick post-workout pick-me-up, or a favorite treat to keep in your snack drawer for whenever cravings strike. Plus, they’re naturally vegan, gluten-free, and packed with fiber, protein, and healthy fats—making them an excellent choice for anyone looking to fuel their body with wholesome ingredients.
No-Bake Date Energy Balls Recipe
If you’ve ever wondered what a perfect no-bake snack looks like, this energy ball recipe is it. It blends the natural sweetness of dates with the nuttiness of almonds, the subtle tartness of a pinch of salt, and the light crunch of coconut flakes for a treat that’s both satisfying and simple to make. These energy balls require just a food processor and a few minutes of your time, and the result is a snack that’s as healthy as it is delicious. They’re great for breakfast, after a workout, or whenever you need a quick energy boost. With their chewy consistency and rich flavor, these are the ultimate handheld snack that you’ll keep reaching for again and again.
Ingredients
- Almonds – 1 cup (roughly chopped or whole, depending on desired texture). For a finer consistency, use a food processor to pulse the almonds into small pieces. If you prefer a coarser texture, keep them whole or use a chopper.
- Medjool Dates – 10 pitted medjool dates. These dates are large and soft, making them ideal for this recipe. If you find them too stiff, soak them in warm water for 10 minutes to soften them before blending.
- Vanilla Extract – ½ teaspoon. A splash of vanilla adds a depth of flavor that complements the sweetness of the dates without overpowering them.
- Salt – ¼ teaspoon. Just a pinch of salt enhances the natural sweetness of the dates and balances the flavors.
- Coconut Flakes – ¼ cup. Lightly toasted coconut flakes add a subtle crispiness to the energy balls. For extra flavor, you can toast them in a dry skillet over medium heat until golden and fragrant.
Substitutions and Tips:
- If you can’t find medjool dates, you can use regular dates, but they’re smaller and less sweet.
- For a nut-free version, substitute almonds with sunflower seeds or pumpkin seeds.
- Coconut flakes can be omitted entirely or replaced with rolled oats for a chewier texture.
- Vanilla extract can be substituted with a pinch of cinnamon or cocoa powder for a different flavor profile.
How to Make No-Bake Date Energy Balls
- Prepare the Dates: Start by removing the pits from the medjool dates. If the dates feel too stiff or hard to soften, place them in a bowl and pour over warm water. Let them soak for about 10 minutes until they become pliable. Drain and set aside.
- Process the Almonds: In a food processor, add the almonds. With the processor running, pulse a few times to break them into small pieces. Do not over-process, as you want a slightly textured base, not a nut butter.
- Add the Other Ingredients: Add the pitted dates, vanilla extract, salt, and coconut flakes to the food processor. Continue blending for about a minute until the mixture begins to form a crumbly dough that can easily be pressed into a ball.
- Check the Consistency: If the mixture is too dry and not forming into a ball, add 1 teaspoon of water and mix again. If it’s too wet or sticky, add a few more almonds, seeds, or oats and blend until the right consistency is achieved.
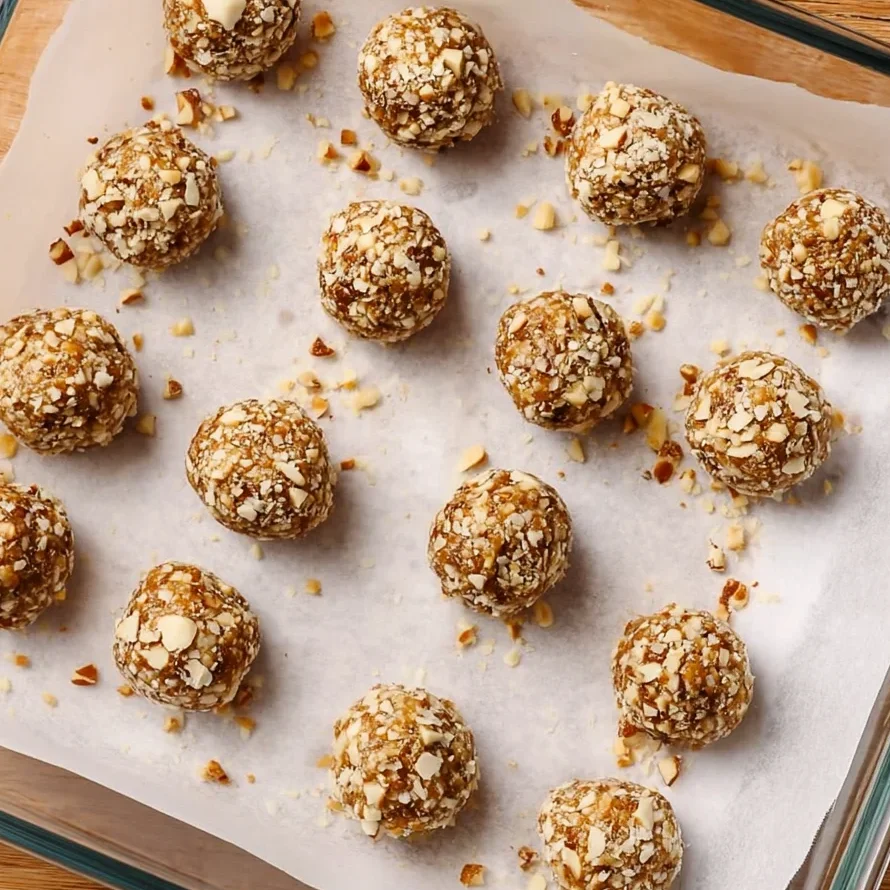
- Form the Balls: Using your hands or a cookie scoop, divide the mixture into 1-inch balls. For easier portioning, use a small cookie scoop or a melon baller to create even-sized balls. Place them on a parchment-lined baking tray.
- Chill and Set: Once all the balls are formed, gently press and roll them in your hands to smooth them out. Transfer to the refrigerator and let them chill for at least 1 hour. This step is essential to help the dates bind everything together and give the balls a firm, chewy texture.
- Serve and Enjoy: After chilling, the energy balls are ready to eat or store. They’re best enjoyed cold, but you can serve them at room temperature if desired. These energy balls are perfect for snacking, adding to a fruit bowl, or packing in a lunchbox for a healthy on-the-go treat.
Tips for the Best Results
Making the perfect batch of no-bake date energy balls is all about getting the right balance of texture and flavor. Here are some tips to help you achieve the best results:
- Check the Dough’s Consistency: The mixture should form a moldable, crumbly ball. If it’s too dry, add a little water. If it’s too wet, add more almonds or nuts. A firm yet slightly sticky dough is ideal.
- Use Pitted Dates for Simplicity: Always use pitted dates to save time and avoid the hassle of removing pits after blending. If you choose unpitted dates, make sure to remove the pits before adding them to the food processor.
- Chill the Balls for Perfect Texture: Chilling the balls is essential to help the dates bind the ingredients together and give them a firm, chewy texture. If you skip this step, the balls might be too soft or fall apart.
- Work with Chilled Hands: When shaping the balls, work with your hands to help the mixture come together evenly. If the mixture is too sticky, dampen your hands with a little water to make it easier to handle.
Common Mistakes to Avoid
Even though this recipe is simple, a few common mistakes can lead to less-than-ideal results. Here’s how to avoid them:
- Over-Processing the Dates: Over-blending the dates can turn them into a gooey paste, which might make the mixture too sticky and difficult to shape. Pulse the food processor only until the ingredients come together and avoid blending for too long.
- Not Chilling the Balls: Skipping the chilling step can result in soft, floppy energy balls that may not hold their shape. Be sure to refrigerate them for at least an hour before serving.
- Using the Wrong Dates: Using smaller or less ripe dates may not provide the right amount of natural sweetness and stickiness needed for the balls to hold together. Stick to medjool dates for the best results.
- Adding Too Much Liquid: If the mixture becomes too wet, it can be difficult to shape into balls. Add small amounts of water or dry ingredients (like more almonds) incrementally to reach the right consistency.
Variations and Substitutions
One of the best things about these energy balls is their versatility. They’re a great base for experimenting with different flavors and ingredients. Here are some creative ways to tweak the recipe:
- Add Nuts and Seeds: Substitute some of the almonds with other nuts like cashews or walnuts for a different flavor and texture. You can also add a handful of chia seeds or flaxseeds for an extra nutrient boost.
- Infuse with Flavor: Add a pinch of cinnamon, nutmeg, or cocoa powder for a warm, spiced kick. A splash of almond butter or peanut butter can also enhance the richness of the flavor.
- Toss in Dried Fruit: Chop up some dried cranberries, raisins, or apricots and mix them into the dough for a burst of additional sweetness and texture.
- Make Them Chocolatey: Add some cacao powder or chopped dark chocolate chunks for a rich, chocolatey twist. This is a great option for a dessert-like treat.
- Customize with Spices: Use different spices like cardamom, cloves, or ginger to give the energy balls a unique, aromatic flavor.
Feel free to experiment with different combinations based on your preferences. The beauty of this recipe is that it’s easy to adapt and personalize to suit your taste and dietary needs.
How to Serve No-Bake Date Energy Balls
No-bake date energy balls are incredibly versatile and can be served in a variety of ways. Here are a few ideas to help you enjoy these delicious little treats:
- As a Quick Snack: These energy balls are perfect for a quick, healthy snack between meals. Keep them in a small bowl or jars at your desk or in your kitchen for an easy grab-and-go option.
- For Breakfast on the Go: Pack a few balls in your lunchbox or take them with you for a quick breakfast before heading out for the day. They’re a great alternative to sugary cereals or pastries.
- At Parties or Potlucks: Serve these energy balls as part of a healthy snack platter or dessert table. They’re small, portable, and sure to be a hit with guests who are looking for something sweet and wholesome.
- As a Post-Workout Treat: After a workout, these energy balls provide a quick source of energy and nutrients, making them the perfect post-exercise snack.
- In the Office or Classroom: Keep a stash of these energy balls in your office or classroom for an easy, nutritious break when cravings hit. They’re great for keeping energy levels steady throughout the day.
Whether you’re snacking alone or sharing them with friends, these energy balls are a delicious way to satisfy your sweet tooth without compromising on health.
How to Store No-Bake Date Energy Balls
These energy balls are best enjoyed fresh but can be stored for several days if kept properly. Here’s how to store them for maximum freshness:
Refrigeration: Once the energy balls are fully chilled and set, transfer them to an airtight container or a resealable plastic bag. Store them in the refrigerator for up to 5 days. This will help maintain their texture and prevent them from becoming too soft or sticky.
Freezing: To extend their shelf life, you can freeze the energy balls. Place them in a single layer on a parchment-lined baking sheet and freeze for 1-2 hours until firm. Then transfer them to an airtight container or a ziplock bag and store in the freezer for up to 2-3 months. Make sure to label the container with the date so you know when they were made.
Room Temperature: If you choose to store them at room temperature, keep them in an airtight container away from direct sunlight and heat. However, they won’t last as long as when stored in the refrigerator or freezer. It’s best to consume them within 2 days at room temperature.
When you’re ready to enjoy them again, simply take them out of the container and let them come to room temperature before eating. If they’re frozen, you can take them out of the freezer and let them thaw at room temperature or in the refrigerator for a few hours before serving.
Frequently Asked Questions
Can I make these energy balls in advance and freeze them?
Yes, you can absolutely make these energy balls in advance and freeze them. Once the balls are fully set after chilling, you can place them in an airtight container or freezer bag and freeze for up to 2-3 months. When you’re ready to enjoy them, simply thaw them at room temperature or in the refrigerator for a few hours before eating.
What if the mixture is too wet to form balls?
If the mixture is too wet to form balls, try adding a little more almonds (or another dry ingredient like oats or seeds) to the mixture. This will help absorb the excess moisture and make the texture more manageable. You can also refrigerate the mixture for 15-20 minutes to firm it up before shaping into balls.
Can I substitute the coconut flakes with something else?
Absolutely! If you’re not a fan of coconut, you can skip it altogether or substitute it with rolled oats for a chewier texture. You can also try adding chopped nuts, sunflower seeds, or even dried fruit for extra flavor and texture.
How many energy balls does this recipe make?
This recipe makes approximately 16 balls, depending on the size of each ball. If you want smaller bites, you can make around 20-24 balls. If you want larger bites, make about 12-14 balls.
Can I use a different type of sweetener instead of dates?
While dates are the perfect natural sweetener for this recipe, you can substitute them with other sweeteners like maple syrup or honey. However, the texture of the energy balls will be different. If you use maple syrup or honey, you’ll need to adjust the amount of other ingredients to achieve the right consistency.
Can I sell these energy balls at a market or event?
Yes, these energy balls make a great snack to sell at local markets, farmers’ markets, or even school fairs. Since they require no baking and are easy to make in advance, they’re perfect for small-batch production. Just make sure to store them properly and label them clearly with the ingredients for any dietary restrictions.
Conclusion
No-bake date energy balls are a delightful and nutritious addition to any snack routine. Their soft, chewy texture, combined with the natural sweetness of dates and the nuttiness of almonds, makes them a truly satisfying treat. With just a few simple ingredients and a little time, you can create a snack that’s not only delicious but also packed with flavor and nutrients. Whether you’re making them for yourself, your family, or to sell at a local market, these energy balls are sure to be a hit. So why wait? Try this easy recipe and discover a new favorite snack in no time!
PrintNo-Bake Date Energy Balls

Soft, chewy, and naturally sweet energy balls made with dates, almonds, and coconut. A healthy, vegan, and gluten-free snack perfect for busy days or post-workout fuel.
- Prep Time: 10
- Total Time: 10
- Yield: 12 energy balls
- Category: Recipes
- Method: No-Bake
- Cuisine: International
- Diet: Vegan
Ingredients
1 cup almonds (roughly chopped or whole)
10 pitted Medjool dates (large and soft)
1/4 cup shredded coconut flakes
1 teaspoon vanilla extract
A pinch of salt
Instructions
Add the almonds into a food processor and pulse a few times to coarsely chop them.
Add the Medjool dates, shredded coconut, vanilla extract, and a pinch of salt.
Blend until the mixture comes together into a cohesive, sticky dough. Stop and scrape down the sides as needed.
Using your hands or a small cookie scoop, roll the mixture into 1-inch balls.
Place the energy balls on a parchment-lined tray and refrigerate for at least 30 minutes before serving.
Store in an airtight container in the refrigerator for up to 5 days.
Notes
Customize by adding a tablespoon of cocoa powder, cinnamon, or chocolate chips.
For a coarser texture, chop the almonds roughly or keep them whole.
If the mixture is too dry, add 1-2 teaspoons of water or date syrup.
If the mixture is too wet, add a tablespoon of shredded coconut or rolled oats.